Hazel’s rules, which determine which decisions it makes as it organizes your files, can be as simple or complex as you need them to be. (See About Folders & Rules for an introduction to what rules can do.) Fundamentally, all rules consist of two parts:
-
Conditions: What Hazel should look for when examining files and folders in the monitored folder
-
Actions: What Hazel should do when the conditions are met
Each folder can have any number of rules. Each rule, in turn, can have one or more conditions that, when met, trigger one or more actions.
Decide What Your Rule Will Do
The About Folders & Rules page gives numerous examples of what a rule can do. When deciding what rules to create for yourself, keep in mind the following tips:
-
Work on one folder at a time. (Your Downloads folder is probably a good place to start.)
-
Within each folder, work on one rule at a time. (You’ll find Hazel’s actions easier to understand if you can watch them working individually at first.)
-
Unsure what rules to create? Ask yourself these questions about the items currently in that folder (or items you expect that folder to contain regularly):
-
What will you want to move ? (And remember, the destination for items you move doesn’t have to be within the monitored folder!)
-
What will you want to delete ? (Some folders accumulate files that turn out to be useless, and Hazel can delete them automatically—perhaps after a specified period of time—by moving them to the Trash.)
-
What will you want to change ? (If you regularly rename files according to a certain pattern, change extensions, add tags, or make other modifications, Hazel may be able to do those tedious tasks for you.)
-
What will you want to know about ? (Hazel can display a notification when a file matches a rule. It can even open a file for you.)
Create a Rule
Once you know what you want your rule to do, it takes just a few clicks to create it.
To create a rule:
-
Select (or add) the folder to which you want the rule to apply.
-
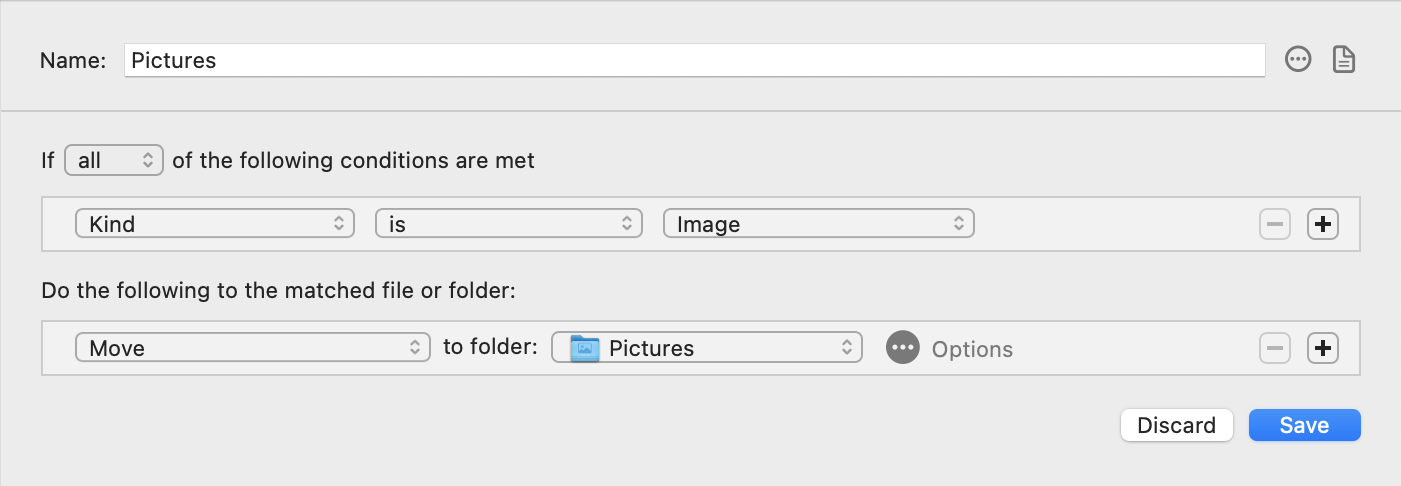
Click the Create Rule
 button on the toolbar. A panel (similar to the one pictured above) appears in which you can specify the rule’s details.
-
In the “Name” field, enter a description. This can be anything you like; it’s just to help you identify the rule later. Optionally, click the Note
 icon to enter a descriptive note (for yourself or anyone with whom you may later share this rule.)
-
Choose “any,” “all,” or “none” from the pop-up menu to indicate whether you want the rule to match if at least one condition (any), all conditions (all), or no conditions (none) are true for a given item in the folder being monitored. (If your rule has only one condition, this choice has no effect.)
-
Create conditions. Fill in the first condition by choosing an attribute from the leftmost pop-up menu (the one labeled Kind in the example above). Depending on which attribute you choose, Hazel may then display one or more additional pop-up menus or fields, which you can use to specify the condition you’re looking for. (For details on the available attributes, see Attribute Reference . For examples of conditions you might create, see About Folders & Rules .)
-
If a single condition is insufficient to describe what you want to match, you can add more:
-
Create an additional condition by clicking the plus
 button at the right side of the condition.
-
Remove a condition by clicking the minus
 button at the right end of the condition.
-
Reorder conditions by dragging them up or down in the list.
-
If you need multiple levels of conditions (to specify, for example, “any of (A and B) or (C and D)”), read about Using Nested Conditions .
-
When adding conditions, be sure to check whether “any” or “all” is selected, and whether that’s still the choice you want.
-
Create actions. As with conditions, you begin by choosing an action from the leftmost pop-up menu (under “Do the following to the matched file or folder”) and then fill in the additional pop-up menus or fields as they appear. If an Options
 icon appears (as in the example above), click it for additional settings. Use the plus
and minus
buttons to create additional actions, and drag them up or down in the list to rearrange the order in which they apply.
icon appears (as in the example above), click it for additional settings. Use the plus
and minus
buttons to create additional actions, and drag them up or down in the list to rearrange the order in which they apply.
-
When you’re done, click “Save” to save your rule. If your rule contains any errors (such as a mandatory field that’s not filled in), Hazel displays an error message and highlights whichever portion(s) of the rule need to be corrected.
Newly created rules become active immediately, and you may see their effects after just a few seconds. Once you’re satisfied that the rule is behaving as you intended, you can repeat these steps to create additional rules.
If you want to temporarily disable a rule, deselect its checkbox in the “Rules” list. To learn about previewing what a rule will do as you create it, see Preview a Rule .
SEE ALSO