Most rules work just fine when you use “all” to match all the conditions, “any” to match at least one condition, or “none” to match no conditions—for example, “All of (Name contains Apple, Extension is .pages, and Date Created is Today)” or “Any of (Size is greater than 1 GB, Date Last Opened is not in the last 5 years, or Color Label is Red).” But what if you need more elaborate combinations, like “All of (Any of (Kind is PDF or Kind is Image)) and (Any of (Name contains Screenshot or Tags do not contain Ignore))”?
Hazel has just the solution for such cases: nested conditions , in which a single condition can contain one or more additional conditions (and so on as deep as necessary), with “all”, “any,” or “none” specified at each step. This capability lets you construct highly specific conditions that amount to various combinations of AND and OR operations. For example:
-
“Name is A or Name is B, and the item is also a music file.”
-
“Size is over 1 GB, and either the file is a move or it has a Red tag.”
Nested conditions come with an additional feature that gives them even more power— condition targets . For each level of nesting (even if you use only a single nested condition, so there’s effectively no hierarchy at all), Hazel provides a pop-up menu that lets you choose the scope to which that condition applies. Although that scope can simply be the file or folder that is currently being processed (the default), you can instead choose to examine subfiles and subfolders, or the enclosing folder, of the current item. For example:
-
You can match an item based on properties of its parent folder, as in “Move this file only if it has the extension .jpg and it’s inside a folder called Pictures.”
-
You can match a folder based on the properties of files it contains, as in “Rename this folder only if a file inside it was created within the last 10 minutes.”
Create Nested Conditions
To create a nested condition, do either of the following:
-
Hold down the Option key. The plus
 button at the right of each condition row changes to an ellipsis
 . Click an ellipsis
button to add a nested condition below it.
. Click an ellipsis
button to add a nested condition below it.
-
Hold down the plus
button for the condition immediately above where you the nested condition to appear. After a moment, a pop-up menu appears; choose “Add nested condition” from this menu.
In either case, two new rows appear below that row. The first has its own “any/all/none” pop-up menu plus a second menu for condition targets, and the second is a blank condition that you can fill in as needed.
In other words, if you start with this (in this image, the Option key is being pressed) and you click the ellipsis
button at the right of the sole condition:

The nested condition then looks like the following (the condition target pop-up menu is outlined in red):

You can repeat this process as needed to create further nesting, or add new conditions at the same level by clicking the plus
button as usual.
Like any other condition, nested conditions can be dragged up or down, or deleted. You can even drag items in and out of nested conditions.
Condition Targets
Nested conditions have a second pop-up menu that specifies the condition target—in other words, what the condition should apply to. The available targets are as follows:
-
“the current file or folder”: This is the default, and the one you will probably want most often. This refers to the file or folder referenced by the outer condition. If the outer condition is the top-level condition (that is, you have only one level of nesting), the conditions under this heading match the file or folder currently being processed. However, if the outer condition (a condition nested above this one) is set to “any of its files or subfolders,” then the conditions under this heading apply to those subfiles as well.
-
“its enclosing folder”: This target matches the folder that contains the file or folder being processed. This can be used, for example, to perform actions on a file based on whether its parent has a certain name.
-
“any file or folder in the same folder”: Use this to apply the conditions to other items in the same folder as the current one. As long as one of the files matches the conditions under this one, this condition will match. This is useful in cases where files in the same folder are related, such as if you need to match a text file if there is a corresponding image file.
-
“all files and folders in the same folder”: This is like the previous target in that it applies to other items in the same folder, but this time, it requires that all the other files match the conditions under this one. You can use this if, for example, you need to match a file that is a manifest/index for the rest of the files in the folder.
-
“any of its subfiles or subfolders”: This target applies only to folders. It will not match if applied to a file. With this target set, the condition matches the folder being processed if at least one subfile or subfolder within it matches the conditions underneath it. For example, you can use this target to match a folder if any of its subfiles have an “Orange” tag.
-
“all of its subfiles and subfolders”: This target is like the previous one in that it applies only to folders, and no individual file will trigger a match. With this target set, the condition matches the folder being processed if every subfile or subfolder within it matches the subconditions. For example, you can use this target to perform an action on a folder if all its subfiles are older than a certain age.
Keep in mind that regardless of your condition target, the rule’s actions apply to the file or folder currently being processed. So, even if the rules conditions are based on the subfiles, subfolders, or enclosing folder of the item being processed, the actions apply to the item itself. (If you need to apply actions to a folder’s subfiles, see Processing Subfolders for more information.)
Condition Target Examples
Here are example rules that illustrate two of the capabilities of condition targets—matching an item based on properties of its parent folder, and matching a folder based on properties of the items it contains. In both cases, the rules contain only one nested condition, which exists simply to expose the condition target pop-up menu.
Matching Based on Parent Folder Properties
This example applies a Blue tag to any item whose parent folder is named Media. Because the actions must apply to items in a subfolder, this rule must appear after a “Go into subfolders” rule that uses the “Run rules on folder contents” action (see Processing Subfolders for details):

The rule itself looks like this:
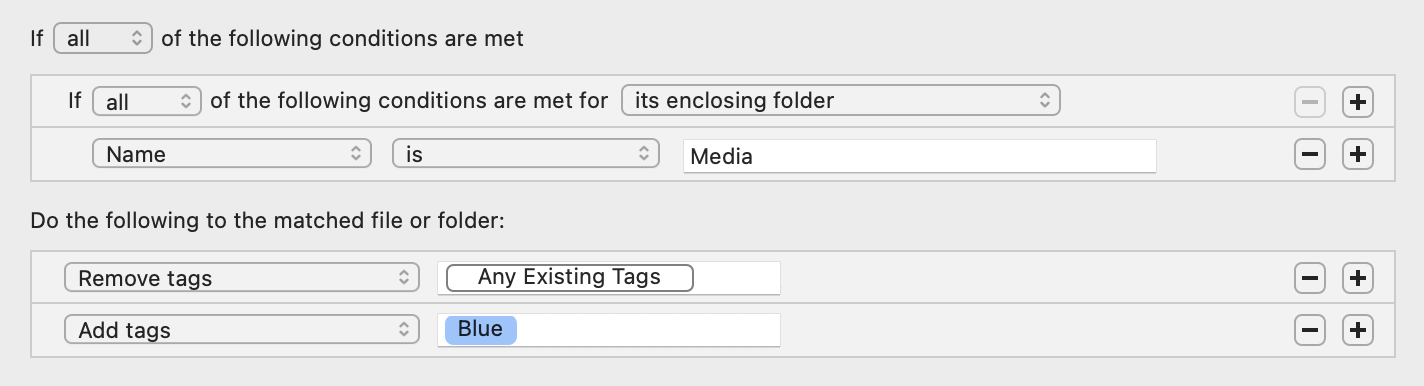
It reads as follows: If the single condition is met for an item’s parent (enclosing) folder—the folder name is “Media”—then remove any existing tags from that item (not the Media folder) and apply the “Blue” tag (so that it will have only the “Blue” tag).
For another example of matching an item based on the properties of its parent folder, see “Example 2: Matching a Filename with the Name of Its Parent Folder” in Using Custom Attributes .
Matching a Folder Based on Its Contents
This example applies a “Green” tag to any folder that contains a music file. Because the actions apply to the folder itself, and not to its contents, it’s unnecessary to use a “Go into subfolders” rule. The rule looks like this:
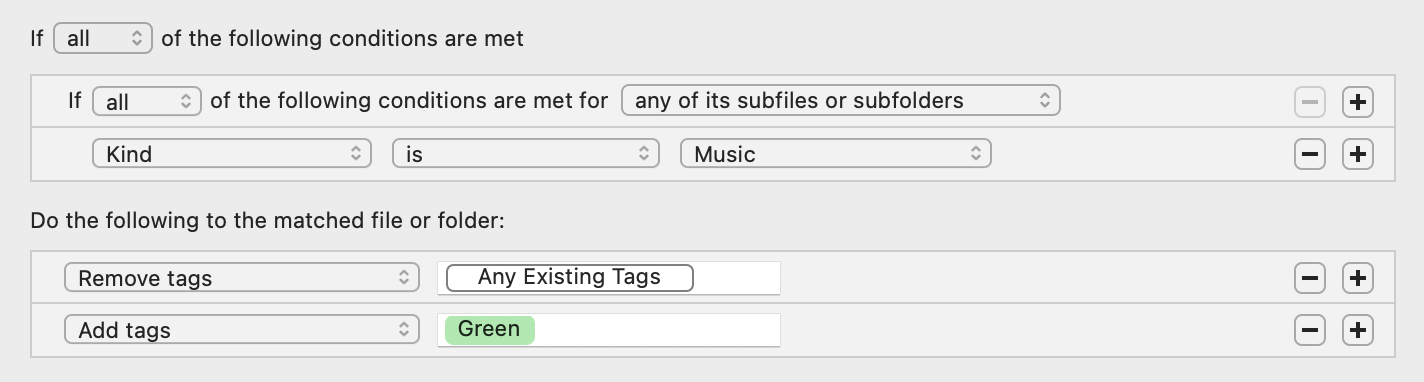
It reads as follows: If the single condition is met for a folder’s contents—there is at least one music subfile—then remove any existing tags from the folder and apply the “Green” tag (so that it will have only the “Green” tag).
SEE ALSO