Category: Programming


Fun with KVC

June 30th, 2009 — 10:33am

[Warning: this article is for entertainment purposes only. Any harm you do to your code or any offense you incur on the sensibilities of other programmers is your responsibility.]

Some time ago, Guy English posted a great and twisted article on key value coding (KVC). He comes up with a nice hack to do stuff with KVC that was never intended. Of course, there are some neat ways you can use KVC without indulging in the craziness that Guy English delves into (and I think he’d be the first to admit that it’s not meant for primetime). The main point remains, which is that using KVC with NSArrays is a great way to avoid coding loops over their contents. You have an array of “Person” objects and want an array of their names (accessible via a -name method)? Just do…

newArray = [array valueForKey:@"name"];

Now, the keys do not necessarily have to be properties of the object. There’s nothing stopping you from calling other methods on your objects that return other objects, provided they don’t require any arguments. For instance, if starting out with an array of strings…

newArray = [array valueForKey:@"lowercaseString"]

…will generate a new array of lowercase versions of the original strings. Actually, the methods don’t even have to return objects. Want to convert an array of numbers in string form to numbers? Try the following:


array = [NSArray arrayWithObjects:@"1", @"2", @"3", @"4", nil];

newArray = [array valueForKey:@"intValue"];

This gives you an array of NSNumbers. KVC auto-boxes scalar types as needed. It’s a great way to do conversions/transformations of arrays of objects in one fell swoop.

Suppose you want to do a deep(er) copy of an array of objects (not only copy the array, but each of its objects as well):

newArray = [array valueForKey:@"copy"];

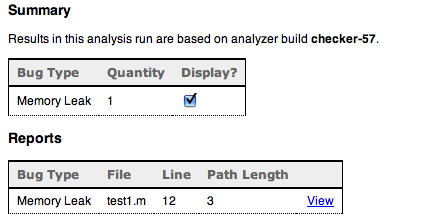
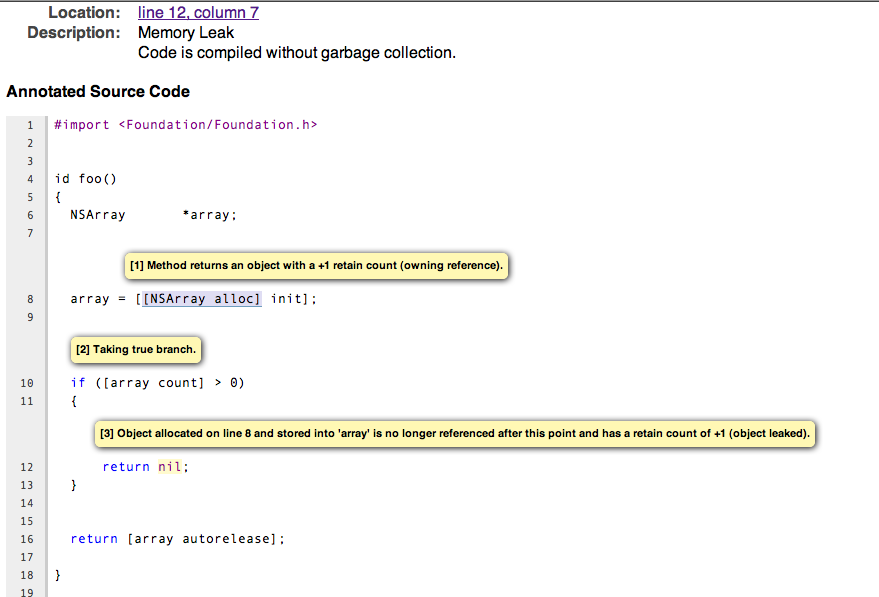
There is the issue, though, that the copies in the array now have a retain count of 1 and will be leaked unless extra care is taken. But no need write a loop to autorelease the objects. Instead, we can use keypaths to create chains:

newArray = [array valueForKeyPath:@"copy.autorelease"];

Retain it now and release it later or just let it get autoreleased. Either way, everything cleans up nicely.

And if you have a bunch of NSMutableCopying-conformant, immutable objects and want to convert them to their mutable counterparts:

newArray = [array valueForKeyPath:@"mutableCopy.autorelease"];

That gives us an array of autoreleased mutable copies.

Sure, not super mind-blowing but hopefully something above may save you some keystrokes. If you have your own KVC tricks, post them here in the comments.

[Update 2009-06-30]

This all started out with an conversation I had with Guy about wacky KVC stuff. The original title of this post was “KVC Abuse” but after a few edits, it got lost. I added the warning at the top but I’ll make it clear here: this is an abuse of KVC. This whole post is an indulgence.

I avoided a whole discussion of implementing HOM (Higher Order Messaging) type functionality in Objective-C but here’s a method you can use in an NSArray category:

- (NSArray *)map:(SEL)selector
{
	NSMutableArray		*result;
	
	result = [NSMutableArray arrayWithCapacity:[self count]];
	for (id object in self)
	{
		[result addObject:[object performSelector:selector]];
	}
	return result;
}


You don’t get the auto-boxing or the keypath stuff but the end result is still succinct and convenient for the basic case:


newArray = [array map:@selector(lowercaseString)];

Of course, my own version that I use has a more verbose method name (-transformedObjectsUsingSelector:) but no matter how you slice it, it will generate less bile from other developers.

6 comments » | Cocoa, OS X, Programming

Understanding Flipped Coordinate Systems

February 2nd, 2009 — 12:25pm

Flipped coordinate systems always seem to confuse people, myself included. After working things out with pen and paper or handpuppets, I always feel like they’re not quite correct so I thought I’d resolve things here. If anything, I can refer back to it whenever I forget this stuff (which happens every couple years). First a refresher in case you need it: Cocoa Drawing Guide: Flipped Coordinate Systems.

The main thing to keep in mind is that while a flipped coordinate system is basically translating the origin to the top left and flipping things vertically, semantically it doesn’t mean that everything is upside-down. Images, text and other elements are supposed to render right-side-up. The flipped coordinates should affect where those elements are placed, not how they are rendered. Being flipped is a higher level notion and is separate from the
CTM. While setting something as flipped will flip the CTM, modifying the CTM without setting the graphics context as flipped results in everything being entirely upside-down, which is different. Many of the Cocoa classes and functions take flipped coordinate systems into account and will draw right-side-up for you but it gets tricky with images.

There are two sets of methods in NSImage to render it in a graphics context: the -composite... methods and the -draw... methods. I’ve put together an interactive example app to help illustrate the differences. It might help you to download it now so you can follow along. The figures included in this article are from that app

The -composite... methods actually seem to work in the sense that the image is always right-side-up. The problem is that it draws “upward” from the draw point regardless of the coordinate system. The result is you have to calculate the compositing point at the upper left corner of the image instead of lower left. This is the result of these methods not taking the CTM into account in terms of scaling and rotation. That also means that if you scale your view up, the images won’t scale with it. While you can use this to your advantage in some cases (like rendering resize handles or labels which you want to stay the same size regardless of zoom), it’s usually not the right way to do it.

composite-scaled.png

View scaled at 2x. Notice how the composited version does not scale.

The -draw... methods on the other hand follow the CTM properly. That also means that if the view is flipped, so is the image, so you need to adjust accordingly. So while these methods obey the CTM, they do not take into account the flipped flag of the context which would be the cue to draw things right-side-up.

draw-flipped.png

The draw... routines follow the CTM, but not the flipped flag.

Now, to complicate things even further, NSImage’s themselves can be flipped. The reason for this isn’t to make the images upside-down. It’s there to provide a flipped coordinate system for whenever you draw into it (i.e. lockFocus on it, draw, then unlockFocus). It’s useful for when you want to tell a flipped view to draw into an NSImage, for instance. It’s basically like a flipped view; you don’t expect a flipped view to draw upside down, no matter which view you set as its superview. A subtlety to be aware of is that flipping an image loaded from a bitmap does not make too much conceptual sense (you are changing the coordinate system after the content has already been “drawn”) but it does have the practical effect of flipping the image vertically, which seems to be an implementation detail. Yes, flipping the image will work to “correct” orientation problems in most cases but, depending on where your image gets its data (for instance if it has an NSCustomImageRep like the example app – see below) and whatever implementation-specific details lurk in NSImage, you may end up with undesired or inconsistent results.

As mentioned above, I’ve put together a little interactive example app (Leopard-only) to show how the different methods behave. In addition, I’ve written methods in an NSImage category (-drawAdjusted...) which will render the image correctly regardless of the flipped status of the coordinate system it draws into. As suggested in Apple’s docs, it does a transform reversing the flip, draws the image, then reverts the coordinate system back.

The image itself is drawn by code, not loaded from a bitmap. The reason for this is that I also wanted to illustrate using flipped images. It draws an arrow and some text to indicate the proper orientation. When flipped, the drawing code is exactly the same in that no coordinates are recalculated. The text content is changed to compensate for the new orientation. Notice how the text renders right side up no matter the flip state of the image; an indication that the NSString drawing methods are “flip-aware.” Also, it shows how to check the graphics context to get its flipped status so you can make your own drawing routines flip-aware as well.

Unfortunately, not everyone draws flipped images correctly. One place in particular is NSView’s/NSWindow’s -dragImage:at:offset:event:pasteboard:source:slideBack: method which will draw flipped images upside-down. Since you can’t control how the image is drawn, you can instead draw your flipped image into another non-flipped image and pass that in. I’ve added a method to the NSImage category to do this and you can check out the result in the example app (you can drag the image out of the views though only the last one has the corrected version).

And what if you actually want to draw everything upside-down, you irrepressible nut? Well, apply your own transforms using NSAffineTransform or CGAffineTransform. Just remember to concat the transform and not set it (a good general rule when using affine transforms). As long as you don’t tell any classes that you’re flipped, it should work out.

Hopefully this didn’t make things even more confusing (and also, hopefully, my interpretation of all this is correct). If you are still lost then just follow these rules:

  1. Do not set images as flipped unless you know what you are doing.
  2. Use the -drawAdjusted... methods in my category (or similar technique) to do all your image drawing.
  3. If you didn’t listen to rule #1 and you have a flipped image and it is showing up upside-down even when following rule #2, then use the -unflippedImage method in my category to get an unflipped version of the image and use that instead.
  4. Never go in against a Sicilian when death is on the line.

That should handle most cases you run into. And trust me on rule #4.

7 comments » | Cocoa, Downloads, OS X, Programming, Quartz

The Invisible Interface: Stealing Prefs

January 27th, 2009 — 1:52pm

In this installment of The Invisible Interface, we are going to look at stealing preferences. What is stealing preferences? Simply enough, it’s using the preferences of some other app instead of having your own for a particular feature. The point of this is to avoid having to provide a separate interface for settings when the user has already made their choices known somewhere else.

The key here is finding cases where your functionality is more centrally used somewhere else. I’m going to use Hazel as an example but hopefully these will illustrate the point well enough for you to look for where you can apply it yourself.

Spring-Loaded Folders

For those that don’t know, Finder has a feature called spring-loaded folders. What this does is when you drag a file over a folder, after a delay, it will flash and then open that folder so you can drill deeper. It allows you to navigate the folder tree without having to let go of the file you are dragging.

Hazel implements spring-loaded folders as well. It works when you want to move/copy rules in between folders. Hovering the dragged rule over a folder in the list on the left will cause the view to switch to the rules for the hovered-over folder allowing you to drag back into the rule list and place the rule where you want it. [On a side note, implementing this uncovered a bug in NSTableView (at least on Tiger; have not checked with Leopard) resulting in me doing my own implementation of NSTableView’s drag and drop.]

Under Finder’s “General” tab, you’ll see a checkbox and slider to configure these settings. Your first thought may be to provide a similar UI in your app. But why? Does the user really care about tweaking this for each app it appears in? It seems like whatever setting works in Finder will be fine wherever else it is used so why not just use Finder’s preference?

Commonly Used Folders

In Hazel, when you specify a destination folder for some actions (like move and copy), there is a pop-up of folders. You’ll notice that there’s a list of common folders at the end of the pop-up menu. If you look a bit closer, you may notice that these are the same folders in the sidebar of your Finder windows. Those folders are common destinations for files so it’s a good list for Hazel to use. By grabbing that list from Finder, Hazel avoids any sort of extra maintenance/interface for managing that list.

AppleScript Editor

In 2.2, Hazel introduced inline editing of scripts. You are provided with a mini-AppleScript editor right in Hazel’s rule interface. Now, there are potentially different things you can tweak to make the editor suit your needs, such as line wrapping, tab widths and whether to use the script assistant. But if you poke around Hazel’s UI, you’ll see that there’s no interface to set these. That’s because Hazel steals these preferences from Script Editor. If someone is serious enough about editing AppleScript that they care about these settings, there’s a good chance they have Script Editor installed and already set these preferences. By using its preferences, there is a consistency of user experience between the two editors.

• • •

Of course, you can’t do this everywhere. It’s best suited when the functionality is primarily used elsewhere and you are echoing it in your own app. The apps Apple ships with the system are an easy mark since you can usually rely on them being installed and they tend to be the places where common functionality is defined. Overall, the result is a less tweaky and cluttered interface and a more seamless experience with the rest of the system.

Doing the Heist

You can grab other apps’ preferences using either CoreFoundation or Cocoa. With Cocoa, NSUserDefaults is your go-to guy. -persistentDomainForName: does what you want. Give it a bundle ID and in return, you get a dictionary of preferences. What would’ve made more sense is something like +userDefaultsForName: which would return an NSUserDefaults instance, but hey, it’s not like Apple is hiring me to do API design. With CoreFoundation, you can use CFPreferencesCopyAppValue() to pick individual preferences. Again, a bundle ID is needed.

And I can’t leave without placating the more pedantic among you that have to point out the potential dangers of doing this. Therefore, I must note that there is some risk in doing this as most apps do not document their preference settings and they can change at any time. Having default values of your own for these settings should minimize the risk, at least buying you time until you can re-work things to use the new schema. That said, if this is for some critical/primary functionality in your app, it might behoove you to have your own settings for it. As they say, invest only what you can afford to lose, or, to milk the stealing metaphor, don’t do the crime if you can’t do the time. And while we’re at it, just say “no” to drugs, kids.

Comment » | Cocoa, Hazel, OS X, Programming, User Interface

Displaying Line Numbers with NSTextView

October 5th, 2008 — 8:16pm

Yes, it’s free code time again. I’ve been neglecting the blog for some time so hopefully this will make up for it. Think of it as that conciliatory heart-shaped box of chocolates used as a sorry way to make up for forgetting about your birthday, after which, I go back to my old ways of sitting on the couch all day watching sports, ignoring you.

In version 2.2 of Hazel, I added mini AppleScript and shell script editors so that people could enter scripts inline without having to go to another program and saving it to an external file. I’ll admit, I didn’t set out to make an uber-editor since it was intended for small scripts. Nonetheless, a user recently pointed out that when a line wraps, it’s hard to tell if it’s a continuation of the previous line or a new one. One of his suggestions was putting line numbers in the left gutter. If you don’t know what I’m talking about, look at TextMate (the example he cited) or XCode (you need to turn it on in preferences). I thought it might be overkill for a script editor that will mostly be used for scripts less than ten lines long. I’m instead considering doing an indented margin for continuation lines. Less visual clutter and addresses the problem at hand.

Nonetheless, I was curious about implementing line numbers. Poking around, I found some tips on how to do it but it seemed like there were odd problems implying it wasn’t as straightforward as one would think. So, snatching some free time in between other things, I decided to tackle the problem.

I looked into subclassing NSRulerView. The problem is that NSRulerView assumes a linear and regular scale. Now, to make it clear, I am talking about numbering logical lines, not visual ones. If a line wraps, it still counts as one line even if it takes two or more visually. The scale is solely dependent on the layout of the text and can’t be computed from an equation. Despite these limitations, I went ahead and subclassed NSRulerView. If anything, NSScrollView knows how to tile it.

I had this notion that NSRulerView was a view that synced its dimensions with the document view of the scrollview. With a vertical ruler, I assumed it would be as tall as the document and the scroll view just scrolls it in tandem with the document. Not so. It’s only as tall as the scrollview. That means you have to translate the scale depending on the clipview’s bounds.

I added some marker support via an NSRulerMarker subclass that knows about line numbers. The line number view will draw the markers underneath the labels a la XCode (with the text inversed to white). The sample project uses another subclass which will toggle markers on mouse click. While NSRulerView usually delegates this to its client view it made more sense to just do it in a subclass of NSRulerView. You have to subclass something to get it to work and it made more sense to subclass the ruler view since the code to handle markers never interacts with anything in the client view anyways. Personally, I find it an odd design on Apple’s part and would have preferred a regular delegate.

The project is linked below. The main classes are NoodleLineNumberView and NoodleLineNumberMarker. Some notes:

  • To integrate: just create the line number view and set it as the vertical ruler. Make sure the document view of the scrollview is an NSTextView or subclass. Depending on the order of operations, you may have to set the client view of the ruler to the text view.
  • The view will expand it’s width to accommodate the widths of the labels as needed.
  • The included subclass (MarkerLineNumberView) shows how to deal with markers. It also shows how to use an NSCustomImageRep to do the drawing. This allows you to reset the size of the image and have the drawing adjust as needed (this happens if the line number view changes width because the line numbers gained an extra digit).
  • Note that markers are tied to numerical lines, not semantic ones. So, if you have a marker at line 50 and insert a new line at line 49, the marker will not shift to line 51 to point at the same line of text but will stay at line 50 pointing at whatever text is there now. Contrast with XCode where the markers move with insertions and deletions of lines (at least as best as it can). This is logic that you’ll have to supply yourself.

More details, including performance notes, can be found in the Read Me file included in the project.

I’m putting this out there because I’m probably not going to use it and it seems like a waste of some useful code. Also, my apologies to the user who asked for this feature. I feel like somewhat of a jerk going through the trouble of implementing the feature and not including it. It was more of a fun exercise on my part but I still feel it’s not suitable for Hazel. That said, I may consider adding it and having it available via a hidden default setting. Votes for or against are welcome.

In the meantime, you can use the code however you want. MIT license applies. Please send me any bug reports, suggestions and feedback.

Enjoy.

Download Line View Test.zip (version 0.4.1)

Update (Oct. 6, 2008): Uploaded version 0.3. Fixes bugs found by Jonathan Mitchell (see comments on this post). Also made line calculations lazy for better performance.

Update (Oct. 10, 2008): Uploaded version 0.4. Fixes bugs mentioned in the comments as well as adds methods to set different colors. There is a display bug that happens when linking against/running on 10.4. See the Read Me for details.

Update (Oct. 13, 2008): Uploaded version 0.4.1. Figured out the 10.4 display bug. Apparently, NSRulerView’s setRuleThickness: method doesn’t like non-integral values. Rounding up solves the problem. Thanks to this page for identifying the problem.

Update (Sep. 29, 2009): I have included this class in my NoodleKit repository so you should check there for future updates.

23 comments » | Cocoa, Downloads, OS X, Programming

New Tool On The Block: The LLVM/Clang Static Analyzer

July 7th, 2008 — 10:30pm

Over the weekend, Gus Mueller turned me on to the LLVM/Clang static analyzer. And just in time, too, as I was polishing up my 2.2 release (which went up earlier today).

It’s an offshoot of the LLVM and Clang projects (read the respective pages on what they are if you don’t know already). The static analyzer analyzes your code and looks for problems, focusing mainly on memory allocation patterns, in this case, including Objective-C/Cocoa (retain/release/autorelease) and CF (CFRetain/CFRelease) semantics.

Take this contrived example for instance:

  id foo()
  {
      NSArray       *array = [[NSArray alloc] init];

      if ([array count] > 0)
      {
        return nil;
      }
      return [array autorelease];
  }

The example above will get you a report like this (it generates html):

checker1.png

Drilling down you get this (still in html):


checker2.png
(click to enlarge)

Here you can see it pointing out [1] where the object was allocated [2] the branch it took and [3] the point where you leaked it. Pretty neat. It tries to follow every possible branch finding paths where you may have leaked an object. It also finds what it calls “dead stores” (when you assign a value to a variable but never use it again) and missing dealloc methods

As the project page says, it is very early in development. You’ll find that it does turn up a lot of false positives, especially with the missing deallocs. False positives for memory leaks seem to occur when you release something in a different scope than where you created it. For instance, I have this chunk of Apple code that wraps CFRelease() with it’s own function that checks for NULL first. The checker complained about this every time. Nonetheless, it did turn up some real leaks for me.

Aside from reducing the number of false positives, I’d also like to see the entries grouped by source file (it’s annoying jumping around between files) as well as some way to bring up the original source file by clicking on its name in the source code view. You will also see multiple entries for the same leak when the code traverses multiple paths that end up with the same leak which can be annoying.

In any case, I recommend downloading it and giving it a try. I’m not sure how thorough it is (i.e. whether it can supplant running your program through MallocDebug/Instruments/leaks) but it makes a great additional tool to add to your arsenal. Chances are it will look at some code path that you don’t test. Oh, and a couple tips:

  • Make sure you do a clean build on your project first. The checker only runs on files that would normally be compiled (it sits in as your compiler). If your project is already built, then no files will be compiled/analyzed.
  • Use the -V option, which will pop open a browser with the analysis page when done. Normally, it sticks the files somewhere under /tmp but only shows the actual path when you start the run. Needless to say, that bit of text scrolls off pretty quickly.
  • While the tool does come up with false positives, you’ll find that sometimes it finds something subtle that you may blow off as a false positive on first glance. Make sure you understand what it is flagging, even if it ends up being wrong.

I haven’t used it with a garbage collected program so I don’t know if it uses different techniques in such a case or is just plain unnecessary. Maybe the dead store detection becomes more important. Reports from anyone using this with GC are welcome.

3 comments » | Debugging, Programming, Software, Tools

Adventures in Debugging: Pref Pane Poppin’ Aplenty

April 23rd, 2008 — 3:34pm

As you may or may not know, Hazel is packaged as a preference pane. While you do all the configuration via the preference pane interface, the actual work of running your rules is done by background processes. The commandline tool that actually runs the rules is stored inside the pref pane bundle. I’ve kept it in the Resources part of the bundle for no good reason except that’s the catch all for all your bundle stuff. But then I thought, “why not stick it in the MacOS dir. That’s where executables are supposed to go, right?”

So, I went into XCode and created a new “Copy Files” phase to copy the built executables into the “executables” dir (which ends up being the MacOS dir in your bundle). I modified the code that launches the program to look in the right place (NSBundle’s -pathForAuxiliaryExecutable: for those of you keeping score at home). It seemed to work. My bundle was now a tad tidier with things in their proper place.

Later on, I was testing something else and noticed that when Hazel was running certain rules, the pref pane icon would show up in the dock and then disappear when the background program was done. Strange enough that a pref pane icon would appear in the dock; stranger that it was being triggered by a non-GUI program. More testing revealed that it happened when Hazel was executing AppleScripts. I tried isolating the AppleScript parts. I checked all sorts of paths. I couldn’t figure out what was causing it. The Pope was in town so maybe he was messing things up somehow.

I checked previous versions to isolate when the bug was introduced and discovered it was only in the last set of changes. Moving the executables back to Resources fixed it.

Problem solved but I had no idea why. After muttering about it in IRC, Mike Ash casually throws out the explanation: “the binary is hitting the window server, the window server notices that it’s in an executable directory of a bundle, sticks it in the Dock.”

Of course, it all sounds so simple when you hear the answer. Calling the AppleScript created the window server connection which then prompted it to throw the icon in the dock as if it were a regular app. Not sure how long it would have taken me to figure that out on my own.

The lesson here is that when faced with a crazy bug, ask Mike Ash. Really, though, don’t do that. He’ll crash his glider into me next chance he gets. The real lesson is that you should be careful about putting executables for background programs in the MacOS directory of your bundle.

Ok, so I can’t pin this one on the Pope. All I know is that I don’t get these types of problems when the Dalai Lama is in town.

2 comments » | Cocoa, Debugging, Hazel, Programming, Xcode

Ruby on Rails: First Impressions

March 31st, 2008 — 7:00pm

In getting Potion Store integrated with my site, I had to learn Ruby on Rails. RoR has always been one of those things I’ve been curious about so I saw it as an opportunity to dive in. I present here a first impression. Note that these are impressions. They represent how I perceived things coming to it for the first time. While chances are that these perceptions are inaccurate, there’s something to be said for seeing how things appear to fresh eyes.

Ruby is an interesting language. It appears to be very flexible and dynamic, allowing you to do a bunch of really neat things that you can’t in most other languages. Note that these features aren’t really unique to Ruby. My sense is that Ruby is not a distinctive language in itself so much as a mostly good mix of other languages. I say “mostly” because I’m not sold on the syntax. It reminds me too much of Perl. It’s like they created a great new flavor of ice cream and then mixed in glass and razor blades.

My advice to those picking up Rails for the first time, get the Rails book and read the first few chapters before diving in. I found the online tutorials kinda annoying and not as good at explaining the structure and conventions that Rails relies on. Rails’ strongpoint is streamlining common tasks and functionality but to do so, it expects things to be laid out in a certain way. The other thing that takes time to figure out is the “magic” that Rails performs at certain points. One of the great things about Rails is how certain things are automatic. Very little glue needs to be coded and I feel that’s a wonderful thing. On the downside, sometimes this magic makes it hard to figure out what’s going on. For instance, some classes had naming patterns for their methods that you had to find out about in the documentation. I found the quality of the documentation to be a bit uneven which didn’t help in some cases.

I feel most of the problems with Rails are less about the design and more about the implementation. For instance, Rails is a memory hog. And because Rails is single-threaded, you need to have at least two of these things sitting there to get any sort of concurrency. When I deployed my store, I had to upgrade my SliceHost slice as the 256M slice wasn’t cutting it (remember I’m also running mysql and PHP stuff). Also, I felt deployment was a bit clumsy, as I had to set up a cluster of mongrel instances to run my app with apache acting as a proxy. While I see that there is a mod_ruby for apache out there, no one I know recommended it. Nonetheless, I felt like I had to deal with more moving parts than was necessary.

In a nutshell, Rails: great, Ruby: enh. If you are going to buy a book on it, get the Rails book first. It has an appendix on Ruby that should be sufficient for most things. If you want to go deeper with the Ruby side of things, you can get the Ruby book as well but personally, I could have done without it.

Overall, I like the platform but at the same time, I can see that it’s relatively immature and has some ways to go. I’m pretty much tied to RoR for now since it’s what the store is written in but that’s not a bad thing. That said, I also am not so amazed that I am going to join the Ruby cult.

Nonetheless, RoR feels like how a web framework should and less like a bloated platform where you end up installing a hundred frameworks requiring just as many config files to be edited to solve non-existent problems that are justified because someone gave it a fancy technical name along with a contrived design pattern to fix it (if you need a hint as to what I’m referring to: “starts with a J”). RoR seems to be able to identify and address the actual problems people run into when creating web applications, all the while keeping it relatively simple, and that is refreshing to see.

6 comments » | Programming, Ruby on Rails, Web

Modal Glue

March 10th, 2008 — 9:51am

Recently, Quentin Carnicelli of Rogue Amoeba asked if there were NSResponder methods that you could hook your “OK” and “Cancel” buttons to to dismiss a modal panel (or sheet). As far as I knew there wasn’t but, gosh darnit, that would be a useful thing to have.

To clarify what I’m talking about here, when you run your own modal window or sheet with “OK” and “Cancel” buttons (or some equivalents), you end up hooking those up to methods that dismiss the window/sheet, stop the modal session and return some code (either one for confirmation or cancellation). Most of the time, you end up writing the exact same code. It’s glue code that shouldn’t have to be written.

Now, if you look at NSResponder, you’ll see all sorts of action methods in place. Sticking these glue methods into NSResponder will allow you to hook up your “OK” and “Cancel” buttons to the “First Responder” in IB. The idea here is that there is a default implementation that will close the current modal window or sheet and set the return code to either NSOKButton or NSCancelButton. With this, your code can act more like it’s using NSRunAlertPanel() or NSBeginAlertSheet() by just interpreting the return code.

I’ve created an NSResponder category with the methods -confirmModal: and -cancelModal: to which you can hook up your “OK” and “Cancel” buttons in IB. Note that you may have to manually add the methods to NSResponder in IB as it doesn’t know about them.

Now NSResponder’s versions of these methods don’t actually do anything besides pass it on to the next responder. The main part is in NSWindow, which overrides it. It will check to see if it’s the current modal window or sheet, order itself out, stop the modal session and send back the appropriate code. By using the responder chain, this mechanism will find the “nearest” modal window. Note that it is assumed here that the buttons to dismiss a modal window are in the same window. If you want to dismiss it from a different window, it may or may not work (depending on the responder chain and other subtleties such as the odd specification of NSWindow’s -isSheet method). I can’t think of a non-contrived case where you’d want this or care but if one comes up, let me know.

So here’s the download. Suggestions, questions, bug reports appreciated.

modalresponder.zip

2 comments » | Cocoa, Downloads, OS X, Programming

Happy Fun Leopard Bug Time: NSCalendar

January 25th, 2008 — 10:38am

Yes, folks, it’s Happy Fun Bug Time where I talk about what has been making me tear my hair out recently. In this installment, we talk about NSCalendar.

NSCalendar has a method called rangeOfUnit:inUnit:forDate:. What this method is supposed to do calculate how many of one time unit are in another. For instance, how many days are in a particular month. Since date calculations can get tricky, with daylight savings, leap years and all, this method is quite handy.

Or, it would be handy if it didn’t suffer from some pretty bad bugs on Leopard. At first, I tried something like the following to calculate the number of days in a given year:

  range = [[NSCalendar currentCalendar] rangeOfUnit:NSDayCalendarUnit
                                             inUnit:NSYearCalendarUnit
                                            forDate:[NSDate date]];
                                  
  NSLog(@"%@", NSStringFromRange(range));

Given that this is a leap year, I’d expect “{1, 366}”. What do I get? “{1, 31}”. I suspect that wires got crossed with the days-in-a-month calculation. Oh, but the fun doesn’t stop there. Try this at home (kids: do not try this at home):

  NSCalendarDate          *date;
  int                     i;
  
  date = [NSCalendarDate dateWithYear:2007 month:1 day:1 hour:0
                               minute:0 second:0 timeZone:nil];
  
  for (i = 0; i < 365; i++)
  {
    range = [[NSCalendar currentCalendar] rangeOfUnit:NSDayCalendarUnit
                                               inUnit:NSWeekCalendarUnit
                                              forDate:date];
    
    if (range.length != 7)
    {
      NSLog(@"Date %@ has week of length %d", date, range.length);
    }
    date = [date dateByAddingYears:0 months:0 days:1 hours:0 minutes:0 seconds:0];
  }

This cycles through each day of last year (2007) and calculates the number of days that week. Now, having just recently lived through that year, I think I can say with some certainty that no week had any more or less than 7 days in it. The above code prints out any oddballs. If you run it yourself, you find that quite a few days are in weeks exceeding 7 days. Upon closer inspection, you find that any day in a week straddling two months reports the number of days in the month, not the week. On weeks fully contained within a month, it reports 7 days. Again we are seeing a tendency towards the days-in-a-month calculation. Someone really likes computing that.

I've filed a bug report (rdar://5704940 for you Apple folks). Unless I'm doing something really wrong here or there were some time distortions last year that I was unaware of, you may want to avoid using NSCalendar's rangeOfUnit:inUnit:forDate: on Leopard for the time being. Thinking about it though, the time distortions would explain a couple weekends…

Update (Feb. 1, 2008):
I strongly recommend reading the comments. Thanks to Chris Suter for explaining what Apple's logic is in doing it this way. We all thought he was nuts at first but it appears that he was just explaining Apple's craziness.

In short, things probably are working as designed by Apple. I still think the design is flawed and that it is horrendous API. It seems that, in Apple's mind, Leopard is correcting a bug in Tiger (in other words, the intuitive and useful behavior in Tiger was a bug).

The original point stands that one needs to take care with -rangeOfUnit:inUnit:forDate:. It seems to be only useful for specific combinations of units and given the change in behavior between Tiger and Leopard, it becomes even more of a headache. If Apple is going to continue with this interpretation, then they should just treat these computations as undefined since the results are misleading.

17 comments » | Cocoa, Debugging, OS X, Programming

Idle Hands

January 8th, 2008 — 3:30pm

A common user annoyance is having alerts popping up at bad times. The worst is when the user is typing and focus gets stolen only to have subsequent key presses going to the new window, possibly resulting in the user inadvertently confirming something they didn’t want to. Peter Hosey discusses this particular case and outlines an NSAlert-based solution.

I recently submitted a patch for Sparkle+ to deal with a similar situation. It can be annoying to get an alert about a new version when you are working. A new version is not a “drop everything and deal with this now” type of alert. With this patch, when a new update is found, it will check the user’s idle time and hold off showing the panel until a certain amount of time has elapsed. This minimizes the chance of the user being in the middle of something when the alert comes up. Of course, this is only suitable for when the alert itself is not terribly critical or time-sensitive. It should not be used if it is in response to direct user action or if the alert is something that needs to be dealt with immediately.

Since this type of thing may be useful in other contexts, I’ve decided to generalize it and put it out there for your consumption. It’s a little NSObject category with two new methods: performSelector:withObject:afterSystemIdleTime: and performSelector:withObject:afterSystemIdleTime:withinTimeLimit:. The first will call the given method on the receiver when the user has been idle for the given period of time. The second method does the same but allows you to set a limit after which it will call the method regardless of idle time, thus preventing the method from being delayed indefinitely.

Beyond the use described above, you can use it in several other situations, such as doing some internal maintenance that may get in the way if the user is actively using the machine. You can reclaim/free memory, clear out caches, compact file stores, optimize data structures or whatever.

For the time being, I am using this in my Sparkle update alerts and my scheduled evaluation period expiration nags. What will be interesting is if this leads to some sort of “refrigerator light syndrome” where users notice that it only happens when they are not looking and are somehow bothered by it. Most likely, though, users probably won’t notice and, with any luck, they will be more receptive to the alerts when they do pop up. If that leads to an extra spring in their step, then I consider it a job well done.

The project is linked below. Make sure you read the Read Me file. If you end up using it, let me know.

Update (Jan 10, 2008): The original project had a couple files specified as absolute paths (so XCode wouldn’t find them). A new project has been put up with this error fixed. It is marked as version 0.6 in the package name and Read Me file.

performwhenidletest-0.6.zip

Update (Feb 5, 2008): It appears that the CGEventSourceSecondsSinceLastEventType() function hangs on Tiger systems. I have updated the code to check for the OS version and only do the idle delay on Leopard and later.

performwhenidletest-0.7.zip

I am also looking into patching this in Sparkle+. If you are using Sparkle+ with this feature enabled, drop me a line or wait for the patch which will hopefully happen soon.

12 comments » | Cocoa, OS X, Programming

Back to top