Category: Downloads


“Sticky” section headers in NSTableView

September 25th, 2009 — 9:25am

Once again, I find myself with some cool code with nowhere to put it. And, yet once again, you get the reap the benefits.

UITableView on the iPhone has the neat feature where section headers stick at the top after the actual row for it has scrolled off. For instance, in Contacts, if you scroll down, the row for section “A” stays visible so that you know what section you’re in if the section is too large for the screen.

Unfortunately, someone asked how something like this could be done on desktop Cocoa. I say “unfortunately” because I was within earshot and it resulted in me embarking on a journey peppered with annoying run-ins with NSTableView’s idiosyncrasies. Nonetheless, I persevered and came up with something hopefully someone will find useful. As was the case before, I don’t have a use for it myself at the moment, but I feel it would be a shame to let the code go to waste.

I am presenting NoodleStickyRowTableView. I call the section headers “sticky rows” as one can specify any row to stick up top for whatever reason, though by default, it does it for group rows.

The bad stuff:

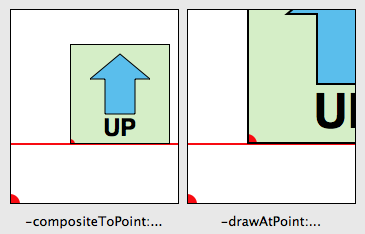
NSTableView makes it very difficult to cache a row visually. -drawRow:clipRect: should be able to do it but the problem is that it’s too smart for it’s own good. If the row is not visible, it will not draw anything. Add on top of that the impossibility of getting it to draw the special background the group rows use. I tried all sorts of techniques but none were general or reliable enough. My email on the cocoa-dev list was, not surprisingly, ignored. As a result, in the default implementation, I use my own look for the rows and then use a fade-in transition since the sticky row will look different from the actual one. You can see it in the video below where it has a ghost-like effect.

The good stuff:

The good news is that I managed to work it into an NSTableView category. You can think of it as an abstract category if you wish. In your subclass, at the very minimum, override -drawRect: and call -drawStickyRowHeader after calling super. From that one call you will get all the functionality.

Why do it this way? Well, ease of use for one. It makes it so that you can integrate it into your own NSTableView subclass without having to copy and paste large swaths of code or put it all sorts of odd hooks. Secondly, the changes get inherited by NSOutlineView so the functionality is available there and in its subclasses as well.

While I could use the new associated objects functionality in Snow Leopard, I opted for Leopard-compatiblity. This resulted in me coming up with a couple tricks to get around the lack of ivars, including the rarely used -viewWithTag: method. Check the “read me” file and code for details.

There are two different transitions. The default is the fade-in transition as shown here:


<a href="https://www.noodlesoft.com/blog/uploads/2009/09/Ghost-Transition.mov">Download movie</a>

As mentioned before, since I couldn’t get the group rows to draw properly and consistently, I use a more generic look for the row. The transition makes it less jarring but it is a compromise of sorts. Not bad when you consider that you get all this by calling just one extra method in your -drawRect:.

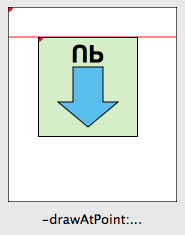
But what if you want something more like the iPhone’s version? In your subclass, you can override -stickyRowHeaderTransition to return no transition and then do your own drawing of the rows so that they look the same between the regular and sticky versions. The NoodleIPhoneTableView included in the project shows how this is done with the result being something on par with UITableView:


<a href="https://www.noodlesoft.com/blog/uploads/2009/09/iPhone-Transition1.mov" title="iPhone Transition.mov">Download movie</a>

I am releasing this under MIT license as usual. Use it however you want as long as you give me credit somewhere. Please send in any feedback, suggestions, bugs, etc but keep in mind that this is not something I use in my projects so I probably will not be actively maintaining it beyond a certain point. I’ve made a point of making the the API easy to use and to extend so have fun with it.

Download NoodleStickyRowTableViewTest.zip (version 0.18639)

Update (Sep. 29, 2009): I have included this class in my NoodleKit repository so you should check there for future updates.

4 comments » | Cocoa, Downloads, OS X, Programming, User Interface

Understanding Flipped Coordinate Systems

February 2nd, 2009 — 12:25pm

Flipped coordinate systems always seem to confuse people, myself included. After working things out with pen and paper or handpuppets, I always feel like they’re not quite correct so I thought I’d resolve things here. If anything, I can refer back to it whenever I forget this stuff (which happens every couple years). First a refresher in case you need it: Cocoa Drawing Guide: Flipped Coordinate Systems.

The main thing to keep in mind is that while a flipped coordinate system is basically translating the origin to the top left and flipping things vertically, semantically it doesn’t mean that everything is upside-down. Images, text and other elements are supposed to render right-side-up. The flipped coordinates should affect where those elements are placed, not how they are rendered. Being flipped is a higher level notion and is separate from the
CTM. While setting something as flipped will flip the CTM, modifying the CTM without setting the graphics context as flipped results in everything being entirely upside-down, which is different. Many of the Cocoa classes and functions take flipped coordinate systems into account and will draw right-side-up for you but it gets tricky with images.

There are two sets of methods in NSImage to render it in a graphics context: the -composite... methods and the -draw... methods. I’ve put together an interactive example app to help illustrate the differences. It might help you to download it now so you can follow along. The figures included in this article are from that app

The -composite... methods actually seem to work in the sense that the image is always right-side-up. The problem is that it draws “upward” from the draw point regardless of the coordinate system. The result is you have to calculate the compositing point at the upper left corner of the image instead of lower left. This is the result of these methods not taking the CTM into account in terms of scaling and rotation. That also means that if you scale your view up, the images won’t scale with it. While you can use this to your advantage in some cases (like rendering resize handles or labels which you want to stay the same size regardless of zoom), it’s usually not the right way to do it.

composite-scaled.png

View scaled at 2x. Notice how the composited version does not scale.

The -draw... methods on the other hand follow the CTM properly. That also means that if the view is flipped, so is the image, so you need to adjust accordingly. So while these methods obey the CTM, they do not take into account the flipped flag of the context which would be the cue to draw things right-side-up.

draw-flipped.png

The draw... routines follow the CTM, but not the flipped flag.

Now, to complicate things even further, NSImage’s themselves can be flipped. The reason for this isn’t to make the images upside-down. It’s there to provide a flipped coordinate system for whenever you draw into it (i.e. lockFocus on it, draw, then unlockFocus). It’s useful for when you want to tell a flipped view to draw into an NSImage, for instance. It’s basically like a flipped view; you don’t expect a flipped view to draw upside down, no matter which view you set as its superview. A subtlety to be aware of is that flipping an image loaded from a bitmap does not make too much conceptual sense (you are changing the coordinate system after the content has already been “drawn”) but it does have the practical effect of flipping the image vertically, which seems to be an implementation detail. Yes, flipping the image will work to “correct” orientation problems in most cases but, depending on where your image gets its data (for instance if it has an NSCustomImageRep like the example app – see below) and whatever implementation-specific details lurk in NSImage, you may end up with undesired or inconsistent results.

As mentioned above, I’ve put together a little interactive example app (Leopard-only) to show how the different methods behave. In addition, I’ve written methods in an NSImage category (-drawAdjusted...) which will render the image correctly regardless of the flipped status of the coordinate system it draws into. As suggested in Apple’s docs, it does a transform reversing the flip, draws the image, then reverts the coordinate system back.

The image itself is drawn by code, not loaded from a bitmap. The reason for this is that I also wanted to illustrate using flipped images. It draws an arrow and some text to indicate the proper orientation. When flipped, the drawing code is exactly the same in that no coordinates are recalculated. The text content is changed to compensate for the new orientation. Notice how the text renders right side up no matter the flip state of the image; an indication that the NSString drawing methods are “flip-aware.” Also, it shows how to check the graphics context to get its flipped status so you can make your own drawing routines flip-aware as well.

Unfortunately, not everyone draws flipped images correctly. One place in particular is NSView’s/NSWindow’s -dragImage:at:offset:event:pasteboard:source:slideBack: method which will draw flipped images upside-down. Since you can’t control how the image is drawn, you can instead draw your flipped image into another non-flipped image and pass that in. I’ve added a method to the NSImage category to do this and you can check out the result in the example app (you can drag the image out of the views though only the last one has the corrected version).

And what if you actually want to draw everything upside-down, you irrepressible nut? Well, apply your own transforms using NSAffineTransform or CGAffineTransform. Just remember to concat the transform and not set it (a good general rule when using affine transforms). As long as you don’t tell any classes that you’re flipped, it should work out.

Hopefully this didn’t make things even more confusing (and also, hopefully, my interpretation of all this is correct). If you are still lost then just follow these rules:

  1. Do not set images as flipped unless you know what you are doing.
  2. Use the -drawAdjusted... methods in my category (or similar technique) to do all your image drawing.
  3. If you didn’t listen to rule #1 and you have a flipped image and it is showing up upside-down even when following rule #2, then use the -unflippedImage method in my category to get an unflipped version of the image and use that instead.
  4. Never go in against a Sicilian when death is on the line.

That should handle most cases you run into. And trust me on rule #4.

7 comments » | Cocoa, Downloads, OS X, Programming, Quartz

Positional Sound in User Interfaces

October 23rd, 2008 — 3:50pm

Video games are on the forefront of what kinds of rich interactions people can have with computers. In the past decade, there’s been a push for more and more immersive virtual environments resulting in more advanced APIs and hardware to provide things such as super-fast 3D rendering. In recent years, OS X has leveraged these advances in the predominantly 2D world of user interfaces, often in brilliant ways as seen with QuartzGL, CoreAnimation and CoreImage.

In video games, it’s quite common to exploit stereo output or even better, surround sound, to provide positional audio cues. Just as graphics can simulate a 3D space, so can sounds be placed positionally in the same space. If you, super-genetically-modified-mutant-soldier, are running around on the virtual battlefield and there is some big-bad-alien-Nazi-demon-zombie dude shooting at you from the side, you will hear it coming from that direction and react accordingly. Directional audio cues can supplement visual cues or even supplant them if visual ones cannot be shown (i.e. something requiring attention outside your field of view).

On OS X, sound is used rather sparingly in the interface, which is probably a good thing. But for those cases where it’s use is warranted, why not take advantage of technology available? Just as animation can be used to guide the user’s focus, why not sound? OS X does ship with OpenAL, which is to sound what OpenGL is to graphics, providing a way to render sounds in a 3D space.

I’ve put together a quick proof of concept app (download link near the end of the article). Move the window around the screen and click the button to make a sound. Based on the window’s position, the sound will appear to come from the different sides, which, for the most part is left/right, most sound output systems not being designed to articulate things in the up/down direction. The program itself basically maps the window position to a point in the 3D sound space. Right now, it doesn’t really use the z-axis (the axis that goes into your screen) but conceivably you can do things like make the sound appear further away based on window ordering. Try using headphones if the effect is not as apparent using speakers.

There is a significant technical issue, though. You can’t really know the actual physical dimensions and layout of a user’s screens. In addition, the position of the speakers relative to the screens is also not known. While you can get screen resolutions and relative positions of the screens, these are mostly hints at the actual layout. In my demo program, it is assumed that the screens are relatively close to each other forming one gigantic screen. It is also assumed that the speakers produce a soundstage roughly centered on the primary display (the one with the menubar). It assumes a model like this (the circle is the user and the thin slabs are the monitors, from a top-down view):

screen-setup1.png

In reality, it’s probably more likely the user would have a setup like the following:

screen-setup2.png

But who knows, it could possibly be something like this:

screen-setup3.png

The point here is that the effectiveness of this is dependent on the user’s setup. A particular idealized model would have to be chosen that hopefully works well enough for most people. While pinpoint accuracy is not really feasible, it probably isn’t required either. Human hearing is imprecise, otherwise ventriloquists would never be able to pick up a paycheck. Just an indication of left, right or center is probably enough for these purposes.

Where would this be useful? Well, this all came up yesterday when I received an IM (via Adium). I had my IM windows split up across two screens so I had to scan around a bit to find out which window had the new message. Though the window was on the screen to the left, the audio alert made me look at the main screen since the sound was centered straight ahead. It would be great to see an idea like this implemented in Adium and I’ve filed a feature request with them for their consideration. It’s ticket #11292 so you don’t go and submit a duplicate request.

It would be interesting to see more use of this in user interfaces out there. I don’t want to encourage people to add sounds to their apps if they weren’t already using them but for those that are, it’s something to consider. Overall, the effect is quite subtle but with some tweaking, it can be quite effective.

The link to download the demo program is below. Sorry, no source is provided this time. The code is a hacked together mess of stuff copied and pasted from an Apple example as I have never used OpenAL before. This can probably also be implemented in CoreAudio by adjusting the balance between the channels. If you are considering implementing something like this, email me and I’d be happy to discuss details as long as they don’t involve audio APIs since, well, I don’t know them particularly well.

Download PositionalAudioAlertTest.zip (Leopard only)

Thanks to Mike Ashe and Chris Liscio for advice on CoreAudio, which I ended up not needing as Daniel Jalkut suggested I use OpenAL instead which made things easier.

5 comments » | Downloads, OS X, Software, User Interface

Displaying Line Numbers with NSTextView

October 5th, 2008 — 8:16pm

Yes, it’s free code time again. I’ve been neglecting the blog for some time so hopefully this will make up for it. Think of it as that conciliatory heart-shaped box of chocolates used as a sorry way to make up for forgetting about your birthday, after which, I go back to my old ways of sitting on the couch all day watching sports, ignoring you.

In version 2.2 of Hazel, I added mini AppleScript and shell script editors so that people could enter scripts inline without having to go to another program and saving it to an external file. I’ll admit, I didn’t set out to make an uber-editor since it was intended for small scripts. Nonetheless, a user recently pointed out that when a line wraps, it’s hard to tell if it’s a continuation of the previous line or a new one. One of his suggestions was putting line numbers in the left gutter. If you don’t know what I’m talking about, look at TextMate (the example he cited) or XCode (you need to turn it on in preferences). I thought it might be overkill for a script editor that will mostly be used for scripts less than ten lines long. I’m instead considering doing an indented margin for continuation lines. Less visual clutter and addresses the problem at hand.

Nonetheless, I was curious about implementing line numbers. Poking around, I found some tips on how to do it but it seemed like there were odd problems implying it wasn’t as straightforward as one would think. So, snatching some free time in between other things, I decided to tackle the problem.

I looked into subclassing NSRulerView. The problem is that NSRulerView assumes a linear and regular scale. Now, to make it clear, I am talking about numbering logical lines, not visual ones. If a line wraps, it still counts as one line even if it takes two or more visually. The scale is solely dependent on the layout of the text and can’t be computed from an equation. Despite these limitations, I went ahead and subclassed NSRulerView. If anything, NSScrollView knows how to tile it.

I had this notion that NSRulerView was a view that synced its dimensions with the document view of the scrollview. With a vertical ruler, I assumed it would be as tall as the document and the scroll view just scrolls it in tandem with the document. Not so. It’s only as tall as the scrollview. That means you have to translate the scale depending on the clipview’s bounds.

I added some marker support via an NSRulerMarker subclass that knows about line numbers. The line number view will draw the markers underneath the labels a la XCode (with the text inversed to white). The sample project uses another subclass which will toggle markers on mouse click. While NSRulerView usually delegates this to its client view it made more sense to just do it in a subclass of NSRulerView. You have to subclass something to get it to work and it made more sense to subclass the ruler view since the code to handle markers never interacts with anything in the client view anyways. Personally, I find it an odd design on Apple’s part and would have preferred a regular delegate.

The project is linked below. The main classes are NoodleLineNumberView and NoodleLineNumberMarker. Some notes:

  • To integrate: just create the line number view and set it as the vertical ruler. Make sure the document view of the scrollview is an NSTextView or subclass. Depending on the order of operations, you may have to set the client view of the ruler to the text view.
  • The view will expand it’s width to accommodate the widths of the labels as needed.
  • The included subclass (MarkerLineNumberView) shows how to deal with markers. It also shows how to use an NSCustomImageRep to do the drawing. This allows you to reset the size of the image and have the drawing adjust as needed (this happens if the line number view changes width because the line numbers gained an extra digit).
  • Note that markers are tied to numerical lines, not semantic ones. So, if you have a marker at line 50 and insert a new line at line 49, the marker will not shift to line 51 to point at the same line of text but will stay at line 50 pointing at whatever text is there now. Contrast with XCode where the markers move with insertions and deletions of lines (at least as best as it can). This is logic that you’ll have to supply yourself.

More details, including performance notes, can be found in the Read Me file included in the project.

I’m putting this out there because I’m probably not going to use it and it seems like a waste of some useful code. Also, my apologies to the user who asked for this feature. I feel like somewhat of a jerk going through the trouble of implementing the feature and not including it. It was more of a fun exercise on my part but I still feel it’s not suitable for Hazel. That said, I may consider adding it and having it available via a hidden default setting. Votes for or against are welcome.

In the meantime, you can use the code however you want. MIT license applies. Please send me any bug reports, suggestions and feedback.

Enjoy.

Download Line View Test.zip (version 0.4.1)

Update (Oct. 6, 2008): Uploaded version 0.3. Fixes bugs found by Jonathan Mitchell (see comments on this post). Also made line calculations lazy for better performance.

Update (Oct. 10, 2008): Uploaded version 0.4. Fixes bugs mentioned in the comments as well as adds methods to set different colors. There is a display bug that happens when linking against/running on 10.4. See the Read Me for details.

Update (Oct. 13, 2008): Uploaded version 0.4.1. Figured out the 10.4 display bug. Apparently, NSRulerView’s setRuleThickness: method doesn’t like non-integral values. Rounding up solves the problem. Thanks to this page for identifying the problem.

Update (Sep. 29, 2009): I have included this class in my NoodleKit repository so you should check there for future updates.

23 comments » | Cocoa, Downloads, OS X, Programming

Modal Glue

March 10th, 2008 — 9:51am

Recently, Quentin Carnicelli of Rogue Amoeba asked if there were NSResponder methods that you could hook your “OK” and “Cancel” buttons to to dismiss a modal panel (or sheet). As far as I knew there wasn’t but, gosh darnit, that would be a useful thing to have.

To clarify what I’m talking about here, when you run your own modal window or sheet with “OK” and “Cancel” buttons (or some equivalents), you end up hooking those up to methods that dismiss the window/sheet, stop the modal session and return some code (either one for confirmation or cancellation). Most of the time, you end up writing the exact same code. It’s glue code that shouldn’t have to be written.

Now, if you look at NSResponder, you’ll see all sorts of action methods in place. Sticking these glue methods into NSResponder will allow you to hook up your “OK” and “Cancel” buttons to the “First Responder” in IB. The idea here is that there is a default implementation that will close the current modal window or sheet and set the return code to either NSOKButton or NSCancelButton. With this, your code can act more like it’s using NSRunAlertPanel() or NSBeginAlertSheet() by just interpreting the return code.

I’ve created an NSResponder category with the methods -confirmModal: and -cancelModal: to which you can hook up your “OK” and “Cancel” buttons in IB. Note that you may have to manually add the methods to NSResponder in IB as it doesn’t know about them.

Now NSResponder’s versions of these methods don’t actually do anything besides pass it on to the next responder. The main part is in NSWindow, which overrides it. It will check to see if it’s the current modal window or sheet, order itself out, stop the modal session and send back the appropriate code. By using the responder chain, this mechanism will find the “nearest” modal window. Note that it is assumed here that the buttons to dismiss a modal window are in the same window. If you want to dismiss it from a different window, it may or may not work (depending on the responder chain and other subtleties such as the odd specification of NSWindow’s -isSheet method). I can’t think of a non-contrived case where you’d want this or care but if one comes up, let me know.

So here’s the download. Suggestions, questions, bug reports appreciated.

modalresponder.zip

2 comments » | Cocoa, Downloads, OS X, Programming

The Road To Leopard

October 16th, 2007 — 12:06am

As Apple is hurtling towards a Leopard release, we developers are scrambling to make sure our apps work. With the clock ticking down, I am making Hazel 2.1 beta available for testing. It should be Leopard compatible so if you have access to Leopard, I’d love it if you could download it and let me know how well it works.

I’ve also added a couple new features and a bunch of fixes so even if you are using Tiger, this release should have something of interest. For instance, you can now properly format the “Authors” Spotlight field so you don’t get the annoying parentheses and quotes (chalk that up to me stupidly using NSArray’s -description method). In any case, Hazel should be useful for replicating the iTunes folder structure of artist/album/song now.

I’m looking to go final with this next week so no time like the present to try and break things.

Enjoy: Hazel Beta page

Update (Oct. 16, 2007): It’s official. Leopard is shipping on October 26th, available for pre-order now.

Comment » | Downloads, Hazel, Noodlesoft, OS X

Animation in the Time of Tiger: Part 3

September 20th, 2007 — 12:22pm

In this final installment, we’ll go over some more advanced ways to do animation.

Now, you may find that the types of animations you want to do can’t be handled by NSViewAnimation or that you need better performance. The solution usually involves getting a bitmap of your view or window. Having a bitmap allows you to do all sorts of manipulations and tap into other technologies that you can’t do directly with views or windows.

To get a bitmap of your window there are a couple methods. The first is to use NSCopyBits(). If you go back to the first article in this series, you’ll see that I glossed over this, but the technique is being used there. The window’s pixels are grabbed and the resulting image is scaled in the animation using an alternate window that just looks like the original. You can check out the downloadable project there.

Now there is a potential issue. This technique will not work if the window device has not been created yet. This happens when you mark the window as deferred and it hasn’t been brought on screen yet. To circumvent this for deferred windows, I quickly order the window on and off screen to force creation of the window device. I don’t see a visible flicker but your mileage may vary. If you know of a better way to force creation of the window device on a deferred window, let me know.

The other method is getting the window’s contentView’s superview and grabbing its pixels using one of the methods below. I’m not sure if it’s a good idea or not to be mucking with the contentView’s superview but it’s an alternate way at getting the pixels.

For views, there are a few options:

- drawRect

You could just lock focus on an NSImage and call view’s drawRect:. This will work but only for the current view. Not really useful except for specific cases where you only want this view and none of its subviews.

- initWithFocusedViewRect:

This works for most cases but it does require that the view be installed in some window’s view hierarchy. lockFocus on your view (not the image), create an NSBitmapImageRep and init using the above method, and boom, you got your view’s pixels (and don’t forget to unlock focus).

- cacheDisplayInRect:toBitmapImageRep:

First get the NSBitmapImageRep by calling NSView’s bitmapImageRepForCachingDisplayInRect:. If your view is not opaque, you may want to clear the pixels in this buffer. Call NSView’s -cacheDisplayInRect:toBitmapImageRep: to actually get NSView to draw the pixels into the bitmap. Using this method, the view does not have to be plugged in, so you don’t have to pop the view into the view hierarchy just to take its picture. Useful in the case where you are swapping views in and out and want to animate the incoming view before it’s actually in. This was added in 10.4 so won’t be useful for pre-Tiger.

• • •

Ok, now you have some pixels, what can you do with them?

Well, you can composite the bitmaps yourself and move them around. In general, this should perform better but you have to do more code in general to coordinate the animation than if you used NSViewAnimation.

You can also pipe that bitmap into Core Image. There are all sorts of effects available including a whole class of filters just for transitions. Luckily, Apple already has a good example called Reducer. Check out the AnimatingTabView class.

Another example of using Core Image is Rainer Brockerhoff’s Flipr which flips windows like Dashboard does with widgets.

And lastly, you can use OpenGL. Create a texture out of the bitmap and slap it onto a surface. I’ve done an example demonstrating this. It does something similar to Flipr but it’s using OpenGL and it focuses on flipping views, not whole windows though Flipr’s technique can be used for views as well and this technique can be extended to windows.

For the dev tool impaired, here’s a movie demonstrating the effect:


<a href="https://www.noodlesoft.com/blog/uploads/2007/09/viewflipper.mov">Download movie</a>

The key step here is described in this technote. Basically, you get the view’s bitmap and then convert that into a texture. As pointed out on cocoadev.com here, textures end up being upside down so as described in that article, I flip it. The code on that page also has a more reliable calculation of the pixel row length than the example from Apple’s technote so make sure you use that. From there, I create a slab and map the textures onto the surfaces. I animate rotating on the y-axis and voila! A flipping animation between views.

Details to note:

  • I create a parent view which swaps in the NSOpenGLView subclass to do the animation then swaps it back out. This avoids having to deal with issues of having subviews of an NSOpenGLView.
  • I do a calculation and adjust the perspective/frustum to make sure the view takes up the full viewport when facing you.
  • Notice that the animation gets clipped. Since it extends out towards the viewer, the shape needs to extend beyond the bottom and top bounds. Basically, the parent flipper view and the OpenGL flipper need to be larger than the views to provide an extra buffer. Or you could do it in an overlay window. There are a few more details involved but feel free to email me if you are thinking of pursuing this.
  • To keep things simple and clear (and because I’m lazy), the code here assumes that the views are opaque (if you look in the nib, the views have opaque, tabless tabviews used to draw the background). One could fix the code to grab a bitmap from the nearest opaque ancestor view though it would require having the view installed in the hierarchy.

Keep in mind that the last time I touched these 3D APIs, it was called just GL, not OpenGL, and it was on an SGI machine. So, while this example may be useful for certain details, my OpenGL-fu is weak so you might be better off using other examples for OpenGL specific stuff. Also, if I am doing anything stupid, let me know.

Well, that wraps it up for this series. I hope you gleaned something useful from it.

Comment » | Cocoa, Downloads, OpenGL, Programming

Animation in the Time of Tiger: Part 2

September 3rd, 2007 — 4:28pm

As promised, here’s part 2 of my animation miniseries. The topic for today: NSViewAnimation

In the last segment, we talked a bit about using NSWindow’s -setFrame:display:animate: method to do some window animations. In conjunction with setting the autoresize flags, you can get some nifty effects.

Many times, though, you need more control. Maybe you want to animate some views (not just windows) or maybe you want to change the rate of animation. For such cases, NSViewAnimation is the answer. NSViewAnimation allows you to set up dictionaries containing views or windows with their start and end states and then animate them. Since it is an NSAnimation subclass, you have control over whether it blocks, how long it takes, the animation curve, etc. If you aren’t familiar with NSViewAnimation, I suggest reading the docs and playing with it yourself.

Now, there are a couple quirks/bugs you need to keep in mind. Knowing these will save you some headaches:

  • If a view has a final frame with a zero dimension (width or height), NSViewAnimation will set it to be hidden when the animation finishes. If you use that view again in an animation (like doing a reverse animation of what you just did), NSViewAnimation will not unhide the view for you. You have to do setHidden:NO yourself before starting the animation. The exception to this is if you use a fade in effect, in which case, NSViewAnimation will unhide the view.
  • NSAnimationCurveEaseOut is broken. It seems to animate backwards. Yes, you can try and work around it and swap the beginning and end frames and such but, when Apple does fix it, you’ll be in for a surprise. I say just avoid using it.

For the purposes of this article, we will be using this project. It demonstrates animating between two views using a variety of basic transitions. If you use Keynote, these should be familiar (I’ve even used the Keynote names). The Dissolve transition needs little explanation; NSViewAnimation’s NSViewAnimationFadeInEffect and NSViewAnimationFadeOutEffect work as advertised. The other effects are variations on a right-to-left transition. They are different combinations of the views either moving in/out of bounds or being revealed or covered. This is achieved through use of clipping (via the view hierarchy) and the autoresizing masks.

viewport.png

Basically, we have two “viewport” views. In doing a transition from right to left, we shrink the left view while expanding the right. Their main job is to clip the view they contain. When used in conjunction with the resizing masks, you can get different effects, the diagram above showing a “Move In” transition.

springs-struts.png

In the diagram here, the blue rectangle is the superview (viewport) of the visible view. I’ve made the rect larger than the view to show the resizing springs/struts but in actuality the viewport is the same size as the view (i.e. its bounds are flush with the contained view). In this case, we have a viewport with a containing view whose left margin is resizable but the right margin is fixed.

reveal-transition.png

Now, let’s say the viewport starts at zero-width and expands out to the left while the view itself is positioned so that it’s right edge is flush with the viewport.

As you see, since the right margin is fixed, it appears as if the view is being revealed as the viewport expands to the left. Note that the autoresizing works just as well when the view is larger than its superview.

To make it appear as if the view is moving in towards the left instead (like in the “Move In” and “Push” transitions), make the left margin fixed and the right margin resizable.

Likewise, you can fiddle with the autoresize masks for the outgoing view to affect how it disappears (either pushed off or covered).

For those unable to compile the project, here’s what it all looks like:


<a href="https://www.noodlesoft.com/blog/uploads/2007/09/transitions.mov">Download movie</a>

As you can see, NSViewAnimation can be quite useful for when your animations involve moving and scaling views. In the next article, I’ll probably just go over some odds and ends such as optimizations and using Core Image transitions.

9 comments » | Cocoa, Downloads, Programming

NoodleLabs: Fix for Mac Pro headphone behavior

July 12th, 2007 — 12:52am

I’ve done it. I’ve joined the 8-core club. Historically, I always shoot for the sweet spot in terms of price/performance but this time I thought I’d splurge for once and get the octocore (or is it octacore?) Mac Pro. Realistically, it’s a bit overkill. Sure, Hazel now compiles 5x faster but it’s not like I’m doing full builds all the time and it didn’t take all that long before either. Nonetheless, it’s a great machine. There’s one thing about it that bugs me, though.

On my Powermac, when I plug in headphones, it automatically switches sound output to them, even if I have external speakers connected to line-out. Basically, the headphones, internal speaker and line-out are treated as three devices sharing a channel. To me, it makes sense. If I plug in my headphones, it’s because I want to listen through them. If I pull them out, it’s because I want audio to go back through the speakers. Most every piece of consumer audio equipment I’ve used operates like this.

On the Mac Pro, that has changed. The line-out is a separate output and is unaffected when you plug in headphones. So, if you are using external speakers, you have to go into System Preferences and manually change the output audio device to headphones. You could use something like Rogue Amoeba’s SoundSource to switch output devices in a more convenient fashion but nonetheless it’s a manual process. This Apple doc describes the change but it sounds like an engineering decision imposing itself on the user. I don’t care if it’s now orthogonal and consistent; I want it to be useful.

Well, the nice thing about being a programmer is that you can solve the problem yourself. So, I went ahead and created headphoned (read it as “headphone-d” like a unix daemon). All it does is sit there and watch for when the headphones are plugged in, at which point it switches audio output automatically. When the headphones are unplugged, output reverts back to whatever device was selected before.

I’ve never touched the CoreAudio API before so please excuse the naiveté of the implementation. Suggestions and improvements are most welcome. A big thanks to Vincent Gable, author of IMLocation for this article which gave me a big headstart.

There seems to be a problem where the audio will wedge when plugging/unplugging. I found that updating with Apple’s recent audio fix got rid of the problem (or maybe it’s wishful thinking on my part but I haven’t experienced it since). If you find it does happen, just plug the headphones in/out again as that usually unwedges things. Also let me know if you experience this even after updating with Apple’s fix.

And, of course, it’s free (MIT License). Do what you will. It’s a bit rough around the edges (no automatic install), but I figure if you are using a Mac Pro, you are less daunted by the command-line. I’ve included a launchd config. Install it in ~/Library/LaunchDaemons and edit it to reflect where you put the executable. Note that it doesn’t seem to work if it runs as root (I think it needs to run as the console user), so don’t bother installing it at the top level LaunchDaemons directories.

Enjoy.

Download headphoned-1.0.zip

Update [Sep. 5, 2007]:

Rogue Amoeba has now integrated this functionality into SoundSource. The announcement is here. You can grab it from their freebies page (and yes, it is free).

21 comments » | Downloads, OS X, Programming, Software

Animation in the Time of Tiger: Part 1

June 30th, 2007 — 3:12pm

One of the most touted APIs in Leopard is CoreAnimation. Soon, you will be able to easily put together animations with tons of crap flying around all over the place. And with the new APIs, it’ll be a snap! Ok, ok, so there are some nice, tasteful animations that can be done and with Leopard they can be done easily. Fact is, though, there’s a good bit of animation you can do right now in Tiger (or earlier).

Why bother? Well, not all of us are dumping our Tiger users come October plus you could stand to learn something if you follow along. So, over the next couple months, I’ll be doing sporadic installments in this series. I’m not sure how many as I haven’t thought that far ahead but let’s say at least two, probably three.

Now, I feel that it’s important to lay down some guidelines. Animation in applications is subject to severe abuse. What may seem neat the first time can quickly become tedious if you are using the app on a daily basis. Too much movement in the interface can make for a visually noisy user experience or cause annoying delays. For the most part, use animation sparingly and with a purpose. Good uses would be to draw a connection between the start and end states of a transformation or to draw the eye from one part of the UI to another. A rule of thumb: if you feel the need to provide a preference to turn your animation off, maybe the animation is too intrusive. Remember, with great power comes great responsibility.

Before we delve into things, I want to point out that most of the animation techniques I’m going to talk about here pertain to NSWindows and NSViews. For various reasons, it is much easier to do animations with views than with, say, NSCells. What this means is that if you have a list of items using an NSMatrix or NSTableView and want to animate them, you may want to consider converting them into a bunch of views. While it is possible to write a control that animates its cells, you have to do a bit more work. Most of the animation hooks available operate on the view level, something that is further emphasized in CoreAnimation.

NSWindow animation

In NSWindow, you already have a powerful method at your disposal. With -setFrame:display:animate: you can set a new frame for your window and by specifying YES to the animate flag, the window will animate from its current frame to the new frame. Not too exciting? Well, try this on for size:

This effect is similar to how windows animate when you use the “Scale Effect” instead of the “Genie Effect” when minimizing windows (check your Dock preferences). You can download the project here. This is all done in an NSWindow category using documented API. While there’s a little magic of getting the window’s pixels (will probably talk about view/window caching in a future installment), the animation itself is done via the setFrame:display:animate: call. Ok, I fudge things slightly by overriding -animationResizeTime: to make it animate faster but the point is that you can do some interesting things with a basic call.

Autoresizing

When you animate, another thing you can take advantage of is the autoresizing mechanism (those springs and struts you see in IB). By setting up the autoresizing flags on your views in creative ways, you can do some neat little animations without having to muck with specifying all the different frames.

In Hazel’s (as well as in Mail’s) rule interface, when you create a new row, notice how all the rows below the new row shift down as space for the new row “grows” in. This is all done via setting the autoresizing masks (at least that’s how I do it; I can’t speak for what actually happens in Mail). Note that the autoresizing masks don’t have to be something you set once in IB and never touch again. Here, I reset them on the fly as needed. For the rows above the inserted row, the bottom margin is set to sizable. For rows below the insertion point, the top margin is set to sizable.

autoresizeanimationdiagrama.png

You need to put the new view into the hierarchy at some point. If you add it before the animation, you need to tweak with its size and autoresizing (make it height sizable). If you add it after, the view “pops” in but it happens fast enough that users will probably not notice. Now, I just resize the window (with animation) and all the views fall into place:

autoresizeanimationdiagramb.png

You do something similar when a row is deleted. Note that this is mostly effective when only one view in the window is resizing (and the others just moving) in a particular dimension as the resizing mechanism produces less than ideal results when more than one view is resizing.

So, that’s it for now. In the next installment, we’ll dig into NSViewAnimation and also have some more fun with autosizing flags.

5 comments » | Cocoa, Downloads, Programming

Back to top