Hazel 3.0 beta

September 12th, 2011 — 12:07pm

After all the delays, dead ends, procrastination, wool gathering, futzing around and some actual hard work, Hazel 3 is finally open for beta testing. There’s no set duration for the beta period; it ships when it’s done.

If you’re feeling lucky, you can get the details from this forum article (you need to register for a forum account if you haven’t already). By the way, I hear Time Machine is pretty cool.


1 comment » | Business, Downloads, Hazel, Noodlesoft, OS X, Software

Hazel is 5!

September 5th, 2011 — 11:02pm

Five years ago today, I shipped Hazel 1.0.

Hazel started as a personal project that I wrote for my own use but over time I realized that this might be useful to others. Sometimes you just have to dive in. I quit my job to work on Hazel full-time and some months later, I finally shipped my 1.0. Sales were modest at first but over the years it’s paid off. It was a lot of work but it was worth it. If anything, I’ve clocked in more hours over the past few years working pantsless in my home office than over my entire career previous in various other offices.

This blog has been quiet for a while mainly because I’m still at it. Hazel 3 is nearing the testing stage (expect a beta release and more details soon). It’s a bit overdue; I was hoping to release before Duke Nukem Forever but then again, they had bit of a head start. With each new version, I feel like Hazel is fulfilling the vision I had when I first released it five years ago, and then some. Of course, I could never predict the new and interesting ways you have used Hazel over the years and hopefully you, the users, will help shape the product for many years to come.

Enough about the future. It’s Hazel’s birthday today and in celebration, you can get 20% off until midnight tonight (Tues, Sep. 6, Eastern time). Just use this link. Most of you reading this probably have a copy already but I’m sure you have a friend/relative/corporation with deep pockets that could use a copy (or twenty) so send the link along to them. Or buy an extra copy for yourself because you’re just crazy like that. And while you’re at it, have a drink on Hazel’s behalf, or even better, have a drink (or five) before you hit that order page. I hear you save more money have more fun that way.

8 comments » | Business, Hazel, Noodlesoft, Software

The Proper Care and Feeding of NSImage

April 15th, 2011 — 10:17am

[This was the topic of my presentation at the NYC Cocoaheads meeting last night. I thought it would be nice to also post on the topic here.]

[I’ve received email from Ken Ferry. See addendum at the bottom]

NSImage is a troublesome class. Over the years, it’s been misunderstood and abused. I think much of this is because of a lack of conceptual clarity in the docs and examples and the API itself can be confusing and misleading. Add to this having to mix with CGImage and CIImage and you can end up with a confused mess.

The way I like to think of NSImage is that it’s a semantic image. When you look at icons, they are made up of several versions at different resolutions. Technically, it’s 4 or 5 images but NSImage wraps those all up into one notion of an image. Semantically, it is an icon of, say, a house but underneath it’s made up of several actual images of a house. The main reason for these different versions is that some graphics do not scale well and it helps to have hand tuned versions, especially for the smaller sizes. You can also do things like omit certain features in the smaller sizes to simplify the graphics and make the icon more recognizable.

One key misunderstanding is the notion that NSImage has actual image data. While there are parts of the API that deal with a cached bitmap (more on this below), NSImage itself is not based on image data. It is best to think of NSImage as a mediator between the image data in the various representations and the drawing context.

Structure3

Loading an image from a file and drawing it is usually straightforward. If there are multiple representations, NSImage will figure out the correct one to use when drawing it. Most of this is automatic and is an important key to understanding how to use NSImage. As you will see further on, bypassing this mechanism leads to many issues with size and resolution mismatches when processing NSImages.

I’ve created a little program to help illustrate the points in this article. Since it also includes a new reusable class, I’ve included it in my NoodleKit repo. I suggest checking it out. Just compile and run the ImageLab target (you may need to set the active executable in XCode in the project menu). The rest of this article will be referring to it so I recommend you run it while reading the rest.

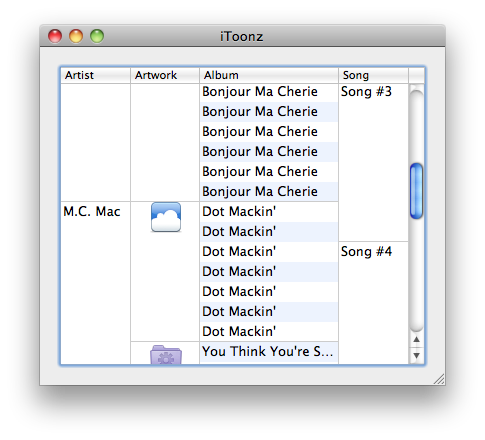
When you launch the app, it will load the test image. It’s just a colored circle. Now resize the window. You’ll see that the color changes as you resize. The icon itself is made up of four different sized images and to make it clear which representation is being used, I made the circle different colors for each one. Whenever the color changes when you resize, NSImage is switching to a different representation based on the size. Here’s what the different reps look like in Preview:

original

Size is another confusing aspect of NSImage. One thing to remember is that size is not pixels. It represents a coordinate space. One way to think of it is that NSImage’s size is like NSView’s frame while NSImageRep’s size is like NSView’s bounds. For NSImage, its size is a suggested size to draw the image in the user coordinate space. If possible, it’s best to explicitly specify the destination rect.

Let’s take the case of drawing some custom graphics on top of an existing icon with several representations, like drawing a badge over your app icon. A common way to do this is to lock focus on the NSImage, do your drawing, unlock focus and then draw the resulting image. What -lockFocus actually does is allow you to draw into a cache. This has probably lead to a lot of the misunderstanding that NSImage holds image data. Unfortunately, there are issues with this approach. Mainly, because there is no context about where this image will be drawn so the resulting image is tied to a specific resolution. Also, you are editing a cache so none of this image data is reflected in the original image reps and actually, from poking around, it’s actually destructive in that it may end up removing any other representations.

In our case here we are modifying an icon with different sized representations, what we end up doing is locking the resulting image into the size that happened to be set on the original NSImage. In many cases, you may not know how and where this icon will be used but if any scaling is involved, you may end up having an icon with the wrong version being displayed. In the example program, select “Modified (lock focus)” in the pop-up. Here it picks the 64×64 version (as indicated by the green circle) which becomes a problem when you scale the image up as shown on the left in the image below.

lockFocus

The one on the right is a version which uses an  NSImageRep subclass (select “Modified (custom image rep)” in the pop-up). Notice that it picks the appropriate size as you resize the window. Why is this the case? It’s because NSImage doesn’t ask the image rep to draw until the NSImage itself is drawn. At that point, you actually have information about the destination, including how big it will actually appear on screen. NSImage is able to use this context to determine the right match between different sized images and the resolution of the output context. The same goes for any drawing code.

Subclassing NSImageRep is quite easy; you just need to override the -draw method. I’ve made it even easier by providing NoodleCustomImageRep which takes a block, allowing you to create images without creating a new subclass.

Say, though, you are drawing an image that should scale without pixellation, like drawing a square. Surely, you can just lock focus on an NSImage and draw a square and scale that as needed? Well, Mr Smarty Pants, take a look at the example program. Select “Drawn (lock focus)” in the pop-up.

square


Here, you’ll see odd fuzziness around the edges. What’s going on here? It’s not anti-aliasing but instead the graphics context where the image is being drawn has image interpolation turned on. As a result, the AppKit is trying to interpolate the image from it’s original size to a much bigger size.

How do you fix this? You could try turning off image interpolation in the destination graphics context but this isn’t always possible or desirable. The better solution is just like before: use a custom image rep to do the drawing (select “Drawn (custom image rep)” from the pop-up). Since the drawing occurs at drawing time, instead of image creation time, it knows about the context it is drawing into and therefore can provide your drawing code with a context at the correct resolution. The crisp square on the right speaks for itself.

Let’s take another example. Say we want to take an existing image and run a Core Image filter on it. Somehow you have to convert your NSImage into a CIImage. This usually entails a game of connecting up various methods that fit together until you got a CIImage. A common way to do this is:

ciImage = [CIImage imageWithData:[nsImage TIFFRepresentation]];

This dumps the whole image (all of its representations) into TIFF format which is in turn, re-parsed back into data. Now, CIImage is pixel based so it ends up picking one of the representations. It’s not documented which representation is picked since there’s no way to specify the context where it will be drawn so there’s a chance it won’t be the right one. Select “Core Image (TIFF Rep)” in the pop-up and you get something like the image on the left (or maybe you won’t; read on):

coreImage

Now, it doesn’t look too bad here. It took the highest res representation and used that. That said, technically, it’s not correct. The version on the right (select “Core Image (custom rep)”) shows the correct image rep being used. Also, my experience has shown that the representation chosen by the -imageWithData: method can be different on different hardware and that it ignores the size set on the original NSImage so you may not be so lucky depending on what machine your code runs on.

Fortunately, Snow Leopard introduced a new method: -CGImageForProposedRect:context:hints:. As mentioned before, when you draw an NSImage into a context, it will automatically pick the right representation for that context. This method does basically the same thing but without the drawing part. Instead it returns a CGImage which you can then use to create your CIImage:

cgImage = [nsImage CGImageForProposedRect:&rect context:[NSGraphicsContext currentContext] hints:nil];
ciImage = [CIImage imageWithCGImage:cgImage];

Keep in mind, though, that it the image returned might not be the exact size you wanted. This becomes more of an issue when you are combining multiple images together in a CIImage pipeline and you need them all to be the same size. You can adjust for this by using CIImage’s -imageByApplyingTransform:.

In addition to the above method, Snow Leopard introduced -bestRepresentationForRect:context:hints: which does a similar thing but returns an image rep instead. Depending on your needs, you can use one or the other to tap NSImage’s image matching logic.

Finally, a note about performance. NSImage does keep a cache based on the drawing context. This helps for when you repeatedly draw the same image at the same size over and over. If you end up sharing an NSImage across different contexts, you’ll find that you are defeating the cache. For these cases, you should be copying the NSImages. Remember that NSImages are just mediators between image data and drawing context. NSImageReps are the actual image sources and, starting with 10.6, reps like NSBitmapImageRep do copy-on-write making it inexpensive to copy NSImages and their reps.

In the example app, there’s a field which shows the time taken to display the image. You’ll notice that when you resize the window, the cases which use a custom image rep are slower as it has to recache whereas the lockFocus cases don’t since the image is static. If this becomes an issue, you can turn off caching or use a fixed resolution image during a live resize. Another more subtle piece of business is performance when drawing from the cache. If you click the “Redisplay” button, it will cause the image to be displayed again. Since you aren’t changing the size, the cached version can be used. Notice how the versions using the custom image rep are usually a smidgen faster than the lockFocus versions. I suspect what is happening is when you lockFocus on the image, you lock the cache into a specific version and size. As a result, if you are drawing at any other size, it has to scale the cached image every time. With a custom image rep, it’s cached at the exact size so the cache can be used as is.

What are the lessons here?

  1. When defining your image, you should use an NSImageRep subclass and override -draw. If you don’t want to create a whole subclass just to create an image, use my NoodleCustomImageRep (included in NoodleKit) which allows you to pass in a drawing block. Using an image rep gives your drawing code better contextual information than you would get just drawing in a -lockFocus.
  2. If you follow point #1, then you can let NSImage make the decision of which representation to use. Use  one of the drawing methods, -CGImageForProposeRect:... or -bestRepresentationForRect:... and you’ll get the best sized representation for the job. Do not assume, though, that this representation will be the actual size you want. When drawing, it also helps to specify the rect to draw into.
  3. Avoid using -lockFocus. It doesn’t produce the correct image in different contexts and can be destructive in terms of kicking out the other reps in the NSImage. While still ok in specific circumstances, you have to know what you are doing.
  4. If using the same NSImage in different contexts, copy it. In 10.6 onwards, this is an inexpensive operation as bitmap data is copy-on-write. Copying NSImages is is also a good idea in case some decides to use -lockFocus on the image (see #3).

If you have access to it, I highly recommend watching the video for Ken Ferry’s session at WWDC 2009: Session 111: NSImage in Snow Leopard (you may need a developer account to view/download it). Much of this is derived from that presentation and it has even more interesting bits about NSImage than what I’ve presented here.

And in case you missed it above, you can find NoodleKit (which contains NoodleCustomImageRep as well as the example program) here.

Addendum (Apr. 18, 2011):

I received an email from Ken Ferry himself pointing out a couple things. Mainly, that as of 10.6, lock focusing doesn’t draw into the cache anymore. It creates a representation whose context is suited for the main display. It is still good for images which are meant for that context. Also as the NSImage context will maintain any size-to-pixel ratio that is on the main display, it can still be used in this situation should resolution independence come into play. It’s not much different than before in this respect but it’s not as volatile as a cache, which I believe is the key point here.

That said, all the caveats above about using -lockFocus still hold true. It’s not so great for when the image needs to be scaled or if you have representations you want to keep (it does remove all other reps when you lock focus). Also, because the representation is tied to the machine, it’s not very suitable for persisting.

Comment » | Cocoa, Downloads, Icons, OS X, Programming, Quartz, User Interface

Life with the MacBook Air

January 4th, 2011 — 12:13pm

Last month, I picked up a MacBook Air. I had only gotten my 13″  MacBook Pro a year previous and it’s a bit uncharacteristic of me to pick up a new machine so quickly afterwards. Before the MBP, I had a PowerBook 12″ which should give you a sense of how long I tend to stick to a machine before upgrading.

I had been eyeing the MacBook Airs ever since they were introduced. Now, keep in mind that for how I work, a portable machine is a secondary machine. I’ve always have some sort of heavy iron desktop machine that I use the lion’s share of the time. The laptop is mostly used for travel. Therefore, portability is a primary concern. I don’t want it too heavy or too big.

I also don’t need tons of storage. In fact, I try and store as little unique data on my laptop as possible. Because of the increased potential for laptops to be lost or stolen, I consider the copy of the data on it to be expendable. I make sure that important data is either centralized or replicated somewhere else. I use FileVault to keep the data from prying eyes. Code is checked in to a version controlled repository somewhere else. Email is all via IMAP. I use MobileMe to sync. Music I have on my iPhone or I stream from my desktop machine. The point is that if I lose the machine, all I lose is the hardware. As a result of all this, I find that I don’t need all that much storage space nor the potential to swap a new drive for more space. My laptop only needs enough space my “working set”.

The other priority in a laptop is some level of performance. I don’t need the fastest Mac but I do need something that doesn’t get in the way of doing work. As a result, a year ago, I ended up picking the MacBook Pro over the Air as, at the time, it didn’t seem as if the Air was beefy enough for my needs as a developer.

That changed with the newest round of Airs. After getting some early adopters of the new MBAs to do some compile tests for me, it appears as if the top of the line MBA 13″ now compiles as fast as or faster than my MBP from last year. The combination of the now standard SSD, the upgraded CPU, and memory option of 4 gigs make it competitive with the MBP 13″.

Note that I didn’t consider the 11″. 12″ is probably the smallest screen I can tolerate. Also, the higher performance options are only available on the 13″.

Overall, the Air feels snappy. The machine feels faster than what its specs would indicate. Development is great. Compiles are sufficiently zippy (though still can’t touch my Mac Pro). Recently, I did a presentation at my local Cocoaheads meeting. A good bit of it was using Instruments and at the end, people were surprised that it was done on the Air.

Traveling around with it has been a breeze. While, it’s not so light that it feels like nothing (it still feels substantial, which is not such a bad thing), it does feel light enough that I don’t feel the fatigue that I’ve felt carrying around my MBP for long stretches. I haven’t had the opportunity to have it around for a full day at a conference yet but I look forward to carrying something lighter this time around.

A pleasant surprise was the screen. I was never a fan of the glossy screen and I’m happy to report that the one on the Air, while not matte, is not as reflective. Another nice bit is that audio is now transmitted via the mini-displayport output allowing you to transmit audio and video via a single HDMI cable to your TV. Note that you need an adapter that supports transmitting the audio as not all of them do. I know this is in all the recent Apple laptops but I thought it was worth pointing out that this feature is still continued in the Airs.

Now, it’s not all roses. If your CPU is under load for more than a couple minutes, the fans will kick in. I do notice the fans rev up more than on my MBP. Usual culprits are Flash and games. Fortunately, it usualy doesn’t happen when doing builds since most of my compiles are incremental. Actually, I can do a full debug build of Hazel without the fans going off though a release build definitely triggers them. That said, a month in, it feels like it’s happening much less, as if the machine were broken in. It’s probably my imagination or maybe it’s me becoming more accustomed to the fan noise to the point where I don’t notice it.

One annoyance for me is that the power button is now a regular keyboard key located in the upper right corner.

keys.png

The Air retains the eject button for the rare case where you bought the external optical disk drive and have it hooked up. As a result of all this, this screws up my muscle memory when changing the volume since I’m used to the volume keys being just one key in from the right, not two. If they insist on keeping the eject key, then I’d prefer the power button off the keyboard, seeing as how I almost never turn the laptop off. And unfortunately, it will be hard to adjust to since it is different than every other keyboard I currently use (which are all made by Apple, by the way).

All these nitpicks are just that, nitpicks. In no uncertain terms, I love this machine. It fits what I need it for. I consider it an upgrade from my MBP. It’s faster (SSD + better GPU). It’s lighter (by over 1½ pounds). It has a higher res screen. Albeit, yes, I could have gotten a current generation MBP with an SSD but I’m more than willing to shed the pounds for last year’s performance levels. It feels quick and agile both digitally and physically. In many respects, this is the laptop I’ve always been waiting for.

And if anyone is interested in a 2009 MacBook Pro 13″, drop me a line. I’ll throw in a free family pack of Hazel if you contact me before I put it up on eBay.


4 comments » | Hardware

Fun with Glue

July 5th, 2010 — 11:41am

In my last post, I introduced a little adapter class called NoodleGlue. It’s a simple class that wraps around a block allowing you to use it as the target and action for APIs that require it. It also optionally can take an extra block that is executed when the glue object is deallocated. This allows you to do any cleanup. In my NSTimer category from last time, I used this cleanup ability to allow the object to unregister from any notifications. Being a category, I couldn’t hook into the -invalidate or -dealloc methods of NSTimer so I created a glue object with a clean up block which I then set as an associated object on the timer. As a result, when the timer was deallocated, so would my glue object and my cleanup block would be triggered.

In more general terms, what does this mean? With my glue object plus the associative references feature, you can inject your code into any object’s deallocation sequence. It’s like being able to be notified if any object is freed. I’ve wrapped this up in an NSObject category with a new method, -addCleanupBlock:, which allows you to add a block to be invoked when the object is deallocated. It’s probably more of a proof of concept than something you’d want to use in production code but you can find it in the latest version of NoodleKit (it’s tacked onto the end of the NoodleGlue class).

Now, this sounds pretty cool on paper but this may be one of those cases of a solution looking for a problem. Not to be deterred, I’ve come up with some contrived cases that might actually be useful.

Add extra cleanup for extra stuff you attached to an object

It’s how I used it in my NSTimer category. You can unregister notifications and invalidate objects which need more than just a -release call.

Zero out references

One of the cool things about weak references in a GC environment is that they nil themselves out when the object is collected. You can simulate this behavior when using retain/release by setting up a cleanup block to nil out your reference to the object in question.

Tracing/debugging deallocations

Sure, you can do this in the debugger or Instruments but in some cases you want to trigger more involved code that you can’t do in gdb. Also, in a multithreaded program where the timing affects whether the bug shows up or not, this allows you to track deallocations without setting a breakpoint in the debugger which might otherwise change the timing.

Test if objects are actually deallocated (unit tests)

Credit goes to Guy English for this one. If you need to do a unit test where you want to test your memory management, you can “do the glue” to test that objects actually get deallocated. The problem here is if it’s not working (i.e. object doesn’t get deallocated), your block won’t get called so any assertions you put in there will just silently not happen. So, have your block set a variable and at the end of the test, do an STAssertTrue() on the variable.

• • •

Keep in mind that there are a couple of important caveats:

  1. You cannot retain the object you are “observing” in the block itself as this will create a retain loop and the observed object (as well as the glue) will never be dealloc’ed. Note that just referencing an object retains it unless you assign the object to a variable declared with __block. This has already been done for you in my code as the cleanup block is sent a non-retaining reference to the object being freed so use that reference instead.
  2. 
    	[self addCleanupBlock:
    		^(id object)
    		{
    			// Do not reference "self"
    			[object doSomething];
    		}];
    
  3. It’s not defined when in the deallocation process the associated object is freed. As a result, you can’t rely on any state of the observed object as it may be the case that all its ivars have already been released. But, you can have the block “capture” variables and the block will retain and subsequently release them. For instance, if you want to log the “name” of an object as it’s deallocated, you can reference the name in the block and it will be retained. But be careful though, if you reference an ivar in the object directly, you end up retaining that object. So, if the observed object is creating the block and you access its ivar in that block, you end up implicitly retaining the observed object, which is in violation of point 1 above. In those cases, assign the ivar to a local variable and use that (in this case, do not use __block in the variable declaration as you want the block to retain the object.
  4. 
    	NSString	*localName = _name;	// _name is an ivar
    	[self addCleanupBlock:
    		^(id object)
    		{
    			// Do not reference _name here as that will implicitly retain self
    			NSLog(@"Object %@ has been deallocated.", localName);
    		}];
    

I suggest reading up on the memory management issues with blocks as described here. Joachim Bengtsson has a great article on blocks (that link goes to the section relevant to this article but I recommend reading the whole thing) and there is always Mike Ash’s reliable series of articles on the subject, which I have consulted many a time myself.

Comment » | Cocoa, Debugging, Downloads, OS X, Programming

Playing with NSTimer

July 1st, 2010 — 2:51pm

It’s been a long while. Part of it is that I’ve been busy working on Hazel 3. And since I’m not interested in writing a book, I’m finding it hard to be motivated to keep posting here. Nonetheless, every so often I have to let something squirt out.

Today, we are going to talk about NSTimer. One thing you may or may not have noticed is that in certain cases where time is suspended (putting your machine to sleep) or altered (changing the clock), NSTimer has a tendency to try and compensate. For instance, say you set a timer to fire in an hour. You close the lid on your MBP and come back 30 minutes later. You’ll see that the fire date for the timer has adjusted to take into account the time it was asleep. Here’s a quickie diagram for those not quite following:

timer-timeline.png

Now, this is great if you wanted a timer to fire an hour later in the machine’s conception of time. But there are times when you want it to fire on the actual date you set on it. Typical example is setting a timer for a calendar appointment. That time is an absolute point in the user’s timeline and you don’t want that timer to shift to compensate for the machine’s timeline.
The basic fix here is when one of these time-altering events occurs, you reset the fire time on the timer to the original time that was set on it when it was created. Luckily, there are notifications for when the machine wakes from sleep as well as when the system clock is changed (this one being new in 10.6). Naturally, one would think to make an NSTimer subclass as the most straightforward way to do this. Unfortunately, it seems that it doesn’t work. Even if you get over the hurdle that NSTimer is actually abstract (like a class cluster), you have to add the timer to the run loop to schedule it. While NSRunLoop seems to accept the NSTimer subclass, it doesn’t ever fire. I don’t know if NSRunLoop is looking for the NSTimer class specifically or if it’s calling some private method that I need to override. If someone else has had any luck doing this, drop me a line.

The alternative is a category. The problem is that we need at least one ivar to store the original fire date. Normally, you can’t add ivars in a category but in this glorious post-10.6 age, we can, via associative references. It’s basically just a dictionary where you can store variables associated with an object. Sure, you could have implemented that yourself but the nice thing is that it handles memory management as well. When the object is dealloc’ed/collected, depending on the memory management you specify, it can also release/collect any associated objects.

So, NSTimer category it is. It supplies the method (among others) +scheduledTimerWithAbsoluteFireDate:target:selector:userInfo: which creates and returns an autoreleased and scheduled timer that will fire on the given date regardless of any time fluctuations/lapses. If all of a sudden the fire date has passed (like if the machine was asleep during the fire date or if the system clock was set ahead), it will fire immediately. Note that calling -setFireDate: won’t quite work in the sense that if the timer ever has to be reset from a time shift, it will be set to the date used when creating the timer, not the one that you set it to afterwards. This is an implementation limitation as I am using a category and can’t override methods (at least not without doing some method-swizzling which is not something I want to deal with). In cases where you need to change the fire date, I’d suggest just creating a new NSTimer.

I’ve also included a test harness where you can see it in action compared against a timer running in normal (non-absolute) mode. When run normally, both timers should fire at the same time but you can test things out by changing the system clock or putting your machine to sleep. You’ll see that the regular timer’s fire date will start to drift out while the “absolute” timer will stick with the time originally set.

I also went ahead and added methods to have NSTimer to use blocks instead of a target/selector combo. Note sure why this wasn’t in there already but I thought it’d be useful.

And that’s not all! Included is my NoodleGlue class. It’s a simple little class that just wraps a block (plus another block for cleanup, if you need it). It’s useful for cases where you want to set a target and selector for some object to use but don’t want to create a new class or method for it. Check out the source code for the NSTimer category to see how its used both with NSTimer (to implement the block API) as well as NSNotificationCenter. In the latter case, there is a blocks-based API but I had special memory management requirements that couldn’t be done with the existing API.

Needless to say, this extension only works on 10.6+. It’s in the latest version of NoodleKit and as a result I’ve made NoodleKit require 10.6 as well. Just build and run the TimerLab target. Fixes and suggestions welcome.

[Update 8:35pm EDT] I neglected to push the code to the github repository. Sorry about that. Everything should be there now.

7 comments » | Cocoa, Downloads, OS X, Programming

Adventures in Email Hosting

December 17th, 2009 — 12:06pm

As I’ve mentioned before, Noodlesoft’s online operations are happily hosted on Slicehost. A while back, I migrated my site and databases from DreamHost to Slicehost and haven’t looked back. Ok, well, not exactly. I didn’t migrate my email hosting over. There were several reasons for this:

  • Setting up and maintaining email software with all the features you want is a bit of a pain.
  • I wanted redundant MX servers. Getting another slice to do that is a bit costly.
  • I didn’t want email service to go down with my web site.

For the time being I left email on DreamHost. It’s a hard habit to kick. They provide tons of bandwidth and disk space for cheap. Of course, given enough time, DreamHost will disappoint you and disappoint they did. They changed the MX servers on me without notifying me. Since I have my DNS hosted elsewhere, I need to be warned ahead of time so I can do the proper DNS change. Not only that, there didn’t seem to be an overlap so mail going to the old MX was being bounced. Not acceptable. It was at this point I decided to get all my business operations off of DreamHost. It only drilled the point home when DreamHost would sporadically fail to resolve some mail aliases for a while afterwards.

What was I looking for in an email hosting provider? Several things:

  1. Reliability. This is where DreamHost seems to falter time and time again. With DreamHost, not only do things seem to go wrong more often, but their handling of the situation is unprofessional.
  2. Easy migration. This seems to be a bit more commonplace now. Providers now have a way where you can point their server at yours and have it suck out all the mail and folders. Even better if you can do it incrementally after the initial run to catch the extra emails that end up going to your old MX during the DNS transition.
  3. Support. I expect support to be accessible, responsive, competent and diligent. This is one of those times where I want to pay. With free, you have no leverage to get them to fix a problem in a timely fashion. This is my business here and I can’t afford to have unresponsive and unhelpful support if the service goes down.
  4. Features. This will be different for everyone but for me, I just need basic things like SSL for inbound (IMAP) and outbound (SMTP) and server-side rules/filtering.
  5. Reasonable resource limits. Some providers limit your bandwidth (both inbound and outbound) and all put limits on disk storage. The limits should be high enough that I don’t notice them.

Google Apps is an obvious choice but frankly, I don’t like how Gmail does IMAP. In addition, I was very unimpressed with Google’s support with Google Checkout and expected the same type of thing with their other services. See point 3 above.

I decided to try FuseMail. I heard some good things about them and pre-sales support was responsive so I signed up for a trial. Unfortunately, it didn’t work out. There were some odd problems here and there but ultimately it was because of unspoken usage limits. They flagged my account when I tried to do a full IMAP sync to my desktop mail client. Their claim was that I was using too many connections and suggested I should set Apple Mail to not download all messages. They violated point 5 in my list so I cancelled my account. Also, while their support was responsive, they weren’t actually always helpful. They seemed to be oriented towards getting a response out quickly instead of actually solving my problem.

I considered FastMail. Poking around on their site, it seemed to be a good fit for features but it felt like they were trying very hard to discourage you from contacting them. Even if you have a ticket system in place, not everyone that needs to talk to you is already a customer. I was turned off by their support pages and put them on the backburner.

I then poked around the Slicehost forums seeing what other people may be using. I discovered that Slicehost has a special deal with Rackspace (who own Slicehost now). I went to their site and was able to have actually useful conversations with sales and support people. I started my trial.

The migration seemed to go smoothly, albeit a bit slower than Fusemail’s migration tool. After the migration was done, I found a problem: all the dates on my messages were set to the migration date and not the actual original date received. After contacting support, I learned that their tool was resetting the IMAP INTERNALDATE which Apple Mail uses as “Date Received” (most other clients use the sent date in the mail header). After some tests with them, they finally fixed the problem internally. They performed a special migration for me and then I pointed my DNS at Rackspace’s servers. It’s unclear to me if/when this fix will get into the main migration tool; if you are considering signing up with them, I suggest contacting their support and asking first.

The verdict: I’m quite satisfied. After the setup hump, things seem to be running smoothly plus the Rackspace servers seem noticeably faster than DreamHost. A recent DreamHost-wide outage made me feel like I jumped ship just in time. I’ll probably keep my DreamHost account around in the short term for some random personal projects (which are expendable) but I’m glad that no part of my business is hosted with them anymore.

• • •

And before I go, I thought I’d share a procedure for those looking to migrate mail servers. Unfortunately, some of these points I came up with after a screw up or two on my part but now you get to benefit from my mistakes:

  1. If you are hosting DNS, turn down the TTL on your MX records. The TTL (time to live) is an indicator as to how long clients can cache this record. You want to turn it down so that when you switch to the new server, the cache won’t be stale for as long.
  2. On your new server, set up all accounts.
  3. On your new server, set up all aliases. Make sure they point to a valid address.
  4. On your new server, if the option is available, set up a catch-all address. This address will receive emails that are addressed to non-existent mailboxes/aliases. If possible, route it to a folder or account that is not used for anything else. Even if you don’t want this on normally, turn it on now until you are sure that all mailboxes and aliases are set up properly.
  5. Test locally. Check with your provider but some should shunt local mail without going to an external MX server (so you can do this before switching DNS). Make sure none of your aliases bounce.
  6. Do the migration. Depending on the size of your mailboxes, this may take some time (letting it run overnight is a good idea). Make sure to verify afterwards. Remember to check those dates!
  7. Update your MX records to point to the new server(s).
  8. When you feel comfortable that things are working ok on the new server, do a final migration to pick up any messages that arrived during the overlap period.
  9. Cancel old account.
  10. Pour yourself a scotch.

Note that steps #1-9 are optional.

Update (Dec. 18, 2009): Oh the irony. A day after I posted this, Rackspace had an outage. One the email hosting side, it seemed to only affect clients connecting to access their accounts. Their mail servers were still able to accept messages during this time which was the more important thing for me. Of course, I’d prefer stuff like this not to happen and time will tell how often it does happen. In the end, it was handled well and support was very quick to answer my follow-up questions after things settled down.

Comment » | Noodlesoft, System Administration

Yet Another Way to Mimic the Artwork Column in Cocoa

October 20th, 2009 — 8:14pm

I was just turned on to a post from Jesper of Waffle Software entitled How to Mimic the Artwork Column in Cocoa. There he approaches the problem of implementing cells in an NSTableView that can span multiple rows. This spurred on Jacob Xiao at Like Thought to tackle the problem in a different manner. I suggest reading both of the above to get a sense of the problem and the possible approaches.

With NSTableView still on my mind from my last diversion, this got me thinking about the problem and I decided to try my own hand at it. I preferred Jacob’s approach as I think it should be all contained within NSTableView if at all possible. I liked the notion of “slicing” up the cell instead of using another view. Playing with it, I came up with a generalized solution. Here are some of the interesting aspects:

  • It can support any NSCell subclass. I do this by using a special wrapper cell. It draws the “full” version of the cell then draws out the slices for each row into the tableview.
  • It determines the spans by finding contiguous rows that have the same object value for the column in question.
  • The above two points are exploited to do some caching such that the “full” cell is only drawn once and the parts composited in place as needed.
  • If the first column is set to span rows, it will only draw the grid for the last row in a span.
  • You can designate multiple columns to do this. In the example project, if you click on the “Album” column, it will toggle between span and non-span mode. The “Artwork” column doesn’t do this because it looks cruddy in non-span mode. I haven’t tested it (see update below) but theoretically, the spans do not have to line up between different columns.

To use it, for any columns you want to have this row-spanning behavior, set the table column class to NoodleRowSpanningTableColumn. Also, it might help to get rid of any intercell spacing in your tableview (at least in the vertical direction). There are probably a few bugs. I do know that reordering columns may cause some grid drawing funniness but for the most part, it seems to work pretty well. Let me know if you find otherwise.

You can check the code for other implementation tidbits. I’ve included a self-contained project below but I’ll eventually polish it a bit and add it to my NoodleKit repository where it can join the rest of my goodies.

Many thanks for Jesper and Jacob for the inspiration and laying down the groundwork for this.

Update (Oct. 21, 2009): I observed odd behavior in that the program would get into a re-drawing frenzy eating up a bit of CPU. This was non-blocking in that I was still able to manipulate the UI (which is why I didn’t notice it at first). I finally figured out that it was the -drawGridInClipRect implementation. I was drawing the grid selectively by changing the grid mask and then calling super on subregions. Unfortunately, changing the grid mask queued up a redraw which started a loop (albeit one that didn’t tie up the event loop). Seeing as I needed to fix the grid-drawing logic anyways, I reworked the whole thing.

The new grid code should now be able to handle multiple spanning columns rearranged in whatever way you want. Here’s contrived example of having multiple spanning columns that don’t necessarily line up:

row-spanning-table.png

I also made some other fixes and improvements so it’s worth re-downloading the project even if you already did so before (I bumped this version to 0.37).

As for integration with the rest of NoodleKit, I still need to decide whether I want to merge this with my sticky row tableview to make some über-tableview. Problem is is that I can’t think of how the two features would interact so maybe it’s best to keep them separate. Thoughts on this are welcome.

Update (Oct. 23, 2009): I’ve just updated the project to version 0.68. There was a crasher when you would click on a non-span row and then move into a spanning cell. Also, the span cells were highlighting when you clicked on a non-span row. Both of these have been fixed. Thanks for Jesper for finding the crasher and Jacob for helping with the fix.

Update (Oct. 25, 2009): I’ve consolidated this functionality along with my previous sticky row header code into a single NoodleTableView class. You can find it in the NoodleKit repository. Future updates to this will be posted there from here on out.

Download NoodleRowSpanningTableViewTest.zip
[This project is no longer being updated here. You can get the latest in the NoodleKit repo]

2 comments » | Cocoa, Downloads, OS X, Programming, Software, User Interface

NoodleKit

September 29th, 2009 — 2:44pm

I’ve finally gotten around to consolidating most of the bits of code I’ve posted on this blog over the years and put it in a repository. While the real NoodleKit is a much more extensive and cohesive toolkit that I use internally, this one will serve as a place where I put the odd scraps that I decide to open source. I guess I could’ve called it NoodleScraps but it doesn’t quite sound as nice.

If you’ve been following my blog for a while then there’s not much new here, codewise. There are a tweaks here and there plus the stuff should be 64-bit ready so it might be worth re-downloading just for that. It will be the place where I put future code so you should keep an eye on it.

The project is structured to build a framework but also has an examples directory (with corresponding targets) to demonstrate the use of the different classes. The current notion is to keep things compatible with 10.5. And, as usual, all code is released under the MIT license.

NoodleKit (hosted at github)

Enjoy.

Comment » | Cocoa, Downloads, OS X, Programming, Quartz, User Interface, Xcode

“Sticky” section headers in NSTableView

September 25th, 2009 — 9:25am

Once again, I find myself with some cool code with nowhere to put it. And, yet once again, you get the reap the benefits.

UITableView on the iPhone has the neat feature where section headers stick at the top after the actual row for it has scrolled off. For instance, in Contacts, if you scroll down, the row for section “A” stays visible so that you know what section you’re in if the section is too large for the screen.

Unfortunately, someone asked how something like this could be done on desktop Cocoa. I say “unfortunately” because I was within earshot and it resulted in me embarking on a journey peppered with annoying run-ins with NSTableView’s idiosyncrasies. Nonetheless, I persevered and came up with something hopefully someone will find useful. As was the case before, I don’t have a use for it myself at the moment, but I feel it would be a shame to let the code go to waste.

I am presenting NoodleStickyRowTableView. I call the section headers “sticky rows” as one can specify any row to stick up top for whatever reason, though by default, it does it for group rows.

The bad stuff:

NSTableView makes it very difficult to cache a row visually. -drawRow:clipRect: should be able to do it but the problem is that it’s too smart for it’s own good. If the row is not visible, it will not draw anything. Add on top of that the impossibility of getting it to draw the special background the group rows use. I tried all sorts of techniques but none were general or reliable enough. My email on the cocoa-dev list was, not surprisingly, ignored. As a result, in the default implementation, I use my own look for the rows and then use a fade-in transition since the sticky row will look different from the actual one. You can see it in the video below where it has a ghost-like effect.

The good stuff:

The good news is that I managed to work it into an NSTableView category. You can think of it as an abstract category if you wish. In your subclass, at the very minimum, override -drawRect: and call -drawStickyRowHeader after calling super. From that one call you will get all the functionality.

Why do it this way? Well, ease of use for one. It makes it so that you can integrate it into your own NSTableView subclass without having to copy and paste large swaths of code or put it all sorts of odd hooks. Secondly, the changes get inherited by NSOutlineView so the functionality is available there and in its subclasses as well.

While I could use the new associated objects functionality in Snow Leopard, I opted for Leopard-compatiblity. This resulted in me coming up with a couple tricks to get around the lack of ivars, including the rarely used -viewWithTag: method. Check the “read me” file and code for details.

There are two different transitions. The default is the fade-in transition as shown here:


<a href="https://www.noodlesoft.com/blog/uploads/2009/09/Ghost-Transition.mov">Download movie</a>

As mentioned before, since I couldn’t get the group rows to draw properly and consistently, I use a more generic look for the row. The transition makes it less jarring but it is a compromise of sorts. Not bad when you consider that you get all this by calling just one extra method in your -drawRect:.

But what if you want something more like the iPhone’s version? In your subclass, you can override -stickyRowHeaderTransition to return no transition and then do your own drawing of the rows so that they look the same between the regular and sticky versions. The NoodleIPhoneTableView included in the project shows how this is done with the result being something on par with UITableView:


<a href="https://www.noodlesoft.com/blog/uploads/2009/09/iPhone-Transition1.mov" title="iPhone Transition.mov">Download movie</a>

I am releasing this under MIT license as usual. Use it however you want as long as you give me credit somewhere. Please send in any feedback, suggestions, bugs, etc but keep in mind that this is not something I use in my projects so I probably will not be actively maintaining it beyond a certain point. I’ve made a point of making the the API easy to use and to extend so have fun with it.

Download NoodleStickyRowTableViewTest.zip (version 0.18639)

Update (Sep. 29, 2009): I have included this class in my NoodleKit repository so you should check there for future updates.

4 comments » | Cocoa, Downloads, OS X, Programming, User Interface

Back to top