Animation in the Time of Tiger: Part 1

June 30th, 2007 — 3:12pm

One of the most touted APIs in Leopard is CoreAnimation. Soon, you will be able to easily put together animations with tons of crap flying around all over the place. And with the new APIs, it’ll be a snap! Ok, ok, so there are some nice, tasteful animations that can be done and with Leopard they can be done easily. Fact is, though, there’s a good bit of animation you can do right now in Tiger (or earlier).

Why bother? Well, not all of us are dumping our Tiger users come October plus you could stand to learn something if you follow along. So, over the next couple months, I’ll be doing sporadic installments in this series. I’m not sure how many as I haven’t thought that far ahead but let’s say at least two, probably three.

Now, I feel that it’s important to lay down some guidelines. Animation in applications is subject to severe abuse. What may seem neat the first time can quickly become tedious if you are using the app on a daily basis. Too much movement in the interface can make for a visually noisy user experience or cause annoying delays. For the most part, use animation sparingly and with a purpose. Good uses would be to draw a connection between the start and end states of a transformation or to draw the eye from one part of the UI to another. A rule of thumb: if you feel the need to provide a preference to turn your animation off, maybe the animation is too intrusive. Remember, with great power comes great responsibility.

Before we delve into things, I want to point out that most of the animation techniques I’m going to talk about here pertain to NSWindows and NSViews. For various reasons, it is much easier to do animations with views than with, say, NSCells. What this means is that if you have a list of items using an NSMatrix or NSTableView and want to animate them, you may want to consider converting them into a bunch of views. While it is possible to write a control that animates its cells, you have to do a bit more work. Most of the animation hooks available operate on the view level, something that is further emphasized in CoreAnimation.

NSWindow animation

In NSWindow, you already have a powerful method at your disposal. With -setFrame:display:animate: you can set a new frame for your window and by specifying YES to the animate flag, the window will animate from its current frame to the new frame. Not too exciting? Well, try this on for size:

This effect is similar to how windows animate when you use the “Scale Effect” instead of the “Genie Effect” when minimizing windows (check your Dock preferences). You can download the project here. This is all done in an NSWindow category using documented API. While there’s a little magic of getting the window’s pixels (will probably talk about view/window caching in a future installment), the animation itself is done via the setFrame:display:animate: call. Ok, I fudge things slightly by overriding -animationResizeTime: to make it animate faster but the point is that you can do some interesting things with a basic call.

Autoresizing

When you animate, another thing you can take advantage of is the autoresizing mechanism (those springs and struts you see in IB). By setting up the autoresizing flags on your views in creative ways, you can do some neat little animations without having to muck with specifying all the different frames.

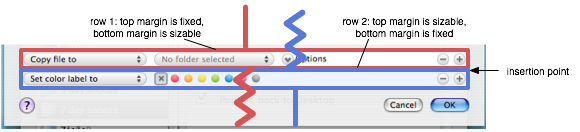
In Hazel’s (as well as in Mail’s) rule interface, when you create a new row, notice how all the rows below the new row shift down as space for the new row “grows” in. This is all done via setting the autoresizing masks (at least that’s how I do it; I can’t speak for what actually happens in Mail). Note that the autoresizing masks don’t have to be something you set once in IB and never touch again. Here, I reset them on the fly as needed. For the rows above the inserted row, the bottom margin is set to sizable. For rows below the insertion point, the top margin is set to sizable.
autoresizeanimationdiagrama.png

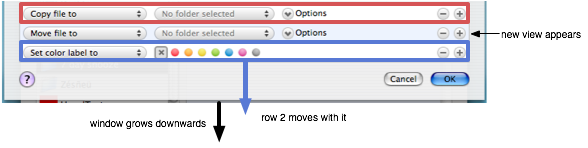
You need to put the new view into the hierarchy at some point. If you add it before the animation, you need to tweak with its size and autoresizing (make it height sizable). If you add it after, the view “pops” in but it happens fast enough that users will probably not notice. Now, I just resize the window (with animation) and all the views fall into place:
autoresizeanimationdiagramb.png

You do something similar when a row is deleted. Note that this is mostly effective when only one view in the window is resizing (and the others just moving) in a particular dimension as the resizing mechanism produces less than ideal results when more than one view is resizing.

So, that’s it for now. In the next installment, we’ll dig into NSViewAnimation and also have some more fun with autosizing flags.

5 comments » | Cocoa, Downloads, Programming

WWDC Wrap-Up

June 20th, 2007 — 12:09pm

Ok, I’ve painted myself into a corner here. I’m back home finally but I don’t really have anything interesting to add (at least anything that won’t break NDA). Nonetheless, since I started talking about WWDC, I might as well cap it off.

As Gus Mueller mentions here, it seems that this year was much more oriented towards those new to the platform (and there were a lot of them). As for me, I found it a bit annoying to walk into a session and find out it was Quartz 101 or somesuch. I don’t mind the existence of such sessions; I just felt that they were not as clearly marked. It was sometimes hard to tell if a session would (a) tell us something new since last time or (b) touch on something more advanced, either of which I would have been satisfied with. Personally, I’d like to see some indication of level or prerequisites (or lack thereof) on sessions.

And like everyone else, I met a bunch of people and even got re-acquainted with a couple people who I haven’t seen in a decade. Maybe next year I should just skip the conference and just crash the parties…

Comment » | WWDC

WWDC midweek report

June 13th, 2007 — 4:55pm

Typing this up between sessions so please excuse the sloppy writing.

Stacks

When Steve started talking about cleaning the Desktop, my heart stopped for a split second. I thought I was going to be Sherlocked (I was also sitting with the Karelia guys at the time). As it turns out, Stacks is just doing what I’ve been suggesting for a while on my tips and tricks page: download everything to a separate downloads folder. Hazel stores the file’s date added and ships with a sample rule to color newly added files; Finder (or maybe the filesystem, I need to check) now keeps track of the date added as well and uses it to keep your most recently added files at the top of the stack. Nonetheless, those Stacks don’t clean themselves so, I think the main adjustment I need to make is to change the marketing message from “Clean Your Desktop” to “Clean Your Stacks”.

Miscellaneous KeyNote comments

I feel like I’m missing the point of the transparent menubar. You can’t drag windows up underneath the menubar. Are the top 20 or so pixels of your wallpaper that important? What do you need to see under there? While I appreciate the tricks they pulled to maintain legibility, it’s still not as clear as an opaque menubar. So yes, add me to the list of grumpy transparent menubar haters.

Did anyone find it odd that when showing the pie charts of Safari’s current market share and their target marketshare, that they had Safari eat up Firefox’s slice of the pie while IE’s market share remained unchanged? Not sure if one should read too much into it as it probably was inadvertent, but it does give the impression that Apple is gunning for Firefox.

Parties

A big thanks for Chuck Soper and Buzz Anderson for organizing their respective parties. The edge has to go to Buzz though since he arranged for a taco truck to be parked outside. Nothing like eating a taco with meat scraped off the face of a cow to start the evening off right.

I’ll probably drop by the OmniFocus get-together later today but won’t be able to make any of the other extracurricular events because of dinner plans.

3 comments » | Hazel, WWDC

Dub Dub Dee See

June 8th, 2007 — 11:31am

It doesn’t seem that long ago that I went to my first WWDC last year. I had recently quit my fulltime job. Hazel 1.0 was in beta at that time. Since my app was to be released on Tiger, all this Leopard talk seemed somewhat irrelevant. I was a newcomer and an unknown.

It’s not quite a year later but WWDC is here again. Hazel 2.0 is now in alpha. It is still targeted for Tiger so Leopard-specific features are still just in the concept phase for me. I’m now not a total unknown. Additionally, since the last WWDC, sales have increased by ∞% so things are going great!

I’m on the road already and am trying to squeeze out another release before the conference (most likely later today). I’ll be in SF on Sunday in time for the Mac ISV dinner. If you spot me, feel free to give me copious amounts of money; it’s what they call “networking.” How do you spot me? Well, take Rodney Dangerfield in a tutu and cross him with Zombie Joseph Stalin and you’d get something that not only is hard to visualize, but also doesn’t resemble me in the least. See you there!

3 comments » | Hazel, Noodlesoft, WWDC

Tracking Hacks

June 1st, 2007 — 5:57pm

You do it more than you’d like to admit. Because of time constraints, laziness, or just plain not-knowing-what-to-do, you write an ugly hack to get around a problem. The code works for the most part but you wonder for how long. The problem isn’t so much with creating the hack; quick ‘n’ dirty code is sometimes necessary. The problem is letting it exist for longer than it should.

I thought I’d share my simple little system for dealing with this. It has worked out well for me over the years.

When writing crufty code, comment the hack. Give as much background as is necessary such that months later you will be able to understand the issue after you’ve dumped it from your short term memory.

Now, prefix the comment as follows:

  • If this hack should be removed before the next release, use PENDING.
  • If this hack is to stay for an indeterminate amount of time, such as a workaround for an Apple bug, use FUTURE.
  • If this hack is permanent (maybe for legacy reasons or it’s otherwise unavoidable), just use good ol’ HACK.

Basically, it would look like this:


// PENDING(MrHacker): I probably should not be doing this.

It also helps to include your name, as shown above. Don’t make people use svn blame.

Basically, what this does is tag your hacks for easy scouring later.

Near the end of your dev cycle, do a global search for all the PENDING comments. Decide whether you want to apply a more permanent fix now or whether to keep the hack in longer. Downgrade to FUTURE or HACK if you aren’t going to fix them for this release. Every so often, revisit FUTURE comments to see if conditions have changed to allow a better fix. If so, you can either fix them on the spot or upgrade them to PENDING for inclusion in the next release.

Also, it’s not strictly for hacked code. Maybe you’re on a roll. Code is just shooting out of your fingertips. When you got the flow, the last thing you want to do stop and figure out how to handle some error condition. Just use a PENDING comment as a placeholder. Since you will undoubtedly scour for them later, it’s a sure way to remind yourself that you need to fill in the rest. In a sense, hacks are defined not just by what you create, but what you omit and tagging them as such helps to identify them later. You could further extend this by also including ticket/issue/bug numbers if you are using such a system.

If there has been any failing to this system, it’s not being diligent about scouring through and changing the tags. But, the important thing is that it is tagged and easily identified when needed.

2 comments » | Programming

Hazel Screencast

May 25th, 2007 — 1:36pm

GTD/productivity guru Ethan Schoonover at Kinkless has put up the last installment of his “Kinkless Desktop” series of screencasts. Of course, this particular one interests me as it focuses on Hazel, showing how he integrates it into his workflow to keep his folders organized. He even makes the rules he uses available for download. Check it out here and make sure to check out the rest of the series.

Comment » | Hazel, Software

Botched Demo

May 10th, 2007 — 9:07pm

Today I got to demo Hazel for the first time at the MetroMac users group meeting. I didn’t do massive prep for it. I just had a general outline of what I wanted to show and talk about. I’m the type of person that can’t deal with too much prep in these types of situations; it makes me nervous. I ran through the demo earlier in the day a few times and it ran fine. I felt pretty loose going into this.

For the demo, I did the typical vacuum cleaner salesman pitch. I had a bunch of files dumped onto the Desktop. I went over the rules I had set up (basically, just a variation on the sample rules Hazel ships with). I activated them all then ran them expecting that Hazel would clean it all up.

Nothing.

Ran them again.

Nothing.

I checked the logs and everything looked fine. The MetroMac guys ran some interference for me (thanks guys) while I did a little flailing and head-scratching. Ultimately, I just moved on with the rest of the demo but I never really recovered. The impact of the rest of demo was blunted by the fact that there was a mess of files all over the Desktop.

Afterwards, I sat on the sidelines and took the time to diagnose the problem. I looked at the Desktop directory in Terminal. Lo and behold. The files were gone. I looked at my Desktop. I looked at the Desktop folder in a Finder window. The files were still there. It finally dawned on me. Finder failed to refresh. Worse than that. It would refuse to refresh after I navigated to other folders and came back. I ended up force-relaunching Finder and was finally greeted by what the audience should have seen: a clean Desktop. In a nutshell, Hazel worked; Finder didn’t.

It was weird in that the subsequent rules I created worked fine on any new files I downloaded. Thinking about it now, it might be related to the fact that I set the clock forward to demonstrate a time-based rule. I did it during my test runs and I guess Finder got very confused afterwards. I don’t remember but it’s possible the setting-the-clock aspect of the demo was added later and therefore not “regression-tested,” so to speak.

In the end, it’s not such a big deal. It was maybe less than 30 people. Nonetheless, it’s not fun sitting up there clicking that button that refuses to do anything. I’m sure there’s a lesson here but at this point I don’t care. What is this? South Park?

Unfortunately, I don’t have lackeys to yell at like Steve but this thing is behind me and I have a bottle of scotch in front of me so here’s to looking forward!

11 comments » | Hazel, Noodlesoft

Productive Waste of Time: Figuring out the main thread

May 1st, 2007 — 10:40am

In keeping with my tradition of random experiments of no practical use, I present another edition of “Productive Waste of Time”.

In a Cocoa app, there’s a notion of the main thread. It’s the thread where all events are dispatched. If you don’t create any threads yourself, all your code is going to run in this thread.

The issue of getting a hold of the main thread came up in #macsb. While the Cocoa docs talk a bit about the main thread and what should and should not happen there, they do not give you a way to actually get a handle on it. Daniel Jalkut, whose fault it is for bringing this all up, suggested using pthread_main_np(). While it may work, I looked for a Cocoa-only solution that didn’t assume that pthreads’ notion of a main thread would always align with Cocoa’s.

So, I whipped up this NSThread category to do just that. Just drop it in. No special hooks or hook up needed. It basically just uses -performSelectorOnMainThread:… to set a static var. I didn’t use any locks as I felt the worse that would happen is a bunch of threads set the variable multiple times with the same value. If there’s a subtlety in the memory model that I’m missing here, let me know. Also, if the main thread is tied up, you could potentially tie up other threads as well. Also also, if the main thread exits, I’m guessing bad stuff will happen though it will happen regardless of the code here.

@interface NSThread (MainThreadAdditions)

+ (NSThread *)mainThread;
- (BOOL)isMainThread;

@end

static NSThread		*_mainThread;

@implementation NSThread (MainThreadAdditions)

// Only call this from the main thread.
// Actually, do not call this at all. It is done for you.
+ (void)_setMainThread
{
    _mainThread = [NSThread currentThread];
}

+ (NSThread *)mainThread
{
    if (_mainThread == nil)
    {
        [self performSelectorOnMainThread:@selector(_setMainThread) withObject:nil waitUntilDone:YES];
    }
    return _mainThread;
}


- (BOOL)isMainThread
{
    return [[NSThread currentThread] isEqual:[NSThread mainThread]];
}

@end

Now, why would you need this? Beats me. It came up in discussion and I decided to roll with it. I provide the code here for your use. It is released under the ‘Splain license. This license says you can do whatever you want with this code under the condition that you ‘splain why you need it. Please post here.

Use this code at your own risk. I am not liable for any bad stuff that may happen as the result, directly or indirectly, of using this code. Side-effects may include nausea, dry mouth and brain rash. This is not a suppository.

9 comments » | Cocoa, OS X, Programming

Keeping Dock Clutter Down

April 23rd, 2007 — 11:40pm

That’s right. I’m doing a productivity post. Not sure what is possessing me to do this. I’ll have to make up for it by posting some VAX assembly in my next article (if you send me a snippet, I may post it).

Personally, I like my Dock icons on the larger side which means reducing the number of icons in the Dock. I know for some of you the Dock is like a trophy case, but for the rest of us, here are some basic tips for cleaning out the Dock.

Also, this is a post for people who use the Dock. If you don’t like the Dock, good for you. Go write your own article.

Pull Dashboard out.

Did you know that you could remove Dashboard from the Dock? Just drag it out. This doesn’t disable it. F12 can still be used to bring it up. Since I never clicked on its Dock icon, it’s a wasted spot, but at least it’s easily regained. Thanks to Brian Cooke at Roobasoft for showing me this at WWDC last year.

Keep “viewers” out of the Dock.

There are certain apps you never really launch directly. They only get launched when you open one of their documents. Good candidates are apps which are primarily meant to just view a file. QuickTime Player and Preview come to mind. I almost never launch them directly but instead launch them by double-clicking a movie or pic in Finder. Pull those out of your Dock. They’ll appear there when you open their documents but when they are not running, save some Dock space and quit them.

The Dock is for the Everyday.

Look at your Dock now. What isn’t running? When’s the last time you ran it? Do a “Get Info” on the app in Finder and check the “Last opened” time. Basically, every app in your Dock should be running and if it isn’t, it should be run sometime today. If not, then poof it. In my case, I don’t actually use Keynote or Pages all that often so finding them in my Applications folder when I need to run them every now and then is no big deal (or I could use Quicksilver. See the last point).

Replace less used apps with a folder.

You can stick arbitrary folders on the right side (or bottom part for you vertical Dockers) of the Dock. Stick your Applications folder there or, if you want to be more precise, create a folder with aliases to a subset of your apps and stick that in your Dock. Of course, you need to do this in exchange for taking some apps out of the Dock otherwise you don’t gain any space.

If you miniaturize windows, get in the habit of hiding apps.

Those miniaturized windows take up space on the Dock. Hiding the app hides them as well. They’ll come back when you switch back to the app.

Use 3rd party software.

There’s a bunch of third party software such as Overflow and Quicksilver that you can use to either extend the Dock or obviate/lessen the need for it.

• • • 

Nothing earth-shattering here but maybe useful to someone. I still have a bunch of icons in my Dock but at least I can say that they are all in use.

4 comments » | OS X

A Modest Proposal: A New Way To Install

April 15th, 2007 — 10:40pm

Currently, there are two main ways that Mac software is packaged. There are Installer packages and there are apps that you just drag and drop into their install location (usually /Applications). The latter has come into favor in Mac ISV circles because of a dislike of the former.

There are various reasons why some people dislike Installer packages. There is the perception that the software is not self-contained and that the installer can run random scripts and do weird things to your permissions. In contrast, taking a self contained bundle and dropping it in your Applications folder seems tidy, controlled and predictable. Nevertheless, it seems that there are a large number of users for whom this does not work. Now, the evidence I have is anecdotal (i.e. stories of people’s less technically savvy relatives and such) so take it as you will.

It seems as if the “drag app into App folder” style of installation is not as intuitive as many developers think. Even with instructions shown in the DMG background image, I’ve heard numerous stories of users running the app directly from the disk image indefinitely. The notion of installing the app is not clear to them. It seems that whatever icon is there just gets double-clicked. They do not care about installing your software. They want to run your software.

If that is the case, then when presenting user with your software, you have one chance to do what you need to do and that is when the user double-clicks on whatever icon you present. It appears that anything more involved will not be followed by many users.

In some ways, then, Installer packages are more ideal. The user will double-click them and are then led through the install process. But, as mentioned previously, the power-user segment is not found of Installer packages plus after the install, the user must still find the application and run it.

Now, let’s look at preference panes. When you double-click a preference pane file, you are asked where to install it and after that, it starts up System Preferences with your pane loaded. Simple. It does what you, the developer, want (get the app off the disk image and onto the user’s system) and what they, the users, want (which is just to run the thing).

My suggestion? When your app launches for the first time, check to see if it’s on a disk image. If so, offer to install it for them. If they accept, you copy it to Applications or wherever and restart. Done and done.

Of course there are details to figure out. To detect if you are running of a disk image, I suggest maybe playing with NSWorkspace’s -getFileSystemInfoForPath:isRemovable:isWritable:isUnmountable:description:type: method. My guess is that an unwritable, removable and ejectable filesystem is sufficient to identify it as some sort of distribution medium but feel free to refine this and let me know. Also, you would have to deal with the situation of the app already being installed and such but these are all surmountable.

So, my proposal is for all you app-writing people to use this type of install. It’s straightforward and benefits both developers and users. Additionally, unlike someone else’s modest proposal, no children will have to be eaten (I’ll leave it to you to decide whether that is a good or bad thing).

If anyone already does this (I feel someone must have come up with this already), please let me know. I’m curious as to your experiences with it. Lastly, but not leastly, thanks go to the #macsb channel for the discussions on the topic.

Update:

I’ve had a few discussions with different devs via different channels on the topic. The one that carried the most weight was the email exchange I had with Dave Nanian. He’s the author of Super Duper which already does what I have proposed here. It appears that from his experiences, there is still confusion even with using this approach. It appears that users still are confused with disk images and end up copying them to their app folder as if they were the app itself. I’ll leave it to him to expound on this when he has time but seeing as this is empirical evidence, maybe people should consider internet enabled disk images.

For the record, this isn’t something I would have needed for my own product. Being a preference pane, System Preference’s way of automatically installing has provided for a smooth and trouble-free experience. Actually, I can see using internet-enabled disk images as being a liability for preference panes as it deposits the pane in your downloads folder tempting users to keep double-clicking it to launch it, installing it over and over again. So, I’m not the best person to spearhead this effort as I lack the actual need for it. While there is the “for the betterment of humanity”-type motivation, I feel someone else who is dealing with actual support emails on the topic should take up the cause.

In the end, you should assess the situation as it pertains to your own product. As mentioned in the comments. Rainer Brockerhoff’s PathProps category on NSWorkspace would be useful for anyone looking into implementing this. I’ve played around with it and it seems to work as advertised.

Thanks to all for the great feedback and comments.

Update #2 (May 25, 2007):

Just got a note from Michael Nickerson who has just released a framework for this. You can read all about it here.

53 comments » | OS X, Software

Back to top