Animation in the Time of Tiger: Part 3

September 20th, 2007 — 12:22pm

In this final installment, we’ll go over some more advanced ways to do animation.

Now, you may find that the types of animations you want to do can’t be handled by NSViewAnimation or that you need better performance. The solution usually involves getting a bitmap of your view or window. Having a bitmap allows you to do all sorts of manipulations and tap into other technologies that you can’t do directly with views or windows.

To get a bitmap of your window there are a couple methods. The first is to use NSCopyBits(). If you go back to the first article in this series, you’ll see that I glossed over this, but the technique is being used there. The window’s pixels are grabbed and the resulting image is scaled in the animation using an alternate window that just looks like the original. You can check out the downloadable project there.

Now there is a potential issue. This technique will not work if the window device has not been created yet. This happens when you mark the window as deferred and it hasn’t been brought on screen yet. To circumvent this for deferred windows, I quickly order the window on and off screen to force creation of the window device. I don’t see a visible flicker but your mileage may vary. If you know of a better way to force creation of the window device on a deferred window, let me know.

The other method is getting the window’s contentView’s superview and grabbing its pixels using one of the methods below. I’m not sure if it’s a good idea or not to be mucking with the contentView’s superview but it’s an alternate way at getting the pixels.

For views, there are a few options:

- drawRect

You could just lock focus on an NSImage and call view’s drawRect:. This will work but only for the current view. Not really useful except for specific cases where you only want this view and none of its subviews.

- initWithFocusedViewRect:

This works for most cases but it does require that the view be installed in some window’s view hierarchy. lockFocus on your view (not the image), create an NSBitmapImageRep and init using the above method, and boom, you got your view’s pixels (and don’t forget to unlock focus).

- cacheDisplayInRect:toBitmapImageRep:

First get the NSBitmapImageRep by calling NSView’s bitmapImageRepForCachingDisplayInRect:. If your view is not opaque, you may want to clear the pixels in this buffer. Call NSView’s -cacheDisplayInRect:toBitmapImageRep: to actually get NSView to draw the pixels into the bitmap. Using this method, the view does not have to be plugged in, so you don’t have to pop the view into the view hierarchy just to take its picture. Useful in the case where you are swapping views in and out and want to animate the incoming view before it’s actually in. This was added in 10.4 so won’t be useful for pre-Tiger.

• • •

Ok, now you have some pixels, what can you do with them?

Well, you can composite the bitmaps yourself and move them around. In general, this should perform better but you have to do more code in general to coordinate the animation than if you used NSViewAnimation.

You can also pipe that bitmap into Core Image. There are all sorts of effects available including a whole class of filters just for transitions. Luckily, Apple already has a good example called Reducer. Check out the AnimatingTabView class.

Another example of using Core Image is Rainer Brockerhoff’s Flipr which flips windows like Dashboard does with widgets.

And lastly, you can use OpenGL. Create a texture out of the bitmap and slap it onto a surface. I’ve done an example demonstrating this. It does something similar to Flipr but it’s using OpenGL and it focuses on flipping views, not whole windows though Flipr’s technique can be used for views as well and this technique can be extended to windows.

For the dev tool impaired, here’s a movie demonstrating the effect:


<a href="https://www.noodlesoft.com/blog/uploads/2007/09/viewflipper.mov">Download movie</a>

The key step here is described in this technote. Basically, you get the view’s bitmap and then convert that into a texture. As pointed out on cocoadev.com here, textures end up being upside down so as described in that article, I flip it. The code on that page also has a more reliable calculation of the pixel row length than the example from Apple’s technote so make sure you use that. From there, I create a slab and map the textures onto the surfaces. I animate rotating on the y-axis and voila! A flipping animation between views.

Details to note:

  • I create a parent view which swaps in the NSOpenGLView subclass to do the animation then swaps it back out. This avoids having to deal with issues of having subviews of an NSOpenGLView.
  • I do a calculation and adjust the perspective/frustum to make sure the view takes up the full viewport when facing you.
  • Notice that the animation gets clipped. Since it extends out towards the viewer, the shape needs to extend beyond the bottom and top bounds. Basically, the parent flipper view and the OpenGL flipper need to be larger than the views to provide an extra buffer. Or you could do it in an overlay window. There are a few more details involved but feel free to email me if you are thinking of pursuing this.
  • To keep things simple and clear (and because I’m lazy), the code here assumes that the views are opaque (if you look in the nib, the views have opaque, tabless tabviews used to draw the background). One could fix the code to grab a bitmap from the nearest opaque ancestor view though it would require having the view installed in the hierarchy.

Keep in mind that the last time I touched these 3D APIs, it was called just GL, not OpenGL, and it was on an SGI machine. So, while this example may be useful for certain details, my OpenGL-fu is weak so you might be better off using other examples for OpenGL specific stuff. Also, if I am doing anything stupid, let me know.

Well, that wraps it up for this series. I hope you gleaned something useful from it.

Comment » | Cocoa, Downloads, OpenGL, Programming

Moving to MarsEdit

September 5th, 2007 — 11:22am

Until now, I’ve always written up my blog posts in a combination of TextEdit for the initial draft and the WordPress web UI for subsequent drafts (mostly to get the formatting right) and final posting. Needless to say, it’s been painful. For a web app, WP isn’t so bad but, in the grand scheme of things, it’s lacking. I know this will probably draw the ire of all of you who think web apps are going to take over the desktop but seriously, it’s not going to happen with the current state of the art (unless users are willing to sacrifice a good bit of usability).

I am now switching over to MarsEdit. Resizable editing area. No html tag buttons whose key equivalents conflict with my use of emacs key bindings. No waiting 10 seconds to preview or save because of a laggy internet or server. The markup macros are editable (so I don’t keep having to type in target="_blank" on every link). The UI is quick and responsive. All the niceties of a native desktop app. Yeah, I’m sure I’ll bump into problems but at least a desktop app can fix most of those. With the web app, there are fundamental problems with the paradigm that make it clumsy and slow.

I know you’re thinking, “well, if the web app sucked so bad, why did you use it?” Simply enough, momentum, or lack thereof. Also, there is my ambivalence towards blogs. I resisted investing in any blogging tools as I didn’t want to admit that I was taking this seriously. I wanted to keep it painful so I would have a reason to hate it. Though now I’m still a bit of a curmudgeon when it comes to blogging, at least I’m willing to concede it’s not worth doing things the hard way.

In any case, MarsEdit 2 is out now. If the thought of writing up a blog post makes you wince, then you should check it out. Who knows, instead of hating it you might end up liking tolerating it.

Oh, and yes, the same Daniel Jalkut who convinced me to start this blog is also responsible for MarsEdit 2. So once again, this is all his fault.

2 comments » | OS X, Software

Animation in the Time of Tiger: Part 2

September 3rd, 2007 — 4:28pm

As promised, here’s part 2 of my animation miniseries. The topic for today: NSViewAnimation

In the last segment, we talked a bit about using NSWindow’s -setFrame:display:animate: method to do some window animations. In conjunction with setting the autoresize flags, you can get some nifty effects.

Many times, though, you need more control. Maybe you want to animate some views (not just windows) or maybe you want to change the rate of animation. For such cases, NSViewAnimation is the answer. NSViewAnimation allows you to set up dictionaries containing views or windows with their start and end states and then animate them. Since it is an NSAnimation subclass, you have control over whether it blocks, how long it takes, the animation curve, etc. If you aren’t familiar with NSViewAnimation, I suggest reading the docs and playing with it yourself.

Now, there are a couple quirks/bugs you need to keep in mind. Knowing these will save you some headaches:

  • If a view has a final frame with a zero dimension (width or height), NSViewAnimation will set it to be hidden when the animation finishes. If you use that view again in an animation (like doing a reverse animation of what you just did), NSViewAnimation will not unhide the view for you. You have to do setHidden:NO yourself before starting the animation. The exception to this is if you use a fade in effect, in which case, NSViewAnimation will unhide the view.
  • NSAnimationCurveEaseOut is broken. It seems to animate backwards. Yes, you can try and work around it and swap the beginning and end frames and such but, when Apple does fix it, you’ll be in for a surprise. I say just avoid using it.

For the purposes of this article, we will be using this project. It demonstrates animating between two views using a variety of basic transitions. If you use Keynote, these should be familiar (I’ve even used the Keynote names). The Dissolve transition needs little explanation; NSViewAnimation’s NSViewAnimationFadeInEffect and NSViewAnimationFadeOutEffect work as advertised. The other effects are variations on a right-to-left transition. They are different combinations of the views either moving in/out of bounds or being revealed or covered. This is achieved through use of clipping (via the view hierarchy) and the autoresizing masks.

viewport.png

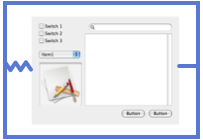
Basically, we have two “viewport” views. In doing a transition from right to left, we shrink the left view while expanding the right. Their main job is to clip the view they contain. When used in conjunction with the resizing masks, you can get different effects, the diagram above showing a “Move In” transition.

springs-struts.png

In the diagram here, the blue rectangle is the superview (viewport) of the visible view. I’ve made the rect larger than the view to show the resizing springs/struts but in actuality the viewport is the same size as the view (i.e. its bounds are flush with the contained view). In this case, we have a viewport with a containing view whose left margin is resizable but the right margin is fixed.

reveal-transition.png

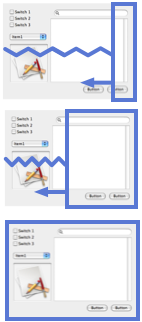
Now, let’s say the viewport starts at zero-width and expands out to the left while the view itself is positioned so that it’s right edge is flush with the viewport.

As you see, since the right margin is fixed, it appears as if the view is being revealed as the viewport expands to the left. Note that the autoresizing works just as well when the view is larger than its superview.

To make it appear as if the view is moving in towards the left instead (like in the “Move In” and “Push” transitions), make the left margin fixed and the right margin resizable.

Likewise, you can fiddle with the autoresize masks for the outgoing view to affect how it disappears (either pushed off or covered).

For those unable to compile the project, here’s what it all looks like:


<a href="https://www.noodlesoft.com/blog/uploads/2007/09/transitions.mov">Download movie</a>

As you can see, NSViewAnimation can be quite useful for when your animations involve moving and scaling views. In the next article, I’ll probably just go over some odds and ends such as optimizations and using Core Image transitions.

9 comments » | Cocoa, Downloads, Programming

Hazel on ScreenCastsOnline

August 27th, 2007 — 12:17pm

Noodlesoft is sponsoring the latest episode of ScreenCastsOnline. Don McAllister does a great job of guiding you through Hazel’s features. Nothing gets the point across like seeing it in action.

You can check it all out here.

Oh, and there’s a discount code in there, if you need any more enticement to watch it.

Comment » | Hazel, Noodlesoft, Software

Numbers and the Next Big Thing

August 15th, 2007 — 1:42pm

I’ve been waiting around for Numbers. Well, not Numbers specifically but for Apple to do a spreadsheet. Now that it’s out, I have to say that I’m disappointed. It’s not about features but about the base paradigm. I wanted Apple to revamp how spreadsheets are perceived and conceived. It may be a bit much to expect from Apple except that the new paradigm was already created some 20 years ago, and not only that, Steve Jobs had a hand in it.

Instead of explaining it all here, I suggest you read about Lotus Improv. Here’s a great article describing the history.

In short, Lotus came out with what is now known as the multidimensional spreadsheet. It was one of the first apps on the NeXT platform. It was also a revolutionary new way of doing spreadsheets.

It’s hard to really get a sense of how it works by reading about it. Quantrix has some great Flash presentations. I advise viewing those before reading on.

The main benefits of a multidimensional spreadsheet is that it actually knows about your model. When constructing a multidimensional spreadsheet, you are not constructing a visual structure so much as a semantic one. Those headers aren’t just for your benefit. The row and column headers are, in effect, axes in your multidimensional model. But you aren’t limited to two dimensions. You can define as many dimensions as you want and dynamically rearrange the axes as you see fit. The order of the axes (which axis is the column and which is the row) is just a part of the view and not the model itself. This also extends to charts. They are just graphical views of the same model and if your model changes, the charts can automatically update as well since they are based on the same semantic structure (i.e. the charts are not just one-offs).

The result of this is that the program makes many things natural and intuitive (it only sounds complicated). For instance, “pivot tables”. In the multidimensional model, it’s a natural extension of the paradigm (there’s no special marketing term for it) which makes pivot tables in traditional spreadsheets look like a hack. Natural language formulas also come, well, naturally. The generic headers and cell designations (A1, C5) are gone. You define the items in the headers so a cell is referenced as “Sales:1990” which makes tons more sense. Also, formulas are more based on the structure of the model and not on individual cells. This allows the formulas to be separated out so you can see (and edit) them all in one place (the formulas don’t go in the cells). Because it is a multidimensional model, extending any one dimension (i.e. adding rows or columns) will bring along any formulas with it. Again, this is hard to visualize if you haven’t seen it before so check out the Flash tours linked above.

So, where are the multidimensional spreadsheets now? Lotus did port Improv to Windows but Improv on both platforms ended up being abandoned. To fill the void, Lighthouse (the company I worked at) created a clone, Quantrix (which I worked on). As I’ve mentioned before, the Lighthouse apps were mothballed by Sun.

Since then, Pete Murray (one of the original authors of Quantrix) wrote it all over again, from scratch in Java, and has released it with his new company. He even got rights to the Quantrix name. As linked above, you can check it out at Quantrix (and thanks to Pete for allowing me to link to his demo presentations). Note that it is not priced for the casual user, being oriented more towards the enterprise customer but they do have educational pricing.

There’s also Flexisheet if you want something free, open source and/or native, though it does not seem to have been worked on in years.

• • •

iWork’s Numbers is fundamentally a 2D spreadsheet. It does some trickery with the headers to allow for some level of natural language formulas. It has some things here and there to simulate some of the aspects of a multidimensional spreadsheet but it’s still a traditional sheet underneath.

One subtle difference between the 2D and multidimensional models is that in the latter, the data model is expected to be dense. What this means you don’t really have unused cells; all cells are intended to have meaning in your model. It’s not a freeform grid but a packed model of data. For people used to sticking all sorts of random non-computational stuff into spreadsheets, this can be hard to adjust to. Basically, people are using spreadsheets not so much as computational tables but as a big piece of graph paper.

Numbers shifts this around a bit by making the tables a part of a larger freeform canvas. This is a big improvement from other traditional spreadsheets as I’ve always believed cells are for numbers. That clip art or paragraph of text you stuck in there is not a part of the model you are creating. It makes it such that the spreadsheet is used as it was intended and anything you attach to it, you put together with it and not in it. All in all, the separation of table and canvas is a welcome change.

Why wasn’t Numbers done as a multidimensional spreadsheet? Several factors come into play here. The main one is that multidimensional spreadsheets are quite different from traditional spreadsheets. If you’re an Excel user then you’d have to unlearn a lot of how you conceive of spreadsheets. In essence, it’s a hard sell to anyone that uses a traditional spreadsheet. The only market where it seems to stick is the financial market, which is not a market Apple is concerned with. It’s too bad, really, since I’ve always felt that the multidimensional model is actually more intuitive for the user who has never touched a spreadsheet. I felt a consumer-level multidimensional spreadsheet would have been the innovation the spreadsheet market needed.

Maybe in the end it was too much to expect of Apple. With innovation comes risk and it’s hard to bet on something that has already failed in the market once. Nonetheless, the innovation is there. The hard part is getting people to use it.

27 comments » | OS X, Software

2 C4 || ! 2 C4?

August 8th, 2007 — 9:27pm

Yes, I’m going to C4 this weekend. It was quite last minute as there was something casting a shadow over my schedule for the month of August. Luckily, that got cleared up at the end of July leaving me to decide whether I should bother scrambling. Considering that I also was prepping my Hazel 2 release, it probably wasn’t a good idea scouring travel sites trying to make arrangements and convincing Rentzsch that the check was in the mail. Hopefully, he won’t try cashing it until after the conference.

Luckily, a hotel room and a not-so-expensive flight to Chicago opened up, so hope to see many of you there. And my offer still stands: if you give me money, I will gracefully accept it.

Also, my official list of people to whom I owe drinks while in Chicago:

  • Daniel Jalkut
  • Gus Mueller
  • Oprah Winfrey

Don’t make me explain the first two.

Comment » | C4

Post Mortem 2.0

August 7th, 2007 — 4:50pm

Hazel 2 has been out for a few days and I’ve had a chance to sit back and reflect a bit. Of course, things are a bit different this time than when I was releasing 1.0. For one, I have users now. That meant that I had to split my time to do support in addition to development. But that also meant that I had more people giving me feedback and a larger pool of beta testers. Yes, it’s time consuming to process all that but it made for a better product in the end.

There were a couple decisions that weren’t applicable when doing a 1.0 that I had to deal with this time:

1.2 vs 2.0

When planning the next release, I went back and forth on whether it was 1.2 or 2.0. What’s in a version number anyways? Well, making it 1.2 would have made some things easier. It’s generally understood that point releases are free so there would have been less confusion on that point if it were 1.2. On the other hand, there were major chunks that were rewritten. The artwork was redone. I ended up labeling it 2.0 as it does indicate that it has significant improvements and that the product is more mature, which is the case here.

Why a free upgrade?

Several factors played a part in this. There were issues in 1.x that 2.0 addresses and they were the type of thing I wanted every user to have access to. Plus, I do feel grateful to all of you who took a chance with not just a new application. If I could, I’d meet with every one of you and shake your hand but I get the feeling that it would be unfeasible. In any case, I think you’d appreciate the free upgrade more. You don’t know where my hands have been.

• • • 

Overall, the pre-release went pretty smoothly. The one thing that was less than ideal was the timing and length of the prerelease period.

Because of issues with 1.x’s use of launchd, I had to write my own task runner/scheduler. Since some users were being affected by this, I released the alpha earlier so that they could have access to the new fixed version. Also, since it was a critical part of the system, I needed it to be tested for as long as possible. So, in retrospect, the alpha came out a bit earlier with fewer features ready than I would have liked but I felt it was necessary given the circumstances.

As for the length of the prerelease, it did run a bit longer than I wanted. A few factors came into play here including a good bit of contract work I was doing during the Spring and logistics concerning the business (including converting Noodlesoft to an LLC).

What surprised me this time around was the amount of attention my beta received. I had multiple articles in the press at each step of the way which was great. A big thanks to all of you who kept up with the pre-releases and sent in feedback and bug reports. I feel that 2.0 is pretty solid out of the gate as a result.

• • • 

In the end, I’m quite happy with how 2.0 turned out. There were some rough edges that I was finally able to polish and I feel like I’ve filled out the feature set while keeping it all cohesive.

What’s in store for the future? I’m still working that out but most likely, 2.1 will be focused on getting Hazel working properly on Leopard (without breaking it on Tiger, of course). I think the next major improvement won’t be in the product itself, but on the Noodlesoft site. People have been clamoring for some sort of repository of Hazel rules so I need to hunker down and figure out how that should work. As always, your feedback helps to shape the future direction of things so keep it coming.

Comment » | Hazel, Noodlesoft, Software

Hazel 2 out (finally)

August 2nd, 2007 — 11:21am

hazel2.png

After what ended up being a longer pre-release period than I anticipated, Hazel 2.0 final is out. Lots of new, neat stuff. Nifty, too. If you haven’t been keeping up with the betas then check it out. I feel it’s much closer to my vision of the product when I started down this path last year.

It’s a free upgrade for you registered 1.0 users because I love you all. Yes, there, I said it.

When the smoke clears, I’ll do another post-mortem but in the meantime, download it.

1 comment » | Hazel, Noodlesoft, Software

Unofficial Hazel Web Badge

July 20th, 2007 — 6:04pm

Hazel 2 is going to be released soon and our marketing manager thought that we should start a marketing campaign. When this happens, we usually sit down and look into how he escaped from his cell, but this time, we decided to give him a chance.

We here at Noodlesoft like to keep up with the latest currents and trends. With that in mind, we present our first unofficial web badge. We feel that it captures the spirit of today’s vibrant web youth culture.

Get Hazel

Feel free to adorn your web page with the badge. Consider this our trial balloon into the wonderful world of online marketing.

K. Bai!

2 comments » | Hazel, Noodlesoft, Software

NoodleLabs: Fix for Mac Pro headphone behavior

July 12th, 2007 — 12:52am

I’ve done it. I’ve joined the 8-core club. Historically, I always shoot for the sweet spot in terms of price/performance but this time I thought I’d splurge for once and get the octocore (or is it octacore?) Mac Pro. Realistically, it’s a bit overkill. Sure, Hazel now compiles 5x faster but it’s not like I’m doing full builds all the time and it didn’t take all that long before either. Nonetheless, it’s a great machine. There’s one thing about it that bugs me, though.

On my Powermac, when I plug in headphones, it automatically switches sound output to them, even if I have external speakers connected to line-out. Basically, the headphones, internal speaker and line-out are treated as three devices sharing a channel. To me, it makes sense. If I plug in my headphones, it’s because I want to listen through them. If I pull them out, it’s because I want audio to go back through the speakers. Most every piece of consumer audio equipment I’ve used operates like this.

On the Mac Pro, that has changed. The line-out is a separate output and is unaffected when you plug in headphones. So, if you are using external speakers, you have to go into System Preferences and manually change the output audio device to headphones. You could use something like Rogue Amoeba’s SoundSource to switch output devices in a more convenient fashion but nonetheless it’s a manual process. This Apple doc describes the change but it sounds like an engineering decision imposing itself on the user. I don’t care if it’s now orthogonal and consistent; I want it to be useful.

Well, the nice thing about being a programmer is that you can solve the problem yourself. So, I went ahead and created headphoned (read it as “headphone-d” like a unix daemon). All it does is sit there and watch for when the headphones are plugged in, at which point it switches audio output automatically. When the headphones are unplugged, output reverts back to whatever device was selected before.

I’ve never touched the CoreAudio API before so please excuse the naiveté of the implementation. Suggestions and improvements are most welcome. A big thanks to Vincent Gable, author of IMLocation for this article which gave me a big headstart.

There seems to be a problem where the audio will wedge when plugging/unplugging. I found that updating with Apple’s recent audio fix got rid of the problem (or maybe it’s wishful thinking on my part but I haven’t experienced it since). If you find it does happen, just plug the headphones in/out again as that usually unwedges things. Also let me know if you experience this even after updating with Apple’s fix.

And, of course, it’s free (MIT License). Do what you will. It’s a bit rough around the edges (no automatic install), but I figure if you are using a Mac Pro, you are less daunted by the command-line. I’ve included a launchd config. Install it in ~/Library/LaunchDaemons and edit it to reflect where you put the executable. Note that it doesn’t seem to work if it runs as root (I think it needs to run as the console user), so don’t bother installing it at the top level LaunchDaemons directories.

Enjoy.

Download headphoned-1.0.zip

Update [Sep. 5, 2007]:

Rogue Amoeba has now integrated this functionality into SoundSource. The announcement is here. You can grab it from their freebies page (and yes, it is free).

21 comments » | Downloads, OS X, Programming, Software

Back to top