Category: Cocoa


Modal Glue

March 10th, 2008 — 9:51am

Recently, Quentin Carnicelli of Rogue Amoeba asked if there were NSResponder methods that you could hook your “OK” and “Cancel” buttons to to dismiss a modal panel (or sheet). As far as I knew there wasn’t but, gosh darnit, that would be a useful thing to have.

To clarify what I’m talking about here, when you run your own modal window or sheet with “OK” and “Cancel” buttons (or some equivalents), you end up hooking those up to methods that dismiss the window/sheet, stop the modal session and return some code (either one for confirmation or cancellation). Most of the time, you end up writing the exact same code. It’s glue code that shouldn’t have to be written.

Now, if you look at NSResponder, you’ll see all sorts of action methods in place. Sticking these glue methods into NSResponder will allow you to hook up your “OK” and “Cancel” buttons to the “First Responder” in IB. The idea here is that there is a default implementation that will close the current modal window or sheet and set the return code to either NSOKButton or NSCancelButton. With this, your code can act more like it’s using NSRunAlertPanel() or NSBeginAlertSheet() by just interpreting the return code.

I’ve created an NSResponder category with the methods -confirmModal: and -cancelModal: to which you can hook up your “OK” and “Cancel” buttons in IB. Note that you may have to manually add the methods to NSResponder in IB as it doesn’t know about them.

Now NSResponder’s versions of these methods don’t actually do anything besides pass it on to the next responder. The main part is in NSWindow, which overrides it. It will check to see if it’s the current modal window or sheet, order itself out, stop the modal session and send back the appropriate code. By using the responder chain, this mechanism will find the “nearest” modal window. Note that it is assumed here that the buttons to dismiss a modal window are in the same window. If you want to dismiss it from a different window, it may or may not work (depending on the responder chain and other subtleties such as the odd specification of NSWindow’s -isSheet method). I can’t think of a non-contrived case where you’d want this or care but if one comes up, let me know.

So here’s the download. Suggestions, questions, bug reports appreciated.

modalresponder.zip

2 comments » | Cocoa, Downloads, OS X, Programming

Happy Fun Leopard Bug Time: NSCalendar

January 25th, 2008 — 10:38am

Yes, folks, it’s Happy Fun Bug Time where I talk about what has been making me tear my hair out recently. In this installment, we talk about NSCalendar.

NSCalendar has a method called rangeOfUnit:inUnit:forDate:. What this method is supposed to do calculate how many of one time unit are in another. For instance, how many days are in a particular month. Since date calculations can get tricky, with daylight savings, leap years and all, this method is quite handy.

Or, it would be handy if it didn’t suffer from some pretty bad bugs on Leopard. At first, I tried something like the following to calculate the number of days in a given year:

  range = [[NSCalendar currentCalendar] rangeOfUnit:NSDayCalendarUnit
                                             inUnit:NSYearCalendarUnit
                                            forDate:[NSDate date]];
                                  
  NSLog(@"%@", NSStringFromRange(range));

Given that this is a leap year, I’d expect “{1, 366}”. What do I get? “{1, 31}”. I suspect that wires got crossed with the days-in-a-month calculation. Oh, but the fun doesn’t stop there. Try this at home (kids: do not try this at home):

  NSCalendarDate          *date;
  int                     i;
  
  date = [NSCalendarDate dateWithYear:2007 month:1 day:1 hour:0
                               minute:0 second:0 timeZone:nil];
  
  for (i = 0; i < 365; i++)
  {
    range = [[NSCalendar currentCalendar] rangeOfUnit:NSDayCalendarUnit
                                               inUnit:NSWeekCalendarUnit
                                              forDate:date];
    
    if (range.length != 7)
    {
      NSLog(@"Date %@ has week of length %d", date, range.length);
    }
    date = [date dateByAddingYears:0 months:0 days:1 hours:0 minutes:0 seconds:0];
  }

This cycles through each day of last year (2007) and calculates the number of days that week. Now, having just recently lived through that year, I think I can say with some certainty that no week had any more or less than 7 days in it. The above code prints out any oddballs. If you run it yourself, you find that quite a few days are in weeks exceeding 7 days. Upon closer inspection, you find that any day in a week straddling two months reports the number of days in the month, not the week. On weeks fully contained within a month, it reports 7 days. Again we are seeing a tendency towards the days-in-a-month calculation. Someone really likes computing that.

I've filed a bug report (rdar://5704940 for you Apple folks). Unless I'm doing something really wrong here or there were some time distortions last year that I was unaware of, you may want to avoid using NSCalendar's rangeOfUnit:inUnit:forDate: on Leopard for the time being. Thinking about it though, the time distortions would explain a couple weekends…

Update (Feb. 1, 2008):
I strongly recommend reading the comments. Thanks to Chris Suter for explaining what Apple's logic is in doing it this way. We all thought he was nuts at first but it appears that he was just explaining Apple's craziness.

In short, things probably are working as designed by Apple. I still think the design is flawed and that it is horrendous API. It seems that, in Apple's mind, Leopard is correcting a bug in Tiger (in other words, the intuitive and useful behavior in Tiger was a bug).

The original point stands that one needs to take care with -rangeOfUnit:inUnit:forDate:. It seems to be only useful for specific combinations of units and given the change in behavior between Tiger and Leopard, it becomes even more of a headache. If Apple is going to continue with this interpretation, then they should just treat these computations as undefined since the results are misleading.

17 comments » | Cocoa, Debugging, OS X, Programming

Idle Hands

January 8th, 2008 — 3:30pm

A common user annoyance is having alerts popping up at bad times. The worst is when the user is typing and focus gets stolen only to have subsequent key presses going to the new window, possibly resulting in the user inadvertently confirming something they didn’t want to. Peter Hosey discusses this particular case and outlines an NSAlert-based solution.

I recently submitted a patch for Sparkle+ to deal with a similar situation. It can be annoying to get an alert about a new version when you are working. A new version is not a “drop everything and deal with this now” type of alert. With this patch, when a new update is found, it will check the user’s idle time and hold off showing the panel until a certain amount of time has elapsed. This minimizes the chance of the user being in the middle of something when the alert comes up. Of course, this is only suitable for when the alert itself is not terribly critical or time-sensitive. It should not be used if it is in response to direct user action or if the alert is something that needs to be dealt with immediately.

Since this type of thing may be useful in other contexts, I’ve decided to generalize it and put it out there for your consumption. It’s a little NSObject category with two new methods: performSelector:withObject:afterSystemIdleTime: and performSelector:withObject:afterSystemIdleTime:withinTimeLimit:. The first will call the given method on the receiver when the user has been idle for the given period of time. The second method does the same but allows you to set a limit after which it will call the method regardless of idle time, thus preventing the method from being delayed indefinitely.

Beyond the use described above, you can use it in several other situations, such as doing some internal maintenance that may get in the way if the user is actively using the machine. You can reclaim/free memory, clear out caches, compact file stores, optimize data structures or whatever.

For the time being, I am using this in my Sparkle update alerts and my scheduled evaluation period expiration nags. What will be interesting is if this leads to some sort of “refrigerator light syndrome” where users notice that it only happens when they are not looking and are somehow bothered by it. Most likely, though, users probably won’t notice and, with any luck, they will be more receptive to the alerts when they do pop up. If that leads to an extra spring in their step, then I consider it a job well done.

The project is linked below. Make sure you read the Read Me file. If you end up using it, let me know.

Update (Jan 10, 2008): The original project had a couple files specified as absolute paths (so XCode wouldn’t find them). A new project has been put up with this error fixed. It is marked as version 0.6 in the package name and Read Me file.

performwhenidletest-0.6.zip

Update (Feb 5, 2008): It appears that the CGEventSourceSecondsSinceLastEventType() function hangs on Tiger systems. I have updated the code to check for the OS version and only do the idle delay on Leopard and later.

performwhenidletest-0.7.zip

I am also looking into patching this in Sparkle+. If you are using Sparkle+ with this feature enabled, drop me a line or wait for the patch which will hopefully happen soon.

12 comments » | Cocoa, OS X, Programming

Weak Linking

December 5th, 2007 — 6:05pm

It’s been a while since I posted. Since then, Leopard has been released and it’s been keeping me busy. Now that I’ve finally upgraded my dev machine to Leopard, I’ve started implementing Leopard-specific functionality. I still want to maintain Tiger-compatibility but there are cases where I need to reference new symbols in Leopard. These articles 1 2 tell you what you need to know, though I thought I’d provide a boiled down guide to what you need to do.

For the purposes of this article, we’ll assume we want a binary that will run on Tiger or later but have access to Leopard-only functionality. In this case, the deployment target is Tiger and the Target SDK (which API version you are using) is Leopard.

  • In Xcode, Project->Edit Project Settings->General. For Cross-Develop Using Target SDK, select the latest OS version whose features you want to use. In this case, Mac OS X 10.5
  • targetsdk.png

  • Click on the Build tab. Make sure the Configuration pop-up is set to All Configurations. Set Mac OS X Deployment Target to the minimum OS version you want to support (Mac OS X 10.4).
  • deploymenttarget.png

In most cases, this is all you need to do. Why’s that? It’s because Apple defines Availability macros that they use to set what symbols are available for different OS releases, based on the settings you just made above. If your target SDK is a later version than your deployment target, the symbols unique to the later target are weak-linked. This means that if the symbol does not exist, it will be set to NULL. As indicated in the articles linked above, you can compare these symbols to NULL before using them. Note that this mostly pertains to things like C functions. For Objective-C, you can check for the existence of classes using NSClassFromString(). For methods, just use -respondsToSelector:. What this all allows is for your program to dynamically use Leopard-specific functionality if it’s available. You can test for specific functionality without relying on doing a broader OS version check.

Of course, there are cases where things don’t work out of the box. For instance, it seems the headers for some lower level APIs aren’t set up with the Availability macros. In such a case, you can do your own prototype, this time asserting the weak linking:

extern void somefunction() __attribute__((weak_import));

If you don’t do this, somefunction() will end up being non-null even on older OS versions which will screw up your check for the function’s existence.

And then there are issues that aren’t based on API so much as behavior. For instance, if there was a bug in Tiger that was fixed in Leopard. It’s not the type of thing your program can detect so in such cases you’ll have to resort to version checking.

Nothing particularly new here but thought it might be helpful for people doing the OS version straddle for the first time.

1 comment » | Carbon, Cocoa, OS X, Programming, Xcode

You’re Doing It Wrong

October 25th, 2007 — 11:00am

In IRC, someone noted how they just learned about gdb’s print-object (or po) command. It was surprising since this was an experienced dev. It just goes to show that no matter how long you’ve been programming, there’s always some thing you should know, but don’t. These are those commands or features you just somehow missed. You bitch about what a pain in the ass something is only to realize that there was a simple solution all along.

So, in the interest of full disclosure, here are a couple of mine.

NSStringFromRect(), NSStringFromRange(), NSStringFromPoint(), et al.

Stupidly, whenever I needed to log an NSRect, NSRange, etc., I’d list out each of the components. For NSRect, it was always the worst, as it would look like this:

NSLog(@"%f %f %f %f", NSMinX(rect), NSMinY(rect), NSWidth(rect), NSHeight(rect));

I could have put this in a #define but for some twisted reason I would just keep copying it from other places or worse, typing it out. I finally learned about the above functions and now my teeth are whiter than ever!

Dragging header files into IB

For years, when I needed to have the header file for my class read into IB, I’d click on the “Classes” tab, select my class, do “Read Files…” (because of peculiarities in my project, the “Read Something.h” item is not enabled) and select my file in the open panel. The step of clicking on the “Classes” tab seemed particularly ridiculous to me if you had an instance of the class selected in the “Instances” pane.

At the last Cocoaheads meeting, Cathy Shive was giving a presentation on doing custom controls. While demonstrating how she put together the nib, I watched in amazement as she dragged the header file into the IB window to update her outlets and actions. I suppressed a sob as I reflected on all the time I wasted.

Command-double-click and option-double-click in XCode

In XCode’s editor, command-double-clicking on a symbol will bring up its definition, opening the appropriate header file as needed. Option-double-click brings up its documentation. You know. Me no know. Me ashamed.

• • •

Maybe these are news to you as well and if so, then I feel slightly less dumb. There are probably worse cases than this but I have erased all traces of them from my memory.

What are your embarrassing discoveries?

10 comments » | Cocoa, Debugging, OS X, Programming

Talking to my self

October 9th, 2007 — 10:21pm

I have code that takes in a string and uses key-value coding to extract a value from an object. It works fine if you want to get a property of an object, but what about getting the object itself? Using nil or an empty string with -valueForKey: or -valueForKeyPath: causes it to call -valueForUndefinedKey: which, by default, throws an exception.

After some diddling around, I found that you can use the key @"self". Doing valueForKey:@"self" on an object returns that object. There’s no magic here. NSObject has a -self method which returns, crazily enough, itself. This is peculiar because on the surface, this method is useless. Anywhere where you can type [anObject self] you can type anObject instead. Where this method comes in handy is in cases where you dynamically call a method/selector, as in KVC, and you want to specify a method that is a short-circuit of sorts.

So, in short, all of the following are equivalent:

someObject
[someObject self]
[someObject valueForKey:@"self"]
[[[someObject valueForKey:@"self"] self] valueForKey:@"self"]

I’m sure someone can use the last one in some Objective-C obfuscation contest.

5 comments » | Cocoa, OS X, Programming

Animation in the Time of Tiger: Part 3

September 20th, 2007 — 12:22pm

In this final installment, we’ll go over some more advanced ways to do animation.

Now, you may find that the types of animations you want to do can’t be handled by NSViewAnimation or that you need better performance. The solution usually involves getting a bitmap of your view or window. Having a bitmap allows you to do all sorts of manipulations and tap into other technologies that you can’t do directly with views or windows.

To get a bitmap of your window there are a couple methods. The first is to use NSCopyBits(). If you go back to the first article in this series, you’ll see that I glossed over this, but the technique is being used there. The window’s pixels are grabbed and the resulting image is scaled in the animation using an alternate window that just looks like the original. You can check out the downloadable project there.

Now there is a potential issue. This technique will not work if the window device has not been created yet. This happens when you mark the window as deferred and it hasn’t been brought on screen yet. To circumvent this for deferred windows, I quickly order the window on and off screen to force creation of the window device. I don’t see a visible flicker but your mileage may vary. If you know of a better way to force creation of the window device on a deferred window, let me know.

The other method is getting the window’s contentView’s superview and grabbing its pixels using one of the methods below. I’m not sure if it’s a good idea or not to be mucking with the contentView’s superview but it’s an alternate way at getting the pixels.

For views, there are a few options:

- drawRect

You could just lock focus on an NSImage and call view’s drawRect:. This will work but only for the current view. Not really useful except for specific cases where you only want this view and none of its subviews.

- initWithFocusedViewRect:

This works for most cases but it does require that the view be installed in some window’s view hierarchy. lockFocus on your view (not the image), create an NSBitmapImageRep and init using the above method, and boom, you got your view’s pixels (and don’t forget to unlock focus).

- cacheDisplayInRect:toBitmapImageRep:

First get the NSBitmapImageRep by calling NSView’s bitmapImageRepForCachingDisplayInRect:. If your view is not opaque, you may want to clear the pixels in this buffer. Call NSView’s -cacheDisplayInRect:toBitmapImageRep: to actually get NSView to draw the pixels into the bitmap. Using this method, the view does not have to be plugged in, so you don’t have to pop the view into the view hierarchy just to take its picture. Useful in the case where you are swapping views in and out and want to animate the incoming view before it’s actually in. This was added in 10.4 so won’t be useful for pre-Tiger.

• • •

Ok, now you have some pixels, what can you do with them?

Well, you can composite the bitmaps yourself and move them around. In general, this should perform better but you have to do more code in general to coordinate the animation than if you used NSViewAnimation.

You can also pipe that bitmap into Core Image. There are all sorts of effects available including a whole class of filters just for transitions. Luckily, Apple already has a good example called Reducer. Check out the AnimatingTabView class.

Another example of using Core Image is Rainer Brockerhoff’s Flipr which flips windows like Dashboard does with widgets.

And lastly, you can use OpenGL. Create a texture out of the bitmap and slap it onto a surface. I’ve done an example demonstrating this. It does something similar to Flipr but it’s using OpenGL and it focuses on flipping views, not whole windows though Flipr’s technique can be used for views as well and this technique can be extended to windows.

For the dev tool impaired, here’s a movie demonstrating the effect:


<a href="https://www.noodlesoft.com/blog/uploads/2007/09/viewflipper.mov">Download movie</a>

The key step here is described in this technote. Basically, you get the view’s bitmap and then convert that into a texture. As pointed out on cocoadev.com here, textures end up being upside down so as described in that article, I flip it. The code on that page also has a more reliable calculation of the pixel row length than the example from Apple’s technote so make sure you use that. From there, I create a slab and map the textures onto the surfaces. I animate rotating on the y-axis and voila! A flipping animation between views.

Details to note:

  • I create a parent view which swaps in the NSOpenGLView subclass to do the animation then swaps it back out. This avoids having to deal with issues of having subviews of an NSOpenGLView.
  • I do a calculation and adjust the perspective/frustum to make sure the view takes up the full viewport when facing you.
  • Notice that the animation gets clipped. Since it extends out towards the viewer, the shape needs to extend beyond the bottom and top bounds. Basically, the parent flipper view and the OpenGL flipper need to be larger than the views to provide an extra buffer. Or you could do it in an overlay window. There are a few more details involved but feel free to email me if you are thinking of pursuing this.
  • To keep things simple and clear (and because I’m lazy), the code here assumes that the views are opaque (if you look in the nib, the views have opaque, tabless tabviews used to draw the background). One could fix the code to grab a bitmap from the nearest opaque ancestor view though it would require having the view installed in the hierarchy.

Keep in mind that the last time I touched these 3D APIs, it was called just GL, not OpenGL, and it was on an SGI machine. So, while this example may be useful for certain details, my OpenGL-fu is weak so you might be better off using other examples for OpenGL specific stuff. Also, if I am doing anything stupid, let me know.

Well, that wraps it up for this series. I hope you gleaned something useful from it.

Comment » | Cocoa, Downloads, OpenGL, Programming

Animation in the Time of Tiger: Part 2

September 3rd, 2007 — 4:28pm

As promised, here’s part 2 of my animation miniseries. The topic for today: NSViewAnimation

In the last segment, we talked a bit about using NSWindow’s -setFrame:display:animate: method to do some window animations. In conjunction with setting the autoresize flags, you can get some nifty effects.

Many times, though, you need more control. Maybe you want to animate some views (not just windows) or maybe you want to change the rate of animation. For such cases, NSViewAnimation is the answer. NSViewAnimation allows you to set up dictionaries containing views or windows with their start and end states and then animate them. Since it is an NSAnimation subclass, you have control over whether it blocks, how long it takes, the animation curve, etc. If you aren’t familiar with NSViewAnimation, I suggest reading the docs and playing with it yourself.

Now, there are a couple quirks/bugs you need to keep in mind. Knowing these will save you some headaches:

  • If a view has a final frame with a zero dimension (width or height), NSViewAnimation will set it to be hidden when the animation finishes. If you use that view again in an animation (like doing a reverse animation of what you just did), NSViewAnimation will not unhide the view for you. You have to do setHidden:NO yourself before starting the animation. The exception to this is if you use a fade in effect, in which case, NSViewAnimation will unhide the view.
  • NSAnimationCurveEaseOut is broken. It seems to animate backwards. Yes, you can try and work around it and swap the beginning and end frames and such but, when Apple does fix it, you’ll be in for a surprise. I say just avoid using it.

For the purposes of this article, we will be using this project. It demonstrates animating between two views using a variety of basic transitions. If you use Keynote, these should be familiar (I’ve even used the Keynote names). The Dissolve transition needs little explanation; NSViewAnimation’s NSViewAnimationFadeInEffect and NSViewAnimationFadeOutEffect work as advertised. The other effects are variations on a right-to-left transition. They are different combinations of the views either moving in/out of bounds or being revealed or covered. This is achieved through use of clipping (via the view hierarchy) and the autoresizing masks.

viewport.png

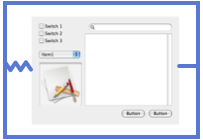
Basically, we have two “viewport” views. In doing a transition from right to left, we shrink the left view while expanding the right. Their main job is to clip the view they contain. When used in conjunction with the resizing masks, you can get different effects, the diagram above showing a “Move In” transition.

springs-struts.png

In the diagram here, the blue rectangle is the superview (viewport) of the visible view. I’ve made the rect larger than the view to show the resizing springs/struts but in actuality the viewport is the same size as the view (i.e. its bounds are flush with the contained view). In this case, we have a viewport with a containing view whose left margin is resizable but the right margin is fixed.

reveal-transition.png

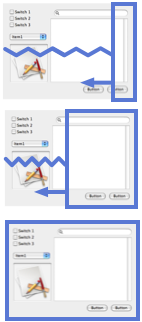
Now, let’s say the viewport starts at zero-width and expands out to the left while the view itself is positioned so that it’s right edge is flush with the viewport.

As you see, since the right margin is fixed, it appears as if the view is being revealed as the viewport expands to the left. Note that the autoresizing works just as well when the view is larger than its superview.

To make it appear as if the view is moving in towards the left instead (like in the “Move In” and “Push” transitions), make the left margin fixed and the right margin resizable.

Likewise, you can fiddle with the autoresize masks for the outgoing view to affect how it disappears (either pushed off or covered).

For those unable to compile the project, here’s what it all looks like:


<a href="https://www.noodlesoft.com/blog/uploads/2007/09/transitions.mov">Download movie</a>

As you can see, NSViewAnimation can be quite useful for when your animations involve moving and scaling views. In the next article, I’ll probably just go over some odds and ends such as optimizations and using Core Image transitions.

9 comments » | Cocoa, Downloads, Programming

Animation in the Time of Tiger: Part 1

June 30th, 2007 — 3:12pm

One of the most touted APIs in Leopard is CoreAnimation. Soon, you will be able to easily put together animations with tons of crap flying around all over the place. And with the new APIs, it’ll be a snap! Ok, ok, so there are some nice, tasteful animations that can be done and with Leopard they can be done easily. Fact is, though, there’s a good bit of animation you can do right now in Tiger (or earlier).

Why bother? Well, not all of us are dumping our Tiger users come October plus you could stand to learn something if you follow along. So, over the next couple months, I’ll be doing sporadic installments in this series. I’m not sure how many as I haven’t thought that far ahead but let’s say at least two, probably three.

Now, I feel that it’s important to lay down some guidelines. Animation in applications is subject to severe abuse. What may seem neat the first time can quickly become tedious if you are using the app on a daily basis. Too much movement in the interface can make for a visually noisy user experience or cause annoying delays. For the most part, use animation sparingly and with a purpose. Good uses would be to draw a connection between the start and end states of a transformation or to draw the eye from one part of the UI to another. A rule of thumb: if you feel the need to provide a preference to turn your animation off, maybe the animation is too intrusive. Remember, with great power comes great responsibility.

Before we delve into things, I want to point out that most of the animation techniques I’m going to talk about here pertain to NSWindows and NSViews. For various reasons, it is much easier to do animations with views than with, say, NSCells. What this means is that if you have a list of items using an NSMatrix or NSTableView and want to animate them, you may want to consider converting them into a bunch of views. While it is possible to write a control that animates its cells, you have to do a bit more work. Most of the animation hooks available operate on the view level, something that is further emphasized in CoreAnimation.

NSWindow animation

In NSWindow, you already have a powerful method at your disposal. With -setFrame:display:animate: you can set a new frame for your window and by specifying YES to the animate flag, the window will animate from its current frame to the new frame. Not too exciting? Well, try this on for size:

This effect is similar to how windows animate when you use the “Scale Effect” instead of the “Genie Effect” when minimizing windows (check your Dock preferences). You can download the project here. This is all done in an NSWindow category using documented API. While there’s a little magic of getting the window’s pixels (will probably talk about view/window caching in a future installment), the animation itself is done via the setFrame:display:animate: call. Ok, I fudge things slightly by overriding -animationResizeTime: to make it animate faster but the point is that you can do some interesting things with a basic call.

Autoresizing

When you animate, another thing you can take advantage of is the autoresizing mechanism (those springs and struts you see in IB). By setting up the autoresizing flags on your views in creative ways, you can do some neat little animations without having to muck with specifying all the different frames.

In Hazel’s (as well as in Mail’s) rule interface, when you create a new row, notice how all the rows below the new row shift down as space for the new row “grows” in. This is all done via setting the autoresizing masks (at least that’s how I do it; I can’t speak for what actually happens in Mail). Note that the autoresizing masks don’t have to be something you set once in IB and never touch again. Here, I reset them on the fly as needed. For the rows above the inserted row, the bottom margin is set to sizable. For rows below the insertion point, the top margin is set to sizable.

autoresizeanimationdiagrama.png

You need to put the new view into the hierarchy at some point. If you add it before the animation, you need to tweak with its size and autoresizing (make it height sizable). If you add it after, the view “pops” in but it happens fast enough that users will probably not notice. Now, I just resize the window (with animation) and all the views fall into place:

autoresizeanimationdiagramb.png

You do something similar when a row is deleted. Note that this is mostly effective when only one view in the window is resizing (and the others just moving) in a particular dimension as the resizing mechanism produces less than ideal results when more than one view is resizing.

So, that’s it for now. In the next installment, we’ll dig into NSViewAnimation and also have some more fun with autosizing flags.

5 comments » | Cocoa, Downloads, Programming

Productive Waste of Time: Figuring out the main thread

May 1st, 2007 — 10:40am

In keeping with my tradition of random experiments of no practical use, I present another edition of “Productive Waste of Time”.

In a Cocoa app, there’s a notion of the main thread. It’s the thread where all events are dispatched. If you don’t create any threads yourself, all your code is going to run in this thread.

The issue of getting a hold of the main thread came up in #macsb. While the Cocoa docs talk a bit about the main thread and what should and should not happen there, they do not give you a way to actually get a handle on it. Daniel Jalkut, whose fault it is for bringing this all up, suggested using pthread_main_np(). While it may work, I looked for a Cocoa-only solution that didn’t assume that pthreads’ notion of a main thread would always align with Cocoa’s.

So, I whipped up this NSThread category to do just that. Just drop it in. No special hooks or hook up needed. It basically just uses -performSelectorOnMainThread:… to set a static var. I didn’t use any locks as I felt the worse that would happen is a bunch of threads set the variable multiple times with the same value. If there’s a subtlety in the memory model that I’m missing here, let me know. Also, if the main thread is tied up, you could potentially tie up other threads as well. Also also, if the main thread exits, I’m guessing bad stuff will happen though it will happen regardless of the code here.

@interface NSThread (MainThreadAdditions)

+ (NSThread *)mainThread;
- (BOOL)isMainThread;

@end

static NSThread		*_mainThread;

@implementation NSThread (MainThreadAdditions)

// Only call this from the main thread.
// Actually, do not call this at all. It is done for you.
+ (void)_setMainThread
{
    _mainThread = [NSThread currentThread];
}

+ (NSThread *)mainThread
{
    if (_mainThread == nil)
    {
        [self performSelectorOnMainThread:@selector(_setMainThread) withObject:nil waitUntilDone:YES];
    }
    return _mainThread;
}


- (BOOL)isMainThread
{
    return [[NSThread currentThread] isEqual:[NSThread mainThread]];
}

@end

Now, why would you need this? Beats me. It came up in discussion and I decided to roll with it. I provide the code here for your use. It is released under the ‘Splain license. This license says you can do whatever you want with this code under the condition that you ‘splain why you need it. Please post here.

Use this code at your own risk. I am not liable for any bad stuff that may happen as the result, directly or indirectly, of using this code. Side-effects may include nausea, dry mouth and brain rash. This is not a suppository.

9 comments » | Cocoa, OS X, Programming

Back to top