Archive for September 2007


Hazel on MacUpdate Promo

September 27th, 2007 — 12:14am

For today only, Hazel is on sale at MacUpdate Promo for 35% off. If you’ve been thinking about it and just haven’t gotten around to clicking the “Purchase” button then here’s your chance. And if you already have a copy (and a thanks to you), then forward the link above to a friend. And if you don’t have any friends, I can think of no better way of making a new friend than by walking up to a random Mac user in a cafe and pointing them to the link above. And if getting to the nearest Mac user requires you to be put in cryogenic stasis for the multi-lightyear journey, then click the link and leave a nice comment.

But please, do not spam people or forums. Practice responsible computing. Only you can prevent forest fires. Be cool, stay in school.

Comment » | Uncategorized

Animation in the Time of Tiger: Part 3

September 20th, 2007 — 12:22pm

In this final installment, we’ll go over some more advanced ways to do animation.

Now, you may find that the types of animations you want to do can’t be handled by NSViewAnimation or that you need better performance. The solution usually involves getting a bitmap of your view or window. Having a bitmap allows you to do all sorts of manipulations and tap into other technologies that you can’t do directly with views or windows.

To get a bitmap of your window there are a couple methods. The first is to use NSCopyBits(). If you go back to the first article in this series, you’ll see that I glossed over this, but the technique is being used there. The window’s pixels are grabbed and the resulting image is scaled in the animation using an alternate window that just looks like the original. You can check out the downloadable project there.

Now there is a potential issue. This technique will not work if the window device has not been created yet. This happens when you mark the window as deferred and it hasn’t been brought on screen yet. To circumvent this for deferred windows, I quickly order the window on and off screen to force creation of the window device. I don’t see a visible flicker but your mileage may vary. If you know of a better way to force creation of the window device on a deferred window, let me know.

The other method is getting the window’s contentView’s superview and grabbing its pixels using one of the methods below. I’m not sure if it’s a good idea or not to be mucking with the contentView’s superview but it’s an alternate way at getting the pixels.

For views, there are a few options:

- drawRect

You could just lock focus on an NSImage and call view’s drawRect:. This will work but only for the current view. Not really useful except for specific cases where you only want this view and none of its subviews.

- initWithFocusedViewRect:

This works for most cases but it does require that the view be installed in some window’s view hierarchy. lockFocus on your view (not the image), create an NSBitmapImageRep and init using the above method, and boom, you got your view’s pixels (and don’t forget to unlock focus).

- cacheDisplayInRect:toBitmapImageRep:

First get the NSBitmapImageRep by calling NSView’s bitmapImageRepForCachingDisplayInRect:. If your view is not opaque, you may want to clear the pixels in this buffer. Call NSView’s -cacheDisplayInRect:toBitmapImageRep: to actually get NSView to draw the pixels into the bitmap. Using this method, the view does not have to be plugged in, so you don’t have to pop the view into the view hierarchy just to take its picture. Useful in the case where you are swapping views in and out and want to animate the incoming view before it’s actually in. This was added in 10.4 so won’t be useful for pre-Tiger.

• • •

Ok, now you have some pixels, what can you do with them?

Well, you can composite the bitmaps yourself and move them around. In general, this should perform better but you have to do more code in general to coordinate the animation than if you used NSViewAnimation.

You can also pipe that bitmap into Core Image. There are all sorts of effects available including a whole class of filters just for transitions. Luckily, Apple already has a good example called Reducer. Check out the AnimatingTabView class.

Another example of using Core Image is Rainer Brockerhoff’s Flipr which flips windows like Dashboard does with widgets.

And lastly, you can use OpenGL. Create a texture out of the bitmap and slap it onto a surface. I’ve done an example demonstrating this. It does something similar to Flipr but it’s using OpenGL and it focuses on flipping views, not whole windows though Flipr’s technique can be used for views as well and this technique can be extended to windows.

For the dev tool impaired, here’s a movie demonstrating the effect:


<a href="https://www.noodlesoft.com/blog/uploads/2007/09/viewflipper.mov">Download movie</a>

The key step here is described in this technote. Basically, you get the view’s bitmap and then convert that into a texture. As pointed out on cocoadev.com here, textures end up being upside down so as described in that article, I flip it. The code on that page also has a more reliable calculation of the pixel row length than the example from Apple’s technote so make sure you use that. From there, I create a slab and map the textures onto the surfaces. I animate rotating on the y-axis and voila! A flipping animation between views.

Details to note:

  • I create a parent view which swaps in the NSOpenGLView subclass to do the animation then swaps it back out. This avoids having to deal with issues of having subviews of an NSOpenGLView.
  • I do a calculation and adjust the perspective/frustum to make sure the view takes up the full viewport when facing you.
  • Notice that the animation gets clipped. Since it extends out towards the viewer, the shape needs to extend beyond the bottom and top bounds. Basically, the parent flipper view and the OpenGL flipper need to be larger than the views to provide an extra buffer. Or you could do it in an overlay window. There are a few more details involved but feel free to email me if you are thinking of pursuing this.
  • To keep things simple and clear (and because I’m lazy), the code here assumes that the views are opaque (if you look in the nib, the views have opaque, tabless tabviews used to draw the background). One could fix the code to grab a bitmap from the nearest opaque ancestor view though it would require having the view installed in the hierarchy.

Keep in mind that the last time I touched these 3D APIs, it was called just GL, not OpenGL, and it was on an SGI machine. So, while this example may be useful for certain details, my OpenGL-fu is weak so you might be better off using other examples for OpenGL specific stuff. Also, if I am doing anything stupid, let me know.

Well, that wraps it up for this series. I hope you gleaned something useful from it.

Comment » | Cocoa, Downloads, OpenGL, Programming

Moving to MarsEdit

September 5th, 2007 — 11:22am

Until now, I’ve always written up my blog posts in a combination of TextEdit for the initial draft and the WordPress web UI for subsequent drafts (mostly to get the formatting right) and final posting. Needless to say, it’s been painful. For a web app, WP isn’t so bad but, in the grand scheme of things, it’s lacking. I know this will probably draw the ire of all of you who think web apps are going to take over the desktop but seriously, it’s not going to happen with the current state of the art (unless users are willing to sacrifice a good bit of usability).

I am now switching over to MarsEdit. Resizable editing area. No html tag buttons whose key equivalents conflict with my use of emacs key bindings. No waiting 10 seconds to preview or save because of a laggy internet or server. The markup macros are editable (so I don’t keep having to type in target="_blank" on every link). The UI is quick and responsive. All the niceties of a native desktop app. Yeah, I’m sure I’ll bump into problems but at least a desktop app can fix most of those. With the web app, there are fundamental problems with the paradigm that make it clumsy and slow.

I know you’re thinking, “well, if the web app sucked so bad, why did you use it?” Simply enough, momentum, or lack thereof. Also, there is my ambivalence towards blogs. I resisted investing in any blogging tools as I didn’t want to admit that I was taking this seriously. I wanted to keep it painful so I would have a reason to hate it. Though now I’m still a bit of a curmudgeon when it comes to blogging, at least I’m willing to concede it’s not worth doing things the hard way.

In any case, MarsEdit 2 is out now. If the thought of writing up a blog post makes you wince, then you should check it out. Who knows, instead of hating it you might end up liking tolerating it.

Oh, and yes, the same Daniel Jalkut who convinced me to start this blog is also responsible for MarsEdit 2. So once again, this is all his fault.

2 comments » | OS X, Software

Animation in the Time of Tiger: Part 2

September 3rd, 2007 — 4:28pm

As promised, here’s part 2 of my animation miniseries. The topic for today: NSViewAnimation

In the last segment, we talked a bit about using NSWindow’s -setFrame:display:animate: method to do some window animations. In conjunction with setting the autoresize flags, you can get some nifty effects.

Many times, though, you need more control. Maybe you want to animate some views (not just windows) or maybe you want to change the rate of animation. For such cases, NSViewAnimation is the answer. NSViewAnimation allows you to set up dictionaries containing views or windows with their start and end states and then animate them. Since it is an NSAnimation subclass, you have control over whether it blocks, how long it takes, the animation curve, etc. If you aren’t familiar with NSViewAnimation, I suggest reading the docs and playing with it yourself.

Now, there are a couple quirks/bugs you need to keep in mind. Knowing these will save you some headaches:

  • If a view has a final frame with a zero dimension (width or height), NSViewAnimation will set it to be hidden when the animation finishes. If you use that view again in an animation (like doing a reverse animation of what you just did), NSViewAnimation will not unhide the view for you. You have to do setHidden:NO yourself before starting the animation. The exception to this is if you use a fade in effect, in which case, NSViewAnimation will unhide the view.
  • NSAnimationCurveEaseOut is broken. It seems to animate backwards. Yes, you can try and work around it and swap the beginning and end frames and such but, when Apple does fix it, you’ll be in for a surprise. I say just avoid using it.

For the purposes of this article, we will be using this project. It demonstrates animating between two views using a variety of basic transitions. If you use Keynote, these should be familiar (I’ve even used the Keynote names). The Dissolve transition needs little explanation; NSViewAnimation’s NSViewAnimationFadeInEffect and NSViewAnimationFadeOutEffect work as advertised. The other effects are variations on a right-to-left transition. They are different combinations of the views either moving in/out of bounds or being revealed or covered. This is achieved through use of clipping (via the view hierarchy) and the autoresizing masks.

viewport.png

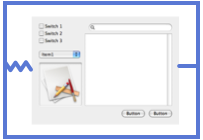
Basically, we have two “viewport” views. In doing a transition from right to left, we shrink the left view while expanding the right. Their main job is to clip the view they contain. When used in conjunction with the resizing masks, you can get different effects, the diagram above showing a “Move In” transition.

springs-struts.png

In the diagram here, the blue rectangle is the superview (viewport) of the visible view. I’ve made the rect larger than the view to show the resizing springs/struts but in actuality the viewport is the same size as the view (i.e. its bounds are flush with the contained view). In this case, we have a viewport with a containing view whose left margin is resizable but the right margin is fixed.

reveal-transition.png

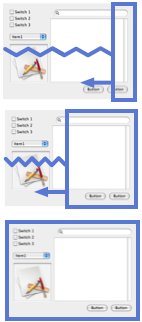
Now, let’s say the viewport starts at zero-width and expands out to the left while the view itself is positioned so that it’s right edge is flush with the viewport.

As you see, since the right margin is fixed, it appears as if the view is being revealed as the viewport expands to the left. Note that the autoresizing works just as well when the view is larger than its superview.

To make it appear as if the view is moving in towards the left instead (like in the “Move In” and “Push” transitions), make the left margin fixed and the right margin resizable.

Likewise, you can fiddle with the autoresize masks for the outgoing view to affect how it disappears (either pushed off or covered).

For those unable to compile the project, here’s what it all looks like:


<a href="https://www.noodlesoft.com/blog/uploads/2007/09/transitions.mov">Download movie</a>

As you can see, NSViewAnimation can be quite useful for when your animations involve moving and scaling views. In the next article, I’ll probably just go over some odds and ends such as optimizations and using Core Image transitions.

9 comments » | Cocoa, Downloads, Programming

Back to top