Category: Cocoa


Fun with Glue

July 5th, 2010 — 11:41am

In my last post, I introduced a little adapter class called NoodleGlue. It’s a simple class that wraps around a block allowing you to use it as the target and action for APIs that require it. It also optionally can take an extra block that is executed when the glue object is deallocated. This allows you to do any cleanup. In my NSTimer category from last time, I used this cleanup ability to allow the object to unregister from any notifications. Being a category, I couldn’t hook into the -invalidate or -dealloc methods of NSTimer so I created a glue object with a clean up block which I then set as an associated object on the timer. As a result, when the timer was deallocated, so would my glue object and my cleanup block would be triggered.

In more general terms, what does this mean? With my glue object plus the associative references feature, you can inject your code into any object’s deallocation sequence. It’s like being able to be notified if any object is freed. I’ve wrapped this up in an NSObject category with a new method, -addCleanupBlock:, which allows you to add a block to be invoked when the object is deallocated. It’s probably more of a proof of concept than something you’d want to use in production code but you can find it in the latest version of NoodleKit (it’s tacked onto the end of the NoodleGlue class).

Now, this sounds pretty cool on paper but this may be one of those cases of a solution looking for a problem. Not to be deterred, I’ve come up with some contrived cases that might actually be useful.

Add extra cleanup for extra stuff you attached to an object

It’s how I used it in my NSTimer category. You can unregister notifications and invalidate objects which need more than just a -release call.

Zero out references

One of the cool things about weak references in a GC environment is that they nil themselves out when the object is collected. You can simulate this behavior when using retain/release by setting up a cleanup block to nil out your reference to the object in question.

Tracing/debugging deallocations

Sure, you can do this in the debugger or Instruments but in some cases you want to trigger more involved code that you can’t do in gdb. Also, in a multithreaded program where the timing affects whether the bug shows up or not, this allows you to track deallocations without setting a breakpoint in the debugger which might otherwise change the timing.

Test if objects are actually deallocated (unit tests)

Credit goes to Guy English for this one. If you need to do a unit test where you want to test your memory management, you can “do the glue” to test that objects actually get deallocated. The problem here is if it’s not working (i.e. object doesn’t get deallocated), your block won’t get called so any assertions you put in there will just silently not happen. So, have your block set a variable and at the end of the test, do an STAssertTrue() on the variable.

• • •

Keep in mind that there are a couple of important caveats:

  1. You cannot retain the object you are “observing” in the block itself as this will create a retain loop and the observed object (as well as the glue) will never be dealloc’ed. Note that just referencing an object retains it unless you assign the object to a variable declared with __block. This has already been done for you in my code as the cleanup block is sent a non-retaining reference to the object being freed so use that reference instead.
  2. 
    	[self addCleanupBlock:
    		^(id object)
    		{
    			// Do not reference "self"
    			[object doSomething];
    		}];
    
  3. It’s not defined when in the deallocation process the associated object is freed. As a result, you can’t rely on any state of the observed object as it may be the case that all its ivars have already been released. But, you can have the block “capture” variables and the block will retain and subsequently release them. For instance, if you want to log the “name” of an object as it’s deallocated, you can reference the name in the block and it will be retained. But be careful though, if you reference an ivar in the object directly, you end up retaining that object. So, if the observed object is creating the block and you access its ivar in that block, you end up implicitly retaining the observed object, which is in violation of point 1 above. In those cases, assign the ivar to a local variable and use that (in this case, do not use __block in the variable declaration as you want the block to retain the object.
  4. 
    	NSString	*localName = _name;	// _name is an ivar
    	[self addCleanupBlock:
    		^(id object)
    		{
    			// Do not reference _name here as that will implicitly retain self
    			NSLog(@"Object %@ has been deallocated.", localName);
    		}];
    

I suggest reading up on the memory management issues with blocks as described here. Joachim Bengtsson has a great article on blocks (that link goes to the section relevant to this article but I recommend reading the whole thing) and there is always Mike Ash’s reliable series of articles on the subject, which I have consulted many a time myself.
Comment » | Cocoa, Debugging, Downloads, OS X, Programming

Playing with NSTimer

July 1st, 2010 — 2:51pm

It’s been a long while. Part of it is that I’ve been busy working on Hazel 3. And since I’m not interested in writing a book, I’m finding it hard to be motivated to keep posting here. Nonetheless, every so often I have to let something squirt out.

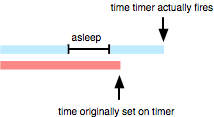
Today, we are going to talk about NSTimer. One thing you may or may not have noticed is that in certain cases where time is suspended (putting your machine to sleep) or altered (changing the clock), NSTimer has a tendency to try and compensate. For instance, say you set a timer to fire in an hour. You close the lid on your MBP and come back 30 minutes later. You’ll see that the fire date for the timer has adjusted to take into account the time it was asleep. Here’s a quickie diagram for those not quite following:

timer-timeline.png

Now, this is great if you wanted a timer to fire an hour later in the machine’s conception of time. But there are times when you want it to fire on the actual date you set on it. Typical example is setting a timer for a calendar appointment. That time is an absolute point in the user’s timeline and you don’t want that timer to shift to compensate for the machine’s timeline.
The basic fix here is when one of these time-altering events occurs, you reset the fire time on the timer to the original time that was set on it when it was created. Luckily, there are notifications for when the machine wakes from sleep as well as when the system clock is changed (this one being new in 10.6). Naturally, one would think to make an NSTimer subclass as the most straightforward way to do this. Unfortunately, it seems that it doesn’t work. Even if you get over the hurdle that NSTimer is actually abstract (like a class cluster), you have to add the timer to the run loop to schedule it. While NSRunLoop seems to accept the NSTimer subclass, it doesn’t ever fire. I don’t know if NSRunLoop is looking for the NSTimer class specifically or if it’s calling some private method that I need to override. If someone else has had any luck doing this, drop me a line.

The alternative is a category. The problem is that we need at least one ivar to store the original fire date. Normally, you can’t add ivars in a category but in this glorious post-10.6 age, we can, via associative references. It’s basically just a dictionary where you can store variables associated with an object. Sure, you could have implemented that yourself but the nice thing is that it handles memory management as well. When the object is dealloc’ed/collected, depending on the memory management you specify, it can also release/collect any associated objects.

So, NSTimer category it is. It supplies the method (among others) +scheduledTimerWithAbsoluteFireDate:target:selector:userInfo: which creates and returns an autoreleased and scheduled timer that will fire on the given date regardless of any time fluctuations/lapses. If all of a sudden the fire date has passed (like if the machine was asleep during the fire date or if the system clock was set ahead), it will fire immediately. Note that calling -setFireDate: won’t quite work in the sense that if the timer ever has to be reset from a time shift, it will be set to the date used when creating the timer, not the one that you set it to afterwards. This is an implementation limitation as I am using a category and can’t override methods (at least not without doing some method-swizzling which is not something I want to deal with). In cases where you need to change the fire date, I’d suggest just creating a new NSTimer.

I’ve also included a test harness where you can see it in action compared against a timer running in normal (non-absolute) mode. When run normally, both timers should fire at the same time but you can test things out by changing the system clock or putting your machine to sleep. You’ll see that the regular timer’s fire date will start to drift out while the “absolute” timer will stick with the time originally set.

I also went ahead and added methods to have NSTimer to use blocks instead of a target/selector combo. Note sure why this wasn’t in there already but I thought it’d be useful.

And that’s not all! Included is my NoodleGlue class. It’s a simple little class that just wraps a block (plus another block for cleanup, if you need it). It’s useful for cases where you want to set a target and selector for some object to use but don’t want to create a new class or method for it. Check out the source code for the NSTimer category to see how its used both with NSTimer (to implement the block API) as well as NSNotificationCenter. In the latter case, there is a blocks-based API but I had special memory management requirements that couldn’t be done with the existing API.

Needless to say, this extension only works on 10.6+. It’s in the latest version of NoodleKit and as a result I’ve made NoodleKit require 10.6 as well. Just build and run the TimerLab target. Fixes and suggestions welcome.

[Update 8:35pm EDT] I neglected to push the code to the github repository. Sorry about that. Everything should be there now.

7 comments » | Cocoa, Downloads, OS X, Programming

Yet Another Way to Mimic the Artwork Column in Cocoa

October 20th, 2009 — 8:14pm

I was just turned on to a post from Jesper of Waffle Software entitled How to Mimic the Artwork Column in Cocoa. There he approaches the problem of implementing cells in an NSTableView that can span multiple rows. This spurred on Jacob Xiao at Like Thought to tackle the problem in a different manner. I suggest reading both of the above to get a sense of the problem and the possible approaches.

With NSTableView still on my mind from my last diversion, this got me thinking about the problem and I decided to try my own hand at it. I preferred Jacob’s approach as I think it should be all contained within NSTableView if at all possible. I liked the notion of “slicing” up the cell instead of using another view. Playing with it, I came up with a generalized solution. Here are some of the interesting aspects:

  • It can support any NSCell subclass. I do this by using a special wrapper cell. It draws the “full” version of the cell then draws out the slices for each row into the tableview.
  • It determines the spans by finding contiguous rows that have the same object value for the column in question.
  • The above two points are exploited to do some caching such that the “full” cell is only drawn once and the parts composited in place as needed.
  • If the first column is set to span rows, it will only draw the grid for the last row in a span.
  • You can designate multiple columns to do this. In the example project, if you click on the “Album” column, it will toggle between span and non-span mode. The “Artwork” column doesn’t do this because it looks cruddy in non-span mode. I haven’t tested it (see update below) but theoretically, the spans do not have to line up between different columns.

To use it, for any columns you want to have this row-spanning behavior, set the table column class to NoodleRowSpanningTableColumn. Also, it might help to get rid of any intercell spacing in your tableview (at least in the vertical direction). There are probably a few bugs. I do know that reordering columns may cause some grid drawing funniness but for the most part, it seems to work pretty well. Let me know if you find otherwise.

You can check the code for other implementation tidbits. I’ve included a self-contained project below but I’ll eventually polish it a bit and add it to my NoodleKit repository where it can join the rest of my goodies.

Many thanks for Jesper and Jacob for the inspiration and laying down the groundwork for this.

Update (Oct. 21, 2009): I observed odd behavior in that the program would get into a re-drawing frenzy eating up a bit of CPU. This was non-blocking in that I was still able to manipulate the UI (which is why I didn’t notice it at first). I finally figured out that it was the -drawGridInClipRect implementation. I was drawing the grid selectively by changing the grid mask and then calling super on subregions. Unfortunately, changing the grid mask queued up a redraw which started a loop (albeit one that didn’t tie up the event loop). Seeing as I needed to fix the grid-drawing logic anyways, I reworked the whole thing.

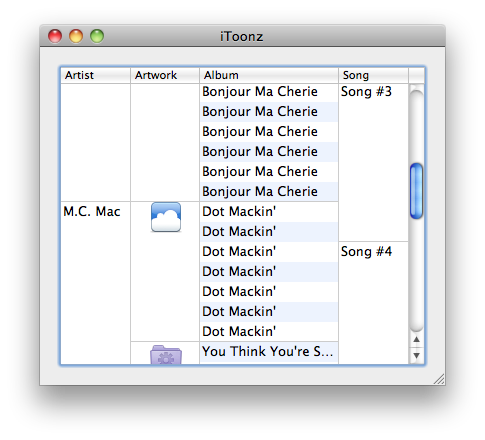
The new grid code should now be able to handle multiple spanning columns rearranged in whatever way you want. Here’s contrived example of having multiple spanning columns that don’t necessarily line up:

row-spanning-table.png

I also made some other fixes and improvements so it’s worth re-downloading the project even if you already did so before (I bumped this version to 0.37).

As for integration with the rest of NoodleKit, I still need to decide whether I want to merge this with my sticky row tableview to make some über-tableview. Problem is is that I can’t think of how the two features would interact so maybe it’s best to keep them separate. Thoughts on this are welcome.

Update (Oct. 23, 2009): I’ve just updated the project to version 0.68. There was a crasher when you would click on a non-span row and then move into a spanning cell. Also, the span cells were highlighting when you clicked on a non-span row. Both of these have been fixed. Thanks for Jesper for finding the crasher and Jacob for helping with the fix.

Update (Oct. 25, 2009): I’ve consolidated this functionality along with my previous sticky row header code into a single NoodleTableView class. You can find it in the NoodleKit repository. Future updates to this will be posted there from here on out.

Download NoodleRowSpanningTableViewTest.zip
[This project is no longer being updated here. You can get the latest in the NoodleKit repo]

2 comments » | Cocoa, Downloads, OS X, Programming, Software, User Interface

NoodleKit

September 29th, 2009 — 2:44pm

I’ve finally gotten around to consolidating most of the bits of code I’ve posted on this blog over the years and put it in a repository. While the real NoodleKit is a much more extensive and cohesive toolkit that I use internally, this one will serve as a place where I put the odd scraps that I decide to open source. I guess I could’ve called it NoodleScraps but it doesn’t quite sound as nice.

If you’ve been following my blog for a while then there’s not much new here, codewise. There are a tweaks here and there plus the stuff should be 64-bit ready so it might be worth re-downloading just for that. It will be the place where I put future code so you should keep an eye on it.

The project is structured to build a framework but also has an examples directory (with corresponding targets) to demonstrate the use of the different classes. The current notion is to keep things compatible with 10.5. And, as usual, all code is released under the MIT license.

NoodleKit (hosted at github)

Enjoy.

Comment » | Cocoa, Downloads, OS X, Programming, Quartz, User Interface, Xcode

“Sticky” section headers in NSTableView

September 25th, 2009 — 9:25am

Once again, I find myself with some cool code with nowhere to put it. And, yet once again, you get the reap the benefits.

UITableView on the iPhone has the neat feature where section headers stick at the top after the actual row for it has scrolled off. For instance, in Contacts, if you scroll down, the row for section “A” stays visible so that you know what section you’re in if the section is too large for the screen.

Unfortunately, someone asked how something like this could be done on desktop Cocoa. I say “unfortunately” because I was within earshot and it resulted in me embarking on a journey peppered with annoying run-ins with NSTableView’s idiosyncrasies. Nonetheless, I persevered and came up with something hopefully someone will find useful. As was the case before, I don’t have a use for it myself at the moment, but I feel it would be a shame to let the code go to waste.

I am presenting NoodleStickyRowTableView. I call the section headers “sticky rows” as one can specify any row to stick up top for whatever reason, though by default, it does it for group rows.

The bad stuff:

NSTableView makes it very difficult to cache a row visually. -drawRow:clipRect: should be able to do it but the problem is that it’s too smart for it’s own good. If the row is not visible, it will not draw anything. Add on top of that the impossibility of getting it to draw the special background the group rows use. I tried all sorts of techniques but none were general or reliable enough. My email on the cocoa-dev list was, not surprisingly, ignored. As a result, in the default implementation, I use my own look for the rows and then use a fade-in transition since the sticky row will look different from the actual one. You can see it in the video below where it has a ghost-like effect.

The good stuff:

The good news is that I managed to work it into an NSTableView category. You can think of it as an abstract category if you wish. In your subclass, at the very minimum, override -drawRect: and call -drawStickyRowHeader after calling super. From that one call you will get all the functionality.

Why do it this way? Well, ease of use for one. It makes it so that you can integrate it into your own NSTableView subclass without having to copy and paste large swaths of code or put it all sorts of odd hooks. Secondly, the changes get inherited by NSOutlineView so the functionality is available there and in its subclasses as well.

While I could use the new associated objects functionality in Snow Leopard, I opted for Leopard-compatiblity. This resulted in me coming up with a couple tricks to get around the lack of ivars, including the rarely used -viewWithTag: method. Check the “read me” file and code for details.

There are two different transitions. The default is the fade-in transition as shown here:


<a href="https://www.noodlesoft.com/blog/uploads/2009/09/Ghost-Transition.mov">Download movie</a>

As mentioned before, since I couldn’t get the group rows to draw properly and consistently, I use a more generic look for the row. The transition makes it less jarring but it is a compromise of sorts. Not bad when you consider that you get all this by calling just one extra method in your -drawRect:.

But what if you want something more like the iPhone’s version? In your subclass, you can override -stickyRowHeaderTransition to return no transition and then do your own drawing of the rows so that they look the same between the regular and sticky versions. The NoodleIPhoneTableView included in the project shows how this is done with the result being something on par with UITableView:


<a href="https://www.noodlesoft.com/blog/uploads/2009/09/iPhone-Transition1.mov" title="iPhone Transition.mov">Download movie</a>

I am releasing this under MIT license as usual. Use it however you want as long as you give me credit somewhere. Please send in any feedback, suggestions, bugs, etc but keep in mind that this is not something I use in my projects so I probably will not be actively maintaining it beyond a certain point. I’ve made a point of making the the API easy to use and to extend so have fun with it.

Download NoodleStickyRowTableViewTest.zip (version 0.18639)

Update (Sep. 29, 2009): I have included this class in my NoodleKit repository so you should check there for future updates.

4 comments » | Cocoa, Downloads, OS X, Programming, User Interface

Fun with KVC

June 30th, 2009 — 10:33am

[Warning: this article is for entertainment purposes only. Any harm you do to your code or any offense you incur on the sensibilities of other programmers is your responsibility.]

Some time ago, Guy English posted a great and twisted article on key value coding (KVC). He comes up with a nice hack to do stuff with KVC that was never intended. Of course, there are some neat ways you can use KVC without indulging in the craziness that Guy English delves into (and I think he’d be the first to admit that it’s not meant for primetime). The main point remains, which is that using KVC with NSArrays is a great way to avoid coding loops over their contents. You have an array of “Person” objects and want an array of their names (accessible via a -name method)? Just do…

newArray = [array valueForKey:@"name"];

Now, the keys do not necessarily have to be properties of the object. There’s nothing stopping you from calling other methods on your objects that return other objects, provided they don’t require any arguments. For instance, if starting out with an array of strings…

newArray = [array valueForKey:@"lowercaseString"]

…will generate a new array of lowercase versions of the original strings. Actually, the methods don’t even have to return objects. Want to convert an array of numbers in string form to numbers? Try the following:


array = [NSArray arrayWithObjects:@"1", @"2", @"3", @"4", nil];

newArray = [array valueForKey:@"intValue"];

This gives you an array of NSNumbers. KVC auto-boxes scalar types as needed. It’s a great way to do conversions/transformations of arrays of objects in one fell swoop.

Suppose you want to do a deep(er) copy of an array of objects (not only copy the array, but each of its objects as well):

newArray = [array valueForKey:@"copy"];

There is the issue, though, that the copies in the array now have a retain count of 1 and will be leaked unless extra care is taken. But no need write a loop to autorelease the objects. Instead, we can use keypaths to create chains:

newArray = [array valueForKeyPath:@"copy.autorelease"];

Retain it now and release it later or just let it get autoreleased. Either way, everything cleans up nicely.

And if you have a bunch of NSMutableCopying-conformant, immutable objects and want to convert them to their mutable counterparts:

newArray = [array valueForKeyPath:@"mutableCopy.autorelease"];

That gives us an array of autoreleased mutable copies.

Sure, not super mind-blowing but hopefully something above may save you some keystrokes. If you have your own KVC tricks, post them here in the comments.

[Update 2009-06-30]

This all started out with an conversation I had with Guy about wacky KVC stuff. The original title of this post was “KVC Abuse” but after a few edits, it got lost. I added the warning at the top but I’ll make it clear here: this is an abuse of KVC. This whole post is an indulgence.

I avoided a whole discussion of implementing HOM (Higher Order Messaging) type functionality in Objective-C but here’s a method you can use in an NSArray category:

- (NSArray *)map:(SEL)selector
{
	NSMutableArray		*result;
	
	result = [NSMutableArray arrayWithCapacity:[self count]];
	for (id object in self)
	{
		[result addObject:[object performSelector:selector]];
	}
	return result;
}


You don’t get the auto-boxing or the keypath stuff but the end result is still succinct and convenient for the basic case:


newArray = [array map:@selector(lowercaseString)];

Of course, my own version that I use has a more verbose method name (-transformedObjectsUsingSelector:) but no matter how you slice it, it will generate less bile from other developers.

6 comments » | Cocoa, OS X, Programming

Understanding Flipped Coordinate Systems

February 2nd, 2009 — 12:25pm

Flipped coordinate systems always seem to confuse people, myself included. After working things out with pen and paper or handpuppets, I always feel like they’re not quite correct so I thought I’d resolve things here. If anything, I can refer back to it whenever I forget this stuff (which happens every couple years). First a refresher in case you need it: Cocoa Drawing Guide: Flipped Coordinate Systems.

The main thing to keep in mind is that while a flipped coordinate system is basically translating the origin to the top left and flipping things vertically, semantically it doesn’t mean that everything is upside-down. Images, text and other elements are supposed to render right-side-up. The flipped coordinates should affect where those elements are placed, not how they are rendered. Being flipped is a higher level notion and is separate from the
CTM. While setting something as flipped will flip the CTM, modifying the CTM without setting the graphics context as flipped results in everything being entirely upside-down, which is different. Many of the Cocoa classes and functions take flipped coordinate systems into account and will draw right-side-up for you but it gets tricky with images.

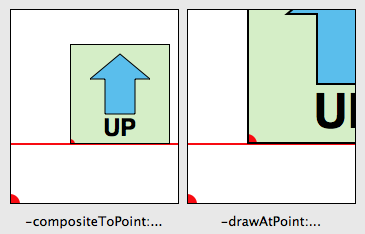
There are two sets of methods in NSImage to render it in a graphics context: the -composite... methods and the -draw... methods. I’ve put together an interactive example app to help illustrate the differences. It might help you to download it now so you can follow along. The figures included in this article are from that app

The -composite... methods actually seem to work in the sense that the image is always right-side-up. The problem is that it draws “upward” from the draw point regardless of the coordinate system. The result is you have to calculate the compositing point at the upper left corner of the image instead of lower left. This is the result of these methods not taking the CTM into account in terms of scaling and rotation. That also means that if you scale your view up, the images won’t scale with it. While you can use this to your advantage in some cases (like rendering resize handles or labels which you want to stay the same size regardless of zoom), it’s usually not the right way to do it.

composite-scaled.png

View scaled at 2x. Notice how the composited version does not scale.

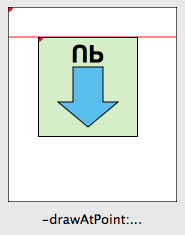
The -draw... methods on the other hand follow the CTM properly. That also means that if the view is flipped, so is the image, so you need to adjust accordingly. So while these methods obey the CTM, they do not take into account the flipped flag of the context which would be the cue to draw things right-side-up.

draw-flipped.png

The draw... routines follow the CTM, but not the flipped flag.

Now, to complicate things even further, NSImage’s themselves can be flipped. The reason for this isn’t to make the images upside-down. It’s there to provide a flipped coordinate system for whenever you draw into it (i.e. lockFocus on it, draw, then unlockFocus). It’s useful for when you want to tell a flipped view to draw into an NSImage, for instance. It’s basically like a flipped view; you don’t expect a flipped view to draw upside down, no matter which view you set as its superview. A subtlety to be aware of is that flipping an image loaded from a bitmap does not make too much conceptual sense (you are changing the coordinate system after the content has already been “drawn”) but it does have the practical effect of flipping the image vertically, which seems to be an implementation detail. Yes, flipping the image will work to “correct” orientation problems in most cases but, depending on where your image gets its data (for instance if it has an NSCustomImageRep like the example app – see below) and whatever implementation-specific details lurk in NSImage, you may end up with undesired or inconsistent results.

As mentioned above, I’ve put together a little interactive example app (Leopard-only) to show how the different methods behave. In addition, I’ve written methods in an NSImage category (-drawAdjusted...) which will render the image correctly regardless of the flipped status of the coordinate system it draws into. As suggested in Apple’s docs, it does a transform reversing the flip, draws the image, then reverts the coordinate system back.

The image itself is drawn by code, not loaded from a bitmap. The reason for this is that I also wanted to illustrate using flipped images. It draws an arrow and some text to indicate the proper orientation. When flipped, the drawing code is exactly the same in that no coordinates are recalculated. The text content is changed to compensate for the new orientation. Notice how the text renders right side up no matter the flip state of the image; an indication that the NSString drawing methods are “flip-aware.” Also, it shows how to check the graphics context to get its flipped status so you can make your own drawing routines flip-aware as well.

Unfortunately, not everyone draws flipped images correctly. One place in particular is NSView’s/NSWindow’s -dragImage:at:offset:event:pasteboard:source:slideBack: method which will draw flipped images upside-down. Since you can’t control how the image is drawn, you can instead draw your flipped image into another non-flipped image and pass that in. I’ve added a method to the NSImage category to do this and you can check out the result in the example app (you can drag the image out of the views though only the last one has the corrected version).

And what if you actually want to draw everything upside-down, you irrepressible nut? Well, apply your own transforms using NSAffineTransform or CGAffineTransform. Just remember to concat the transform and not set it (a good general rule when using affine transforms). As long as you don’t tell any classes that you’re flipped, it should work out.

Hopefully this didn’t make things even more confusing (and also, hopefully, my interpretation of all this is correct). If you are still lost then just follow these rules:

  1. Do not set images as flipped unless you know what you are doing.
  2. Use the -drawAdjusted... methods in my category (or similar technique) to do all your image drawing.
  3. If you didn’t listen to rule #1 and you have a flipped image and it is showing up upside-down even when following rule #2, then use the -unflippedImage method in my category to get an unflipped version of the image and use that instead.
  4. Never go in against a Sicilian when death is on the line.

That should handle most cases you run into. And trust me on rule #4.

7 comments » | Cocoa, Downloads, OS X, Programming, Quartz

The Invisible Interface: Stealing Prefs

January 27th, 2009 — 1:52pm

In this installment of The Invisible Interface, we are going to look at stealing preferences. What is stealing preferences? Simply enough, it’s using the preferences of some other app instead of having your own for a particular feature. The point of this is to avoid having to provide a separate interface for settings when the user has already made their choices known somewhere else.

The key here is finding cases where your functionality is more centrally used somewhere else. I’m going to use Hazel as an example but hopefully these will illustrate the point well enough for you to look for where you can apply it yourself.

Spring-Loaded Folders

For those that don’t know, Finder has a feature called spring-loaded folders. What this does is when you drag a file over a folder, after a delay, it will flash and then open that folder so you can drill deeper. It allows you to navigate the folder tree without having to let go of the file you are dragging.

Hazel implements spring-loaded folders as well. It works when you want to move/copy rules in between folders. Hovering the dragged rule over a folder in the list on the left will cause the view to switch to the rules for the hovered-over folder allowing you to drag back into the rule list and place the rule where you want it. [On a side note, implementing this uncovered a bug in NSTableView (at least on Tiger; have not checked with Leopard) resulting in me doing my own implementation of NSTableView’s drag and drop.]

Under Finder’s “General” tab, you’ll see a checkbox and slider to configure these settings. Your first thought may be to provide a similar UI in your app. But why? Does the user really care about tweaking this for each app it appears in? It seems like whatever setting works in Finder will be fine wherever else it is used so why not just use Finder’s preference?

Commonly Used Folders

In Hazel, when you specify a destination folder for some actions (like move and copy), there is a pop-up of folders. You’ll notice that there’s a list of common folders at the end of the pop-up menu. If you look a bit closer, you may notice that these are the same folders in the sidebar of your Finder windows. Those folders are common destinations for files so it’s a good list for Hazel to use. By grabbing that list from Finder, Hazel avoids any sort of extra maintenance/interface for managing that list.

AppleScript Editor

In 2.2, Hazel introduced inline editing of scripts. You are provided with a mini-AppleScript editor right in Hazel’s rule interface. Now, there are potentially different things you can tweak to make the editor suit your needs, such as line wrapping, tab widths and whether to use the script assistant. But if you poke around Hazel’s UI, you’ll see that there’s no interface to set these. That’s because Hazel steals these preferences from Script Editor. If someone is serious enough about editing AppleScript that they care about these settings, there’s a good chance they have Script Editor installed and already set these preferences. By using its preferences, there is a consistency of user experience between the two editors.

• • •

Of course, you can’t do this everywhere. It’s best suited when the functionality is primarily used elsewhere and you are echoing it in your own app. The apps Apple ships with the system are an easy mark since you can usually rely on them being installed and they tend to be the places where common functionality is defined. Overall, the result is a less tweaky and cluttered interface and a more seamless experience with the rest of the system.

Doing the Heist

You can grab other apps’ preferences using either CoreFoundation or Cocoa. With Cocoa, NSUserDefaults is your go-to guy. -persistentDomainForName: does what you want. Give it a bundle ID and in return, you get a dictionary of preferences. What would’ve made more sense is something like +userDefaultsForName: which would return an NSUserDefaults instance, but hey, it’s not like Apple is hiring me to do API design. With CoreFoundation, you can use CFPreferencesCopyAppValue() to pick individual preferences. Again, a bundle ID is needed.

And I can’t leave without placating the more pedantic among you that have to point out the potential dangers of doing this. Therefore, I must note that there is some risk in doing this as most apps do not document their preference settings and they can change at any time. Having default values of your own for these settings should minimize the risk, at least buying you time until you can re-work things to use the new schema. That said, if this is for some critical/primary functionality in your app, it might behoove you to have your own settings for it. As they say, invest only what you can afford to lose, or, to milk the stealing metaphor, don’t do the crime if you can’t do the time. And while we’re at it, just say “no” to drugs, kids.

Comment » | Cocoa, Hazel, OS X, Programming, User Interface

Displaying Line Numbers with NSTextView

October 5th, 2008 — 8:16pm

Yes, it’s free code time again. I’ve been neglecting the blog for some time so hopefully this will make up for it. Think of it as that conciliatory heart-shaped box of chocolates used as a sorry way to make up for forgetting about your birthday, after which, I go back to my old ways of sitting on the couch all day watching sports, ignoring you.

In version 2.2 of Hazel, I added mini AppleScript and shell script editors so that people could enter scripts inline without having to go to another program and saving it to an external file. I’ll admit, I didn’t set out to make an uber-editor since it was intended for small scripts. Nonetheless, a user recently pointed out that when a line wraps, it’s hard to tell if it’s a continuation of the previous line or a new one. One of his suggestions was putting line numbers in the left gutter. If you don’t know what I’m talking about, look at TextMate (the example he cited) or XCode (you need to turn it on in preferences). I thought it might be overkill for a script editor that will mostly be used for scripts less than ten lines long. I’m instead considering doing an indented margin for continuation lines. Less visual clutter and addresses the problem at hand.

Nonetheless, I was curious about implementing line numbers. Poking around, I found some tips on how to do it but it seemed like there were odd problems implying it wasn’t as straightforward as one would think. So, snatching some free time in between other things, I decided to tackle the problem.

I looked into subclassing NSRulerView. The problem is that NSRulerView assumes a linear and regular scale. Now, to make it clear, I am talking about numbering logical lines, not visual ones. If a line wraps, it still counts as one line even if it takes two or more visually. The scale is solely dependent on the layout of the text and can’t be computed from an equation. Despite these limitations, I went ahead and subclassed NSRulerView. If anything, NSScrollView knows how to tile it.

I had this notion that NSRulerView was a view that synced its dimensions with the document view of the scrollview. With a vertical ruler, I assumed it would be as tall as the document and the scroll view just scrolls it in tandem with the document. Not so. It’s only as tall as the scrollview. That means you have to translate the scale depending on the clipview’s bounds.

I added some marker support via an NSRulerMarker subclass that knows about line numbers. The line number view will draw the markers underneath the labels a la XCode (with the text inversed to white). The sample project uses another subclass which will toggle markers on mouse click. While NSRulerView usually delegates this to its client view it made more sense to just do it in a subclass of NSRulerView. You have to subclass something to get it to work and it made more sense to subclass the ruler view since the code to handle markers never interacts with anything in the client view anyways. Personally, I find it an odd design on Apple’s part and would have preferred a regular delegate.

The project is linked below. The main classes are NoodleLineNumberView and NoodleLineNumberMarker. Some notes:

  • To integrate: just create the line number view and set it as the vertical ruler. Make sure the document view of the scrollview is an NSTextView or subclass. Depending on the order of operations, you may have to set the client view of the ruler to the text view.
  • The view will expand it’s width to accommodate the widths of the labels as needed.
  • The included subclass (MarkerLineNumberView) shows how to deal with markers. It also shows how to use an NSCustomImageRep to do the drawing. This allows you to reset the size of the image and have the drawing adjust as needed (this happens if the line number view changes width because the line numbers gained an extra digit).
  • Note that markers are tied to numerical lines, not semantic ones. So, if you have a marker at line 50 and insert a new line at line 49, the marker will not shift to line 51 to point at the same line of text but will stay at line 50 pointing at whatever text is there now. Contrast with XCode where the markers move with insertions and deletions of lines (at least as best as it can). This is logic that you’ll have to supply yourself.

More details, including performance notes, can be found in the Read Me file included in the project.

I’m putting this out there because I’m probably not going to use it and it seems like a waste of some useful code. Also, my apologies to the user who asked for this feature. I feel like somewhat of a jerk going through the trouble of implementing the feature and not including it. It was more of a fun exercise on my part but I still feel it’s not suitable for Hazel. That said, I may consider adding it and having it available via a hidden default setting. Votes for or against are welcome.

In the meantime, you can use the code however you want. MIT license applies. Please send me any bug reports, suggestions and feedback.

Enjoy.

Download Line View Test.zip (version 0.4.1)

Update (Oct. 6, 2008): Uploaded version 0.3. Fixes bugs found by Jonathan Mitchell (see comments on this post). Also made line calculations lazy for better performance.

Update (Oct. 10, 2008): Uploaded version 0.4. Fixes bugs mentioned in the comments as well as adds methods to set different colors. There is a display bug that happens when linking against/running on 10.4. See the Read Me for details.

Update (Oct. 13, 2008): Uploaded version 0.4.1. Figured out the 10.4 display bug. Apparently, NSRulerView’s setRuleThickness: method doesn’t like non-integral values. Rounding up solves the problem. Thanks to this page for identifying the problem.

Update (Sep. 29, 2009): I have included this class in my NoodleKit repository so you should check there for future updates.

23 comments » | Cocoa, Downloads, OS X, Programming

Adventures in Debugging: Pref Pane Poppin’ Aplenty

April 23rd, 2008 — 3:34pm

As you may or may not know, Hazel is packaged as a preference pane. While you do all the configuration via the preference pane interface, the actual work of running your rules is done by background processes. The commandline tool that actually runs the rules is stored inside the pref pane bundle. I’ve kept it in the Resources part of the bundle for no good reason except that’s the catch all for all your bundle stuff. But then I thought, “why not stick it in the MacOS dir. That’s where executables are supposed to go, right?”

So, I went into XCode and created a new “Copy Files” phase to copy the built executables into the “executables” dir (which ends up being the MacOS dir in your bundle). I modified the code that launches the program to look in the right place (NSBundle’s -pathForAuxiliaryExecutable: for those of you keeping score at home). It seemed to work. My bundle was now a tad tidier with things in their proper place.

Later on, I was testing something else and noticed that when Hazel was running certain rules, the pref pane icon would show up in the dock and then disappear when the background program was done. Strange enough that a pref pane icon would appear in the dock; stranger that it was being triggered by a non-GUI program. More testing revealed that it happened when Hazel was executing AppleScripts. I tried isolating the AppleScript parts. I checked all sorts of paths. I couldn’t figure out what was causing it. The Pope was in town so maybe he was messing things up somehow.

I checked previous versions to isolate when the bug was introduced and discovered it was only in the last set of changes. Moving the executables back to Resources fixed it.

Problem solved but I had no idea why. After muttering about it in IRC, Mike Ash casually throws out the explanation: “the binary is hitting the window server, the window server notices that it’s in an executable directory of a bundle, sticks it in the Dock.”

Of course, it all sounds so simple when you hear the answer. Calling the AppleScript created the window server connection which then prompted it to throw the icon in the dock as if it were a regular app. Not sure how long it would have taken me to figure that out on my own.

The lesson here is that when faced with a crazy bug, ask Mike Ash. Really, though, don’t do that. He’ll crash his glider into me next chance he gets. The real lesson is that you should be careful about putting executables for background programs in the MacOS directory of your bundle.

Ok, so I can’t pin this one on the Pope. All I know is that I don’t get these types of problems when the Dalai Lama is in town.

2 comments » | Cocoa, Debugging, Hazel, Programming, Xcode

Back to top