More Fun With Gradients

October 11th, 2006 — 4:11pm

For the past couple weeks on and off (mostly off), I’ve been working on this gradient code. In my previous post, I mentioned my attempts at vectorizing it which resulted in no performance gain in the end. Here, I recount a tale of writing a generic gradient method in a NSBezierPath category. Yes, a tedious story, but this is a blog after all, plus you stand to get some actually-useful, free source code in the end so bear with me. Or, like a kid pouring all the cereal out of the box to get the glow-in-the-dark prize inside, you could, through the power of the scrollbar, skip all this and just grab the code.

So yes, I wanted to write a category to provide a method to fill the path with a gradient. Of course, you need to provide a start and end color but I also thought, why not also provide an angle? I didn’t need to do gradients at arbitrary angles (the only gradients I need right now are vertical) but when writing this stuff, I like to make it generic. When Apple starts using -23.728° angle gradients all over the place, I’ll be ready.

Now, the issue is figuring out the starting and ending points for the gradient given an angle. You want the gradient to fully fill the path. Let’s take filling a rectangle at a specific angle:
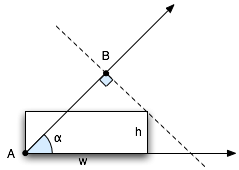
gradients-figure1.png

In the figure, with an angle α and a starting point A, you’d want the gradient to end at B to maintain the angle and also fill in the opposite corner of the rectangle. Recalling the trig and geometry from the deep recesses of my mind, I came up with the following equation (using known quantities w, h and α):

x = sqrt(h2 + w2) * cos(α - atan(h/w)) * cos(α)

I was a little disappointed that this didn’t reduce down to something a bit more tidy (makes you appreciate E = mc2) but it did seem to work. The problem: not every path is a rectangle. While using the above does cover whatever path may be bound by that box, it is not optimal. Another diagram is in order.
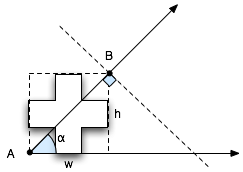

gradients-figure2.pngsadsun.png

In this example, there’s slop at the start and end. Imagine pulling a squeegee from point A to point B. There’s a gap before you hit the shape starting from A and then a gap after the shape before you hit B. How does this affect the gradient? Why is Mr. Sun sad? See below:

gradients-figure3.png

All these diagrams were done in OmniGraffle (except for Mr. Sun which obviously required more sophisticated software). You can see that the “L” shape on the left has a truncated gradient (the black is somewhere where the upper right corner should be). As a user, I’d expect that if I had specified a gradient from white to black, that I would get that range within the shape, otherwise, I would have specified gray as the darker color. It appears OmniGraffle is shading according to the bounding box. Here’s another picture:

gradients-figure4.png

The first shape I freehanded with the correct orientation. The second is the “L” shape from the previous diagram rotated. Notice the difference in gradients. It seems to me the user should not need to care how the shape was originally created. The gradient should be white to black in both cases. By the way, I’m not picking on OmniGraffle; I was using it for these diagrams and decided to test it’s behavior in this regard since I had it running. My guess is that this is the common behavior for software implementing gradients with rotation.

If someone specifies an angle and start and end colors, then the final result should be at that angle and have those start and end colors visible in the gradient and not cut off, dag gummit! I feel in the ideal case, you should really be filling the shape with a gradient, not just providing a window to what ever portion of the gradient happens to be lined up under the shape.

The problem here is that we are using the bounding box in the original coordinate system. What would be ideal is to calculate the bounding box in a rotated coordinate system so we can get the minimum span along the axis of the gradient (the line going through A to B in the first two diagrams).
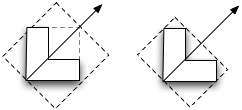
gradients-figure5.png

In the case above, we want the bounding box on the right.

My initial approach was to apply the path to the current state, transform the coordinate space to the rotated space and get the bounding box there. The problem with this is that I was getting the bounding box of the bounding box in the original coordinate system. In a sense, I was getting what I originally calculated above. The solution was to transform the path and not the coordinate system.

After some futzing and some stupid mistakes which sent me down some dead-ends, I got it working. Rotate the path, calculate the bounding box and set the start and end points to the edge of the bounding box that corresponds to the gradient axis, then do an inverse transform back on those two points to get them back into the original coordinate system.

What does this get me? Well, for me personally, not much as I mentioned before I only needed to do a vertical gradient. But you, gentle reader, get to enjoy the fruits of my labor. This code is provided under MIT license. If you use it then just mention me and the Noodlesoft site wherever you put your attributions. And of course, if you have any bug reports, fixes, suggestions or whatever, send them my way so I can address/incorporate them.

Noodle Gradient Test + NSBezierPath-NoodleGradient category

5 comments » | Cocoa, Downloads, OS X, Programming, Quartz

Productive Waste of Time: Gradients and Altivec

October 5th, 2006 — 12:20pm

I was writing some gradient code and while writing the gradient function it occurred to me that it could be vectorized. I was doing the same operation in a loop to two sets of 4 floats (the red, green, blue and alpha values that need to be calculated for the gradient). The 4 floats fit perfectly into a 128 bit vector. My reason for doing this was not because of any bottleneck observed in Shark; it was just a flimsy excuse to play with Altivec for the first time. Nonetheless, if there was a noticeable performance increase, all the better.

In between a wedding, entertaining friends who were staying with me and getting a beta release of Hazel out the door, I read a little on Altivec and cooked up a little test program. You can download the source below. It’s PowerPC with Altivec only. I was sloppy with the #ifdefs but compiling the test without Altivec support is a bit pointless. I don’t have an Intel machine so I didn’t write an SSE version. For you Intel readers at home, feel free to add the appropriate SSE code (and let me know what you come up with). You’ll find my guess at what the SSE version is supposed to look like commented out in the code (but don’t trust it; I don’t exactly know what I’m doing here).

What does the test show? Well, at least on the G4 and G5 machines I have available, performance is roughly the same.

Of course, there are two ways to interpret this:

My test sucks
(obligatory remarks: “I didn’t know they taught programming at clown college.”, “My [insert feeble relative] can code better than you”)

A very likely possibility. This is my first foray into Altivec and I just started delving into Core Graphics gradient functions last week. As far as my Altivec code goes, I am still quite fuzzy on whether I should have used something like vec_ld or vec_splat to turn the multiplier into a vector though I’m pretty sure that using the float[]/vFloat union fulfills the byte alignment requirements (though it’s possible that it’s slower). I’m guessing it’s the difference between sticking it in a register and having it in memory. If any SIMD experts could educate me on this, I’d appreciate it.

Vectorization is not effective in this scenario

I’m sure those much more experienced with Altivec can explain this without resorting to a tactic that we like to call “making stuff up”. Me, I am going make stuff up. So here goes: I’m only computing one vector at a time and I’m doing all these scalar to vector (and back) conversions. My guess is that the overhead outweighs the reduced instruction count in the computation. If the CoreGraphics functions were structured such that it gave you all the values at once (or at least in chunks) instead of at each step of the gradient, then I could see an argument for vectorization made here.

So for now the result is inconclusive until I can get someone who knows what they’re doing to either verify or refute my test. Try it for yourself and let me know (especially if your results differ from mine). And please point out any deficiencies in my implementation (though comments on coding style can go to /dev/hell).

GradientTest (PowerPC with Altivec only)

2 comments » | Cocoa, Downloads, OS X, Programming, Quartz

Paths to Enlightenment

September 26th, 2006 — 7:36pm

An issue I’ve been dealing with is displaying a file path to the user. While this may be strongly discouraged (anyone have a cite from official Apple documents?), you have to admit that having a compact visual representation is useful at times.

With OS X being a collision of sorts between UNIX and the older Mac OS, there are two ways most programmers would conceive of a file path. The UNIX way would use slashes (/) with no drive at the root. In the Mac OS way, you’d have a drive at the root and colons (:) to separate the parts of the path. It was my impression that colons were on the way out but at the same time UNIX paths did not seem appropriate for regular users.

Trying to find examples in OS X itself, you find that inklings of both appear depending on where you look. For instance, doing “Get Info” on a file in Finder gives you the UNIX path. Command-clicking on the title of the Finder window gives you a pop up of all the ancestors of the currently shown file in the more Mac OS style (it shows the drive). The open and save panels have the same thing in the pop-up up top. No colons though.

Things get a bit more interesting when English is not your primary language. Set Spanish as your primary language in System Preferences and look at your sidebar. Notice anything different? Common folders are now translated. “Music” is now “Música”. “Movies” is now “Películas”. You no longer have a Desktop, you have an Escritorio. Now, this isn’t the problem (for programmers) that you think it is in terms of having to localize references to these paths. Just jump into Terminal or even do a “Get Info” on the file and you see the same UNIX path you’d see if everything were in English. These translations only exist to the user. That said, it would be nice when displaying a path to use the one the user would most likely understand so UNIX paths are out.

Now, let’s look at NSFileManager. There are two methods for getting a display version of a path:

– displayNameAtPath:
– componentsToDisplayForPath:

The odd thing here is that you cannot get a string with the whole path. -displayNameAtPath: only returns a translation of the last path component. -componentsToDisplayForPath: returns an array of the components. In both cases, they skirt the issue of what to use as a path separator.

In the current version of Hazel, I punted and just used what was shown in “Get Info”, which is the UNIX path (BTW, to show the full path in Hazel, just hover your mouse over a folder). Recently, though I caught Finder in the act of displaying a path.

Try this: drag a file into that space in the Finder window between the toolbar buttons and the search field. For those that don’t know about this feature, it’s basically a place where you can stick files that you can quickly access later. For you NeXTSTEP people, it’s a poor man’s shelf.

Now hover your mouse over the file on the “shelf”. There it is. Not a slash. Not a colon. The path separator is a triangle pointing right (▸). That’s unicode character 0x25B8, for those keeping score at home. You can see this somewhat echoed in Finder when you do a search. When you click on one of the results, you get that nifty path widget at the bottom with different triangles, but triangles nonetheless.

So is this standard? Dunno, but it’s good enough for my purposes and I’ve stuck it in the next version of Hazel (I’ve also added a contextual “Reveal in Finder” menu item for those that want to view the folder in context in Finder). If you see file paths popping up anywhere else, let me know.

3 comments » | Cocoa, Hazel, OS X, Programming

Bowling For Icons

September 12th, 2006 — 12:00pm

[IMPORTANT ADDENDUM: I have received requests to be even more emphatic in discouraging use of these icons. Using undocumented API does create a legacy that makes it hard for the Apple engineers to move forward with the API. So, in addition to the apocalyptic vision presented in the original post below, I, along with my cohorts, will start calling you “stinkypants” so, DO NOT USE THESE IMAGES IN A SHIPPING APP. I leave this article here out of archaeological interest but I am willing to remove it for the greater good of the Republic.]

To keep with the icon theme, let’s look into another source of icons.

Under Cocoa, you can also get access to certain system images via NSImage’s +imageNamed: method. Give it a string and it gives you an image registered with that name. For system images, the catch is that only a handful of those names are documented. Here are the ones I could find in the docs:

  • NSAscendingSortIndicator
  • NSDescendingSortIndicator
  • NSApplicationIcon
  • DRBurnIcon
  • DREraseIcon

The docs also state that +imageNamed: searches the Appkit Framework. Digging around, I’ve come up with the following:

  • NSDefaultApplicationIcon
  • NSDeadKeyMenuImage
  • NSGrayResizeCorner
  • NSHelpCursor
  • NSMysteryDocument
  • NSMultipleFiles
  • NSOpacitySlider
  • NSUtilityInactivePattern
  • NSUtilityKeyPattern
  • SpellingDot
  • NSTriangleNormalRight
  • NSTrianglePressedRight
  • NSTriangleNormalDown
  • NSTrianglePressedDown

As with the Icon Manager icons, some of these are not currently used (old NeXTies should find the NSMutipleFiles image familiar). While most of these are prefixed with “NS” making them seem official, they are not documented explicitly, only indirectly via the allusion to images in the Appkit Framework.

It’s unclear whether one can count these images sticking around from release to release but my guess “no”. Usage of these images may result in plagues of locusts (in the form of people in three-piece suits with “Esquire” tacked to the end of their names) descending upon your home as it is simultaneously invaded by fire-breathing hippos who proceed to trample your worldly possessions and imbue your commemorative plate collection with a strange odor making them unsuitable for sale on Ebay, the worst of it being that your insurance will not cover any of it. Or maybe all that happens is that milk starts tasting funny. Try it out and let me know.

But even if you don’t use them in a shipping app, they can be useful as a temporary stand-in until you or a graphic artist makes a knock-off.

You can preview these images in InterfaceBuilder by setting them on a control (just type in the name). At least on my machine, IB shows a broken image when you enter any of the above but cutting and pasting the control seems to make the image appear. Maybe at some point I’ll add these to the System Icon Viewer.

By the way, if anyone knows of any named images that I missed, send them my way.

Enjoy.

Comment » | Cocoa, Icons, Programming

System Icon Viewer

September 10th, 2006 — 11:06am

When I saw this post, I mentioned to Daniel Jalkut that I had done the same thing that he did (which was to create an NSImage category to access Carbon’s Icon Manager’s icons). After his obligatory insistence that I start a blog, I sent him a little program I had thrown together to preview the icons.

Since he referenced it in his post, I’ve made it available. It’s not pretty as it was just slapped together but it’s functional. It does show that if you are using Cocoa, the category is pretty much unnecessary as NSWorkspace seems to return the same icons, with a few exceptions. Of course, if the icon you want is one of those exceptions, you can look and decide for yourself.

System Icon Viewer source

7 comments » | Carbon, Cocoa, Downloads, Icons, Programming

Rhyme & Reason

September 9th, 2006 — 2:51pm

Despite my lack of desire for doing a blog, I’ve caved in and set one up. Why? One reason, two words: Daniel Jalkut. The renowned author of Red Sweater Blog has been bugging me for months to do one. Most of our conversations go something like this:

Me: [something about programming]
Daniel: Blog it!

Luckily for Daniel, these conversations are always online so he can’t hear the unpleasantly moist sound of my eyes rolling up into my head.

So, it is my hope that doing this blog will bring a little more variety to my conversations with Daniel. And thus begins a sporadically updated, at best mildly interesting developer blog. If you don’t like it, blame him.

5 comments » | Uncategorized

Back to top