Animation in the Time of Tiger: Part 1
One of the most touted APIs in Leopard is CoreAnimation. Soon, you will be able to easily put together animations with tons of crap flying around all over the place. And with the new APIs, it’ll be a snap! Ok, ok, so there are some nice, tasteful animations that can be done and with Leopard they can be done easily. Fact is, though, there’s a good bit of animation you can do right now in Tiger (or earlier).
Why bother? Well, not all of us are dumping our Tiger users come October plus you could stand to learn something if you follow along. So, over the next couple months, I’ll be doing sporadic installments in this series. I’m not sure how many as I haven’t thought that far ahead but let’s say at least two, probably three.
Now, I feel that it’s important to lay down some guidelines. Animation in applications is subject to severe abuse. What may seem neat the first time can quickly become tedious if you are using the app on a daily basis. Too much movement in the interface can make for a visually noisy user experience or cause annoying delays. For the most part, use animation sparingly and with a purpose. Good uses would be to draw a connection between the start and end states of a transformation or to draw the eye from one part of the UI to another. A rule of thumb: if you feel the need to provide a preference to turn your animation off, maybe the animation is too intrusive. Remember, with great power comes great responsibility.
Before we delve into things, I want to point out that most of the animation techniques I’m going to talk about here pertain to NSWindows and NSViews. For various reasons, it is much easier to do animations with views than with, say, NSCells. What this means is that if you have a list of items using an NSMatrix or NSTableView and want to animate them, you may want to consider converting them into a bunch of views. While it is possible to write a control that animates its cells, you have to do a bit more work. Most of the animation hooks available operate on the view level, something that is further emphasized in CoreAnimation.
NSWindow animation
In NSWindow, you already have a powerful method at your disposal. With -setFrame:display:animate: you can set a new frame for your window and by specifying YES to the animate flag, the window will animate from its current frame to the new frame. Not too exciting? Well, try this on for size:
This effect is similar to how windows animate when you use the “Scale Effect” instead of the “Genie Effect” when minimizing windows (check your Dock preferences). You can download the project here. This is all done in an NSWindow category using documented API. While there’s a little magic of getting the window’s pixels (will probably talk about view/window caching in a future installment), the animation itself is done via the setFrame:display:animate: call. Ok, I fudge things slightly by overriding -animationResizeTime: to make it animate faster but the point is that you can do some interesting things with a basic call.
Autoresizing
When you animate, another thing you can take advantage of is the autoresizing mechanism (those springs and struts you see in IB). By setting up the autoresizing flags on your views in creative ways, you can do some neat little animations without having to muck with specifying all the different frames.
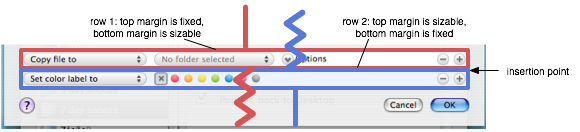
In Hazel’s (as well as in Mail’s) rule interface, when you create a new row, notice how all the rows below the new row shift down as space for the new row “grows” in. This is all done via setting the autoresizing masks (at least that’s how I do it; I can’t speak for what actually happens in Mail). Note that the autoresizing masks don’t have to be something you set once in IB and never touch again. Here, I reset them on the fly as needed. For the rows above the inserted row, the bottom margin is set to sizable. For rows below the insertion point, the top margin is set to sizable.
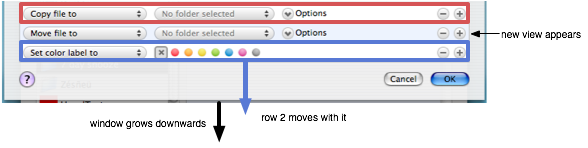
You need to put the new view into the hierarchy at some point. If you add it before the animation, you need to tweak with its size and autoresizing (make it height sizable). If you add it after, the view “pops” in but it happens fast enough that users will probably not notice. Now, I just resize the window (with animation) and all the views fall into place:
You do something similar when a row is deleted. Note that this is mostly effective when only one view in the window is resizing (and the others just moving) in a particular dimension as the resizing mechanism produces less than ideal results when more than one view is resizing.
So, that’s it for now. In the next installment, we’ll dig into NSViewAnimation and also have some more fun with autosizing flags.
Category: Cocoa, Downloads, Programming 5 comments »
July 1st, 2007 at 2:36 pm
Great article! I’m looking forward to playing with the example project.
July 4th, 2007 at 5:01 pm
Interesting post. Just to let you know, the blog link from the Hazel beta page is 404.
July 5th, 2007 at 4:46 pm
Ah, thanks for the heads up. The link should be fixed now.
July 12th, 2007 at 7:13 pm
Great article! I never would have thought about this approach.
April 7th, 2012 at 3:02 am
NSWindow-NoodleEffects, This works prefect on normal NSWindow, But cannot get image for NSWindow with NSBorderlessWindowMask(Border less window.)
NSCopyBits([self gState], NSMakeRect(0.0, 0.0, frame.size.width, frame.size.height), NSZeroPoint);
This only get a white background image.
Any idea?