Hi,
I have updated my paperless office process where now most of my scans are automatically filed and renamed using a combination of Hazel rules and workflows. Basically it looks for certain content in the OCRed documents and files according to rules that relate to the heiracheral folder structure I utilise. Additional rules then rename the files according to the file path of the folder structure.
More details can be found at http://www.documentsnap.com/forum/share-your-paperless-workflow/automate-via-hazel/ or my blog at http://wannabgeek.com which includes a video of the process at work.
Hope it is of use to you.

Automatic filing and renaming of scanned documents
Moderators: Mr_Noodle, Moderators
11 posts
• Page 1 of 1
Automatic filing and renaming of scanned documents
Sun May 22, 2011 6:28 am •
by noodle1965
- noodle1965
- Posts: 10
- Joined: Sun Sep 13, 2009 12:37 am
- Location: Perth, Western Australia
Re: Automatic filing and renaming of scanned documents
Sat May 28, 2011 2:37 am •
by Haydardk
Thanks so much for the POST ! i will check the video now and give you a feedback
- Haydardk
- Posts: 4
- Joined: Sat May 28, 2011 2:31 am
Re: Automatic filing and renaming of scanned documents
Mon May 30, 2011 10:27 pm •
by Mr_Noodle
Cool. I'm currently traveling (doing my yearly WWDC trip) but I'll check out the video in the next couple days. Thanks for doing this.
- Mr_Noodle
- Site Admin
- Posts: 12281
- Joined: Sun Sep 03, 2006 1:30 am
- Location: New York City
Re: Automatic filing and renaming of scanned documents
Sun May 01, 2016 4:22 am •
by Moeri
Links are down.
- Moeri
- Posts: 11
- Joined: Tue Feb 09, 2016 10:46 am
Re: Automatic filing and renaming of scanned documents
Mon May 30, 2016 6:05 pm •
by Karl.Browning
noodle1965 wrote:Hi,
I have updated my paperless office process where now most of my scans are automatically filed and renamed using a combination of Hazel rules and workflows. Basically it looks for certain content in the OCRed documents and files according to rules that relate to the heiracheral folder structure I utilise. Additional rules then rename the files according to the file path of the folder structure.
More details can be found at http://www.documentsnap.com/forum/share-your-paperless-workflow/automate-via-hazel/ or my blog at http://wannabgeek.com which includes a video of the process at work.
Hope it is of use to you.
Mr. Noodle, recognizing that I am 5 years late I am now trying to ratchet up my use of Hazel. Specifically, wanting to use it to verify if PDFs are OCR ready or not. This thread seemed to deal with the subject as well as a few others that I am benefiting from. BUT, if you have easy access to the link (...share-your-paperless-workflow...) above, I would greatly appreciate having access to that wisdom. Count me among your biggest fans. Karl
- Karl.Browning
- Posts: 18
- Joined: Sun Dec 09, 2012 10:18 am
Re: Automatic filing and renaming of scanned documents
Tue May 31, 2016 11:02 am •
by Mr_Noodle
Note that the original poster is noodle1965 and has no official affiliation with Noodlesoft, Hazel or me (Mr_Noodle).
- Mr_Noodle
- Site Admin
- Posts: 12281
- Joined: Sun Sep 03, 2006 1:30 am
- Location: New York City
Re: Automatic filing and renaming of scanned documents
Wed Jun 01, 2016 6:15 am •
by noodle1965
Karl.Browning wrote:noodle1965 wrote: if you have easy access to the link (...share-your-paperless-workflow...) above, I would greatly appreciate having access to that wisdom. Count me among your biggest fans. Karl
Hi,
I have uploaded the videos but the process being used is many years and versions old - https://youtu.be/RTllPSqexx0 and https://youtu.be/r7SDfF9HJDw.
My latest process is as follows;
Step 1 - Scan the document and perform OCR (I use the built in Fine Reader with my Scansnap Scanner) and save it to an Intray folder. Rules are then run to rename the File as per the 1st date found within the document, if no date is found the Created date is used. Move to next folder.
I have attached the rules for Step 1http://cl.ly/2m3c0H113h1l, it includes a couple of processes to detect if the PDF is not OCRed and will send the file to PDFPenPro for conversion. I will be updating the Rules to reset the Date to Created Date if the Date found is greater than Today.
Step 2 - Identify keywords within the document and add a Category Tag, i.e. Banking, Motor Vehicle. Move to next folder.
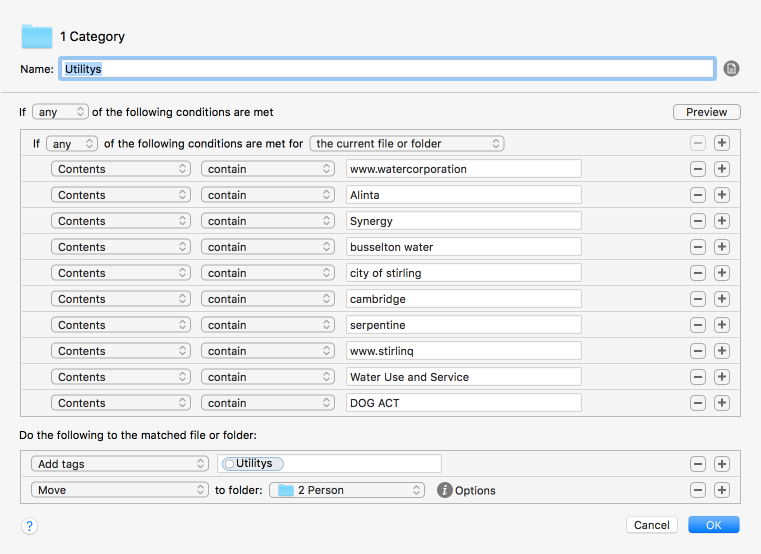
Step 3 - Look for Keywords to add a Name Tag (Person, Property etc). Move to next folder.
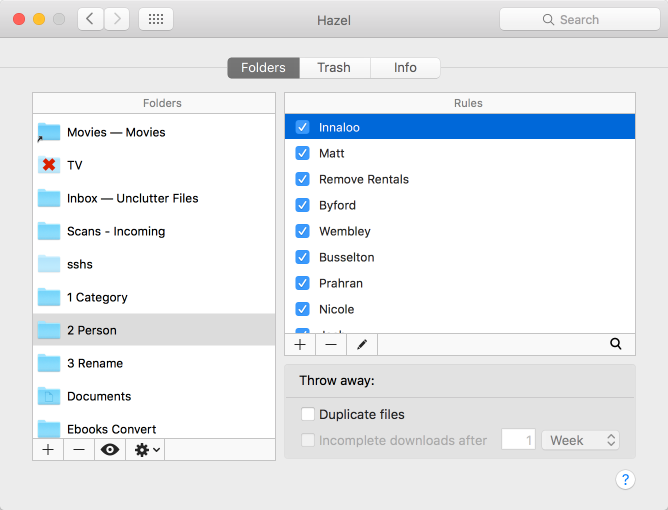
Step 4 - Rename file to Date(Name)_Tags_Extension. Move to storage folder (I actually send it to the Devonthink Intray.
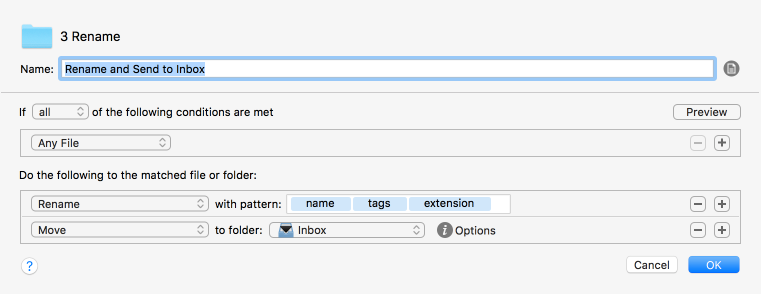
I like this process as it allows for searching via the OCRed content & OSX tags and sorting by document date.
- noodle1965
- Posts: 10
- Joined: Sun Sep 13, 2009 12:37 am
- Location: Perth, Western Australia
Re: Automatic filing and renaming of scanned documents
Wed Jun 01, 2016 3:34 pm •
by Karl.Browning
Mr_Noodle wrote:Note that the original poster is noodle1965 and has no official affiliation with Noodlesoft, Hazel or me (Mr_Noodle).
Oh my. I am truly sorry. I should have seen the difference in name.
- Karl.Browning
- Posts: 18
- Joined: Sun Dec 09, 2012 10:18 am
Re: Automatic filing and renaming of scanned documents
Thu Jun 02, 2016 6:36 am •
by Karl.Browning
noodle1965 wrote:Karl.Browning wrote:noodle1965 wrote: if you have easy access to the link (...share-your-paperless-workflow...) above, I would greatly appreciate having access to that wisdom. Count me among your biggest fans. Karl
Hi,
I have uploaded the videos but the process being used is many years and versions old - https://youtu.be/RTllPSqexx0 and https://youtu.be/r7SDfF9HJDw.
Thank you. I genuinely appreciate your efforts. These rules and methods are incredibly helpful. I am putting them to use.
In addition to your workflow ideas, I've added steps that selectively converts a PDF to text (via Automator) and that parse the resulting text document to locate the effective date of the document (due date, statement date, etc) via AppleScript. I don't have all of it working just yet, but it is close and your help closes the gap a lot. For the AppleScript step I've had to be specific about which lines contain the dates I want - so it only works for specified documents - a bit analogous to your "1 Category" step in which you identify the applicable documents for processing.
If you have interest in the finished product I will happily post it for sharing.
Best to you,
Karl
- Karl.Browning
- Posts: 18
- Joined: Sun Dec 09, 2012 10:18 am
Re: Automatic filing and renaming of scanned documents
Thu Jun 02, 2016 9:30 am •
by fabio
First of all thank you for sharing your workflows.
Unfortunately I don't why the script to check if a document needs to be OCR'd doesn't work (I mean followning code:
)
https://www.dropbox.com/s/4jk6wl95t6ghw0n/Screenshot%202016-06-02%2015.27.54.png?dl=0
Any idea why?
Thank you
Unfortunately I don't why the script to check if a document needs to be OCR'd doesn't work (I mean followning code:
- Code: Select all
#! /bin/bash
if ! grep Font "$1"
then
     exit 0
else
     exit 1
fi
)
https://www.dropbox.com/s/4jk6wl95t6ghw0n/Screenshot%202016-06-02%2015.27.54.png?dl=0

Any idea why?
Thank you
- fabio
- Posts: 4
- Joined: Sun Oct 07, 2012 5:53 am
Re: Automatic filing and renaming of scanned documents
Sun Nov 15, 2026 7:06 pm •
by DaveB
A Paperless Office Workflow with ScanSnap, Hazel, OCRmyPDF and EagleFiler
This is how I get paper mail from a ScanSnap iX500 into EagleFiler with only one manual step: reviewing each scan. ScanSnap Home only scans and saves. Hazel handles the OCR (with OCRmyPDF), renaming, tagging, date fixing and import into EagleFiler. Names, paths and account details in the screenshots have been replaced with generic ones.
Overview
Why OCRmyPDF instead of ABBYY. ScanSnap setups have long relied on ABBYY FineReader for ScanSnap for OCR, but it is not supported on future Macs or macOS versions. OCRmyPDF (Tesseract under the hood) is faster, has given me better results, runs natively on Apple Silicon and is kept current through Homebrew.
Components and folder layout
The setup uses four pieces of software and three working folders, all under ~/Desktop/Scan Target.
Software
Folders
Step 1: ScanSnap Home profile
The profile's only job is to scan a clean PDF into Raw Scans. ScanSnap does no OCR and sends the file to no app.
In ScanSnap Home, open Edit profiles and create a profile with these settings:
Two settings matter more than the rest:
The profile as configured:

Step 2: Install OCRmyPDF
OCRmyPDF is installed with Homebrew and must end up at /opt/homebrew/bin/ocrmypdf, the path the Hazel rule calls.
Step 3: Hazel OCR rule on Raw Scans
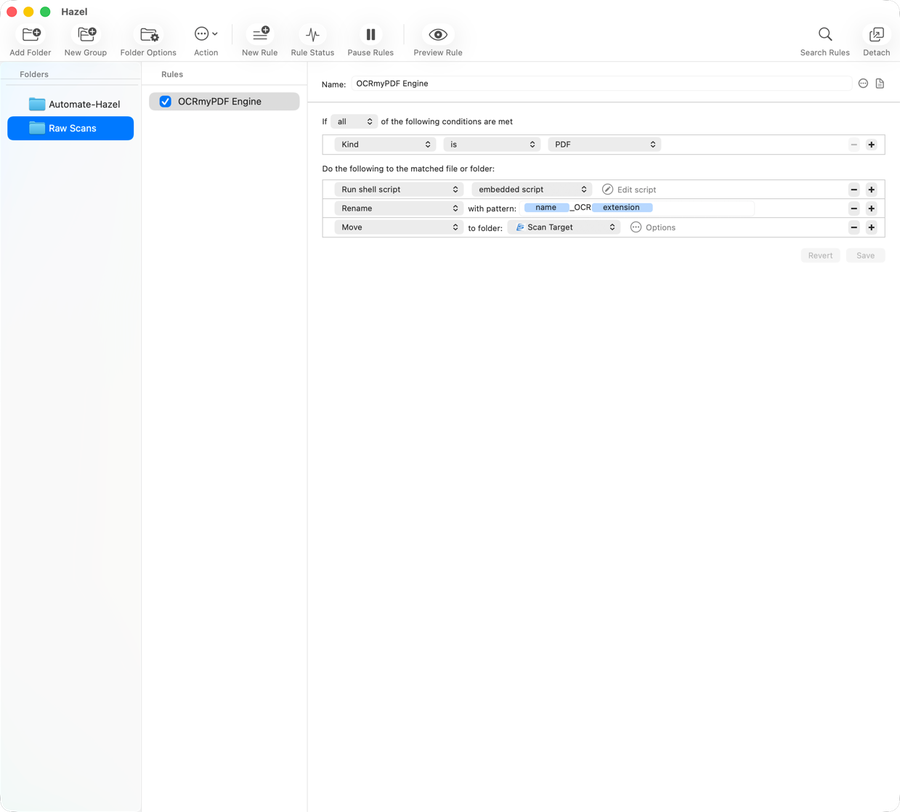
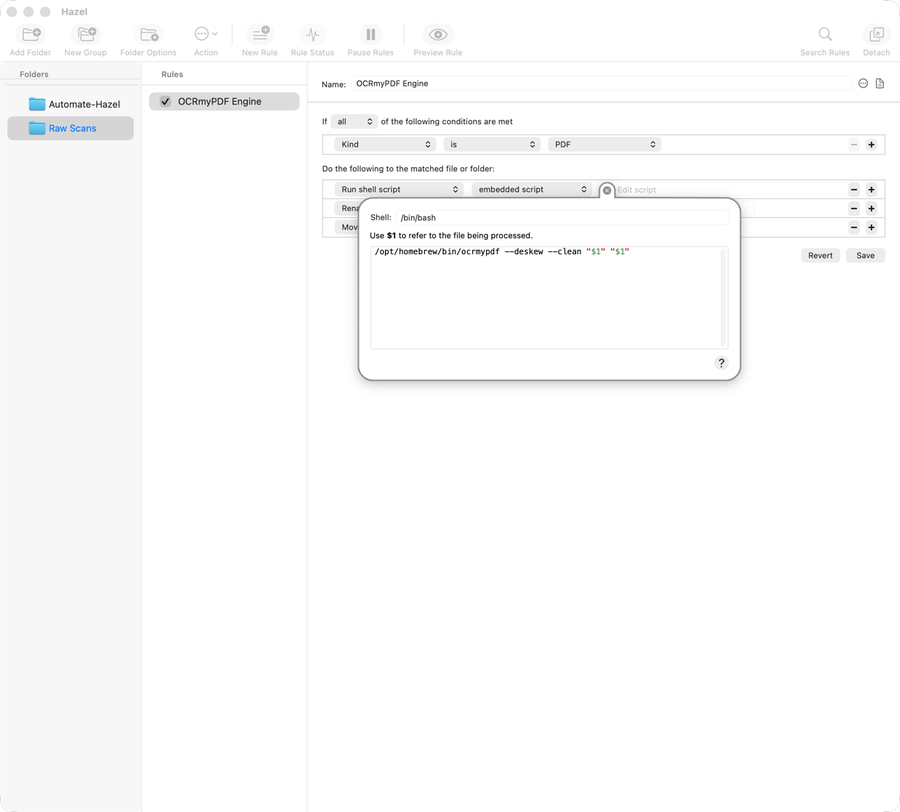
One Hazel rule, OCRmyPDF Engine, makes every new scan searchable and moves it out of Raw Scans for review.
The embedded script:
How the script works:
After the rename and move, the file has left Raw Scans, so the rule never runs on the same file twice. A scan named 2026-06-24-16-05-59.pdf arrives in Scan Target as 2026-06-24-16-05-59_OCR.pdf.
The rule and its script in Hazel:
Step 4: Review and re-date in Scan Target
Scan Target is the one manual checkpoint. It is also where each file gets its real document date. Nothing goes into EagleFiler until I move it.
Why each file is re-dated by hand
The date at the start of the file name becomes the document's creation date in EagleFiler (script A in step 5 reads it). ScanSnap writes the scan date there, but mail can wait several days before it gets scanned, so the scan date can be days off from the date on the document itself. Renaming the file with the document's own date (its statement, invoice or notice date) means it is filed and sorted under the date that matters.
This step is manual on purpose. I tried finding the date inside documents automatically, but documents vary too much and many carry several dates (statement, due, print, period covered), so the results weren't reliable.
For each _OCR.pdf file in ~/Desktop/Scan Target:
Keep the name's exact format when you rename: a four-digit year, a two-digit month and day, and hyphens, followed by the original -HH-MM-SS. Script A reads the date from fixed character positions, so a missing zero or a different separator gives a wrong date. If a document has no clear date of its own, leave the scan date as it is.
One-off documents with no filing rule
Some documents are new or one of a kind, so no Hazel rule will recognize them. For these, I type the whole file name during review and import the file into EagleFiler by hand.
Because no Hazel rule runs, script A never sets the creation date on one-offs. The file keeps the date it was OCRed, and the date in its name is the record of the document date.
If the same kind of one-off keeps coming back, it's time to give it a rule (see Adding a new filing rule).
Step 5: Filing rules on Automate-Hazel
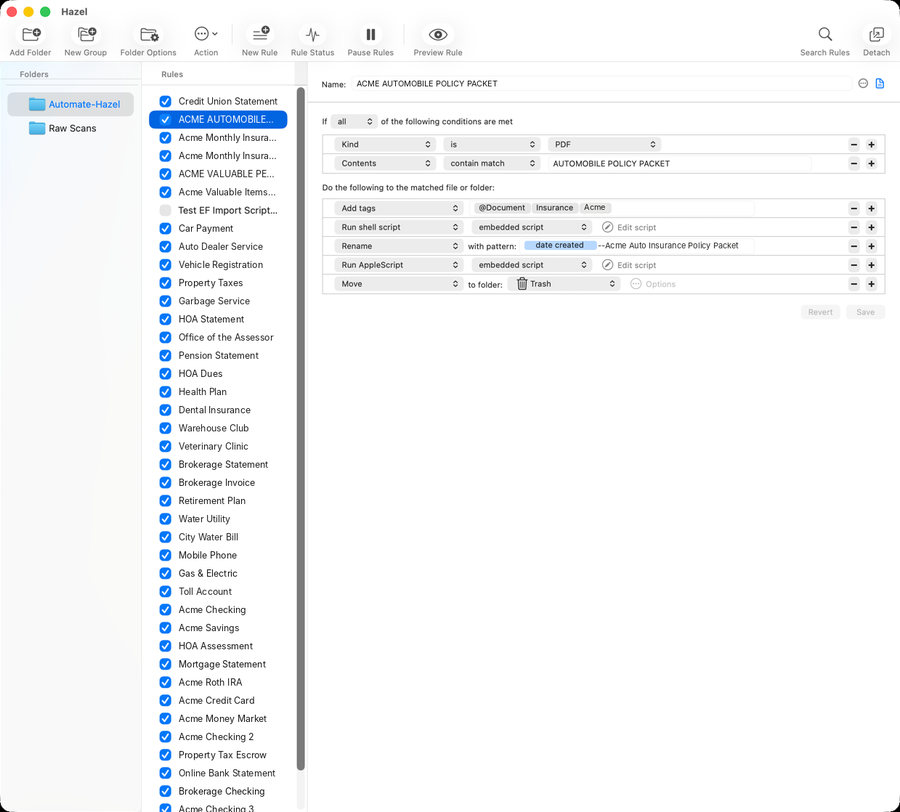
Each filing rule recognizes one kind of document by its OCR text and files it into a set EagleFiler folder. There is one rule per sender or document type (bank statements, utility bills, property taxes, HOA statements, and so on). All the rules follow the same pattern, so an insurance policy rule, ACME AUTOMOBILE POLICY PACKET, is shown here as the model. "Acme Insurance" stands in for the real insurer.
Add ~/Desktop/Scan Target/Automate-Hazel to Hazel with Add Folder, then build each rule like this:
The order matters. The date script has to run before Rename so that [date created] is the document date, and the original goes to the Trash only after EagleFiler has imported its own copy.
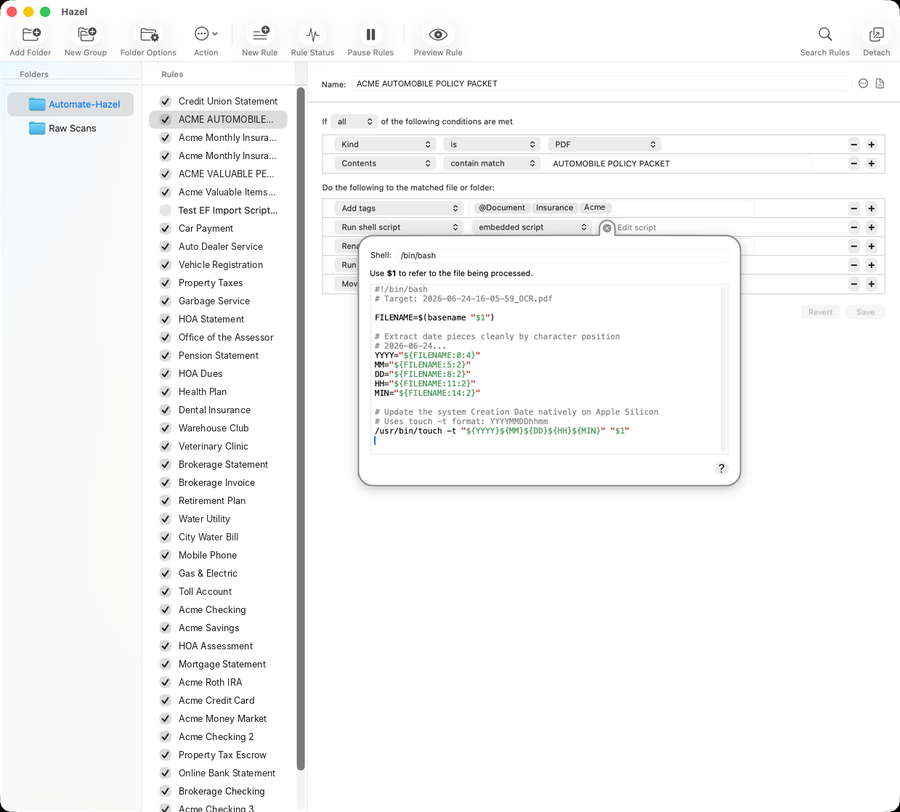
Script A: set the file date from the file name
This script is the same in every filing rule.
The script takes the year, month, day, hour and minute from fixed positions in the file name. That is the document date set during review, or the scan date if it was left alone. touch -t then sets the modification date to that time. When the new modification date is earlier than the creation date, macOS moves the creation date back to match, so the file ends up with the document date as its creation date. This depends on the file name starting with YYYY-MM-DD-HH-MM, which is why the ScanSnap profile has to keep the [Scanned date] file name.
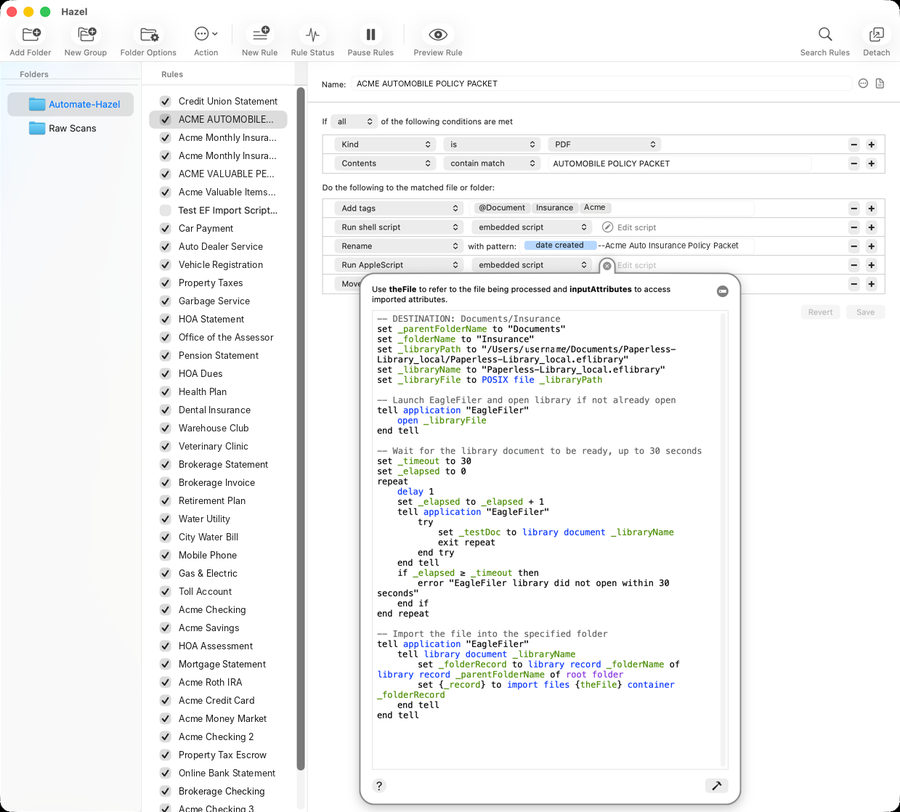
Script B: import into EagleFiler
This script changes from rule to rule only in its first two "set" lines, which name the destination folder. Change _libraryPath and _libraryName to match your own library.
The model rule and both scripts as they appear in Hazel:
Adding a new filing rule
The fastest way to add a filing rule is to duplicate an existing rule that goes to a similar EagleFiler folder and change four things.
If two rules can match the same document, Hazel runs the first matching rule in the list. Make the Contents phrase more specific, or reorder the rules.
Backup, restore and troubleshooting
The Hazel rules hold most of this setup, so keep them exported.
Backup. In Hazel, select a folder, then choose Action > Export Rules, and save into ~/Desktop/Scan Target/Rules Backup. Do this for both Raw Scans and Automate-Hazel, and again whenever you add or change a filing rule.
Restore on a new Mac.
Troubleshooting.
This is how I get paper mail from a ScanSnap iX500 into EagleFiler with only one manual step: reviewing each scan. ScanSnap Home only scans and saves. Hazel handles the OCR (with OCRmyPDF), renaming, tagging, date fixing and import into EagleFiler. Names, paths and account details in the screenshots have been replaced with generic ones.
Overview
- Scan. The ScanSnap iX500 scans with a dedicated profile and saves a plain PDF, named by scan date, into ~/Desktop/Scan Target/Raw Scans.
- OCR. A Hazel rule on Raw Scans runs OCRmyPDF on the file in place, adds _OCR to the name, and moves it up into ~/Desktop/Scan Target.
- Review. I check the file in Scan Target, rename it so the name starts with the document's own date (its statement or invoice date) instead of the scan date, then drag it into ~/Desktop/Scan Target/Automate-Hazel.
- File. Hazel rules on Automate-Hazel recognize the document by its text. They tag it, set its creation date to the date in its file name, rename it, import it into the EagleFiler library, and trash the original. One-off documents with no rule are named and imported by hand instead.
Why OCRmyPDF instead of ABBYY. ScanSnap setups have long relied on ABBYY FineReader for ScanSnap for OCR, but it is not supported on future Macs or macOS versions. OCRmyPDF (Tesseract under the hood) is faster, has given me better results, runs natively on Apple Silicon and is kept current through Homebrew.
Components and folder layout
The setup uses four pieces of software and three working folders, all under ~/Desktop/Scan Target.
Software
- ScanSnap iX500 + ScanSnap Home: scans and saves a plain PDF, using a dedicated scan profile.
- Hazel: watches folders and runs the rules. Live rules are stored in ~/Library/Application Support/Hazel/
- OCRmyPDF (Homebrew): adds the text layer. Installed at /opt/homebrew/bin/ocrmypdf
- EagleFiler: the final document library, ~/Documents/Paperless-Library_local/Paperless-Library_local.eflibrary
Folders
- ~/Desktop/Scan Target/Raw Scans: where ScanSnap drops new scans. Watched by the Hazel rule "OCRmyPDF Engine".
- ~/Desktop/Scan Target: OCRed files wait here for manual review. Not watched.
- ~/Desktop/Scan Target/Automate-Hazel: reviewed files go here to be filed. Watched by the Hazel filing rules (one per document type).
- ~/Desktop/Scan Target/Rules Backup: exported Hazel rules. Not watched.
Step 1: ScanSnap Home profile
The profile's only job is to scan a clean PDF into Raw Scans. ScanSnap does no OCR and sends the file to no app.
In ScanSnap Home, open Edit profiles and create a profile with these settings:
- Document type: Documents
- Color mode: Automatic
- Scanning side: Duplex
- Image quality: Better
- Rotation: Automatic
- File format: PDF (Single) (*.pdf)
- File name: [Scanned date].pdf
- Feed: Normal scan
- Managing options, Type: Mac (Scan to file)
- Save to: /Users/username/Desktop/Scan Target/Raw Scans
- Application, Send to: None (Scan to file)
Two settings matter more than the rest:
- File name must stay [Scanned date]. ScanSnap writes names like 2026-06-24-16-05-59.pdf. The date script in each filing rule reads the date from fixed character positions in that name, so a different naming format breaks the dates.
- Leave ScanSnap's own OCR off. Under Detailed settings... > File format, keep Convert to Searchable PDF unchecked so OCRmyPDF does all the OCR and the scan isn't processed twice.
The profile as configured:
Step 2: Install OCRmyPDF
OCRmyPDF is installed with Homebrew and must end up at /opt/homebrew/bin/ocrmypdf, the path the Hazel rule calls.
- Code: Select all
# Install Homebrew first if it is missing: https://brew.sh
brew install ocrmypdf unpaper

# Confirm the path the Hazel rule expects
which ocrmypdf        # should print /opt/homebrew/bin/ocrmypdf
ocrmypdf --version
- unpaper is what the --clean option uses. If Homebrew already installed it with OCRmyPDF, the extra name does nothing.
- OCRmyPDF uses Tesseract, which comes with English. For other languages, run brew install tesseract-lang and add -l eng+spa (for example) to the command.
- To update later, run brew upgrade ocrmypdf.
Step 3: Hazel OCR rule on Raw Scans
One Hazel rule, OCRmyPDF Engine, makes every new scan searchable and moves it out of Raw Scans for review.
- In Hazel, click Add Folder and choose ~/Desktop/Scan Target/Raw Scans.
- Click New Rule and name it OCRmyPDF Engine.
- Condition: if all of the following are met, Kind is PDF.
- Add these three actions, in this order:
- Run shell script, embedded script, Shell /bin/bash, with the script below.
- Rename with pattern [name]_OCR[extension] (the name token, the literal text _OCR, then the extension token).
- Move to folder Scan Target (~/Desktop/Scan Target).
- Click Save.
The embedded script:
- Code: Select all
/opt/homebrew/bin/ocrmypdf --deskew --clean "$1" "$1"
How the script works:
- $1 is the file Hazel is processing. Giving it as both input and output makes OCRmyPDF replace the scan in place with the searchable version.
- --deskew straightens pages that went through the feeder crooked.
- --clean cleans up the page image before OCR (this uses unpaper), which improves recognition. The saved page image itself is left as scanned.
- The full path to ocrmypdf is used because Hazel scripts don't load your Terminal PATH.
After the rename and move, the file has left Raw Scans, so the rule never runs on the same file twice. A scan named 2026-06-24-16-05-59.pdf arrives in Scan Target as 2026-06-24-16-05-59_OCR.pdf.
The rule and its script in Hazel:
Step 4: Review and re-date in Scan Target
Scan Target is the one manual checkpoint. It is also where each file gets its real document date. Nothing goes into EagleFiler until I move it.
Why each file is re-dated by hand
The date at the start of the file name becomes the document's creation date in EagleFiler (script A in step 5 reads it). ScanSnap writes the scan date there, but mail can wait several days before it gets scanned, so the scan date can be days off from the date on the document itself. Renaming the file with the document's own date (its statement, invoice or notice date) means it is filed and sorted under the date that matters.
This step is manual on purpose. I tried finding the date inside documents automatically, but documents vary too much and many carry several dates (statement, due, print, period covered), so the results weren't reliable.
For each _OCR.pdf file in ~/Desktop/Scan Target:
- Open it and check that every page is there, right side up and readable.
- Spot-check the OCR by searching for a word or two (Command-F in Preview).
- If it is bad, delete it and rescan.
- Find the document's own date: the statement, invoice or notice date.
- Rename the file, replacing the YYYY-MM-DD at the start with that date and leaving the rest of the name alone. For example, a statement dated June 18 that was scanned June 24 goes from 2026-06-24-16-05-59_OCR.pdf to 2026-06-18-16-05-59_OCR.pdf.
- Drag it into ~/Desktop/Scan Target/Automate-Hazel.
Keep the name's exact format when you rename: a four-digit year, a two-digit month and day, and hyphens, followed by the original -HH-MM-SS. Script A reads the date from fixed character positions, so a missing zero or a different separator gives a wrong date. If a document has no clear date of its own, leave the scan date as it is.
One-off documents with no filing rule
Some documents are new or one of a kind, so no Hazel rule will recognize them. For these, I type the whole file name during review and import the file into EagleFiler by hand.
- Rename the file to the document date in reversed form (YYYY-MM-DD), followed by a descriptive name. For example: 2026-06-18--Roof Repair Invoice.pdf
- Either leave it in Scan Target or drag it into Automate-Hazel with the rest. No rule will match it, so Hazel leaves it alone.
- Select the file in Finder and press Fn + Option + F1, EagleFiler's capture shortcut.
- In EagleFiler, choose the destination folder and import.
- If the original is still in the Finder folder afterward, delete it.
Because no Hazel rule runs, script A never sets the creation date on one-offs. The file keeps the date it was OCRed, and the date in its name is the record of the document date.
If the same kind of one-off keeps coming back, it's time to give it a rule (see Adding a new filing rule).
Step 5: Filing rules on Automate-Hazel
Each filing rule recognizes one kind of document by its OCR text and files it into a set EagleFiler folder. There is one rule per sender or document type (bank statements, utility bills, property taxes, HOA statements, and so on). All the rules follow the same pattern, so an insurance policy rule, ACME AUTOMOBILE POLICY PACKET, is shown here as the model. "Acme Insurance" stands in for the real insurer.
Add ~/Desktop/Scan Target/Automate-Hazel to Hazel with Add Folder, then build each rule like this:
- Conditions: if all of the following are met:
- Kind is PDF
- Contents contain match AUTOMOBILE POLICY PACKET (a phrase that appears only in this kind of document)
- Actions, in this order:
- Add tags: @Document, Insurance, Acme
- Run shell script, embedded script, Shell /bin/bash: sets the file's dates from the date in its file name (script A)
- Rename with pattern [date created]--Acme Auto Insurance Policy Packet
- Run AppleScript, embedded script: imports the file into EagleFiler (script B)
- Move to folder Trash
The order matters. The date script has to run before Rename so that [date created] is the document date, and the original goes to the Trash only after EagleFiler has imported its own copy.
Script A: set the file date from the file name
This script is the same in every filing rule.
- Code: Select all
#!/bin/bash
# Target: 2026-06-24-16-05-59_OCR.pdf

FILENAME=$(basename "$1")

# Extract date pieces cleanly by character position
# 2026-06-24...
YYYY="${FILENAME:0:4}"
MM="${FILENAME:5:2}"
DD="${FILENAME:8:2}"
HH="${FILENAME:11:2}"
MIN="${FILENAME:14:2}"

# Update the system Creation Date natively on Apple Silicon
# Uses touch -t format: YYYYMMDDhhmm
/usr/bin/touch -t "${YYYY}${MM}${DD}${HH}${MIN}" "$1"
The script takes the year, month, day, hour and minute from fixed positions in the file name. That is the document date set during review, or the scan date if it was left alone. touch -t then sets the modification date to that time. When the new modification date is earlier than the creation date, macOS moves the creation date back to match, so the file ends up with the document date as its creation date. This depends on the file name starting with YYYY-MM-DD-HH-MM, which is why the ScanSnap profile has to keep the [Scanned date] file name.
Script B: import into EagleFiler
This script changes from rule to rule only in its first two "set" lines, which name the destination folder. Change _libraryPath and _libraryName to match your own library.
- Code: Select all
-- DESTINATION: Documents/Insurance
set _parentFolderName to "Documents"
set _folderName to "Insurance"
set _libraryPath to "/Users/username/Documents/Paperless-Library_local/Paperless-Library_local.eflibrary"
set _libraryName to "Paperless-Library_local.eflibrary"
set _libraryFile to POSIX file _libraryPath

-- Launch EagleFiler and open library if not already open
tell application "EagleFiler"
    open _libraryFile
end tell

-- Wait for the library document to be ready, up to 30 seconds
set _timeout to 30
set _elapsed to 0
repeat
    delay 1
    set _elapsed to _elapsed + 1
    tell application "EagleFiler"
        try
            set _testDoc to library document _libraryName
            exit repeat
        end try
    end tell
    if _elapsed ≥ _timeout then
        error "EagleFiler library did not open within 30 seconds"
    end if
end repeat

-- Import the file into the specified folder
tell application "EagleFiler"
    tell library document _libraryName
        set _folderRecord to library record _folderName of library record _parentFolderName of root folder
        set {_record} to import files {theFile} container _folderRecord
    end tell
end tell
- theFile is the file Hazel is processing.
- The script opens the library if EagleFiler isn't running and waits up to 30 seconds for it. If the library isn't ready by then, the script raises an error. Hazel then stops the rule, so the file is not trashed.
- The destination is two levels deep: _folderName inside _parentFolderName at the library's top level (here, Documents/Insurance). Both folders must already exist in EagleFiler.
The model rule and both scripts as they appear in Hazel:
Adding a new filing rule
The fastest way to add a filing rule is to duplicate an existing rule that goes to a similar EagleFiler folder and change four things.
- In Hazel's Automate-Hazel rule list, right-click a similar rule and choose Duplicate. Rename the copy after the document.
- Contents contain match: pick a phrase that appears in every copy of this document and in no other kind (a form title or an account-type heading works well).
- Add tags: set the tags for this document.
- Rename: keep [date created]-- at the start and change the description text.
- Run AppleScript: change only _parentFolderName and _folderName (and the "-- DESTINATION" comment), and make sure that folder exists in EagleFiler.
- Leave script A and the final Move to Trash as they are.
- Drop a sample into Automate-Hazel, select it, and use Preview Rule to confirm only the new rule matches. Then check that the file landed in the right EagleFiler folder with the right name and date.
If two rules can match the same document, Hazel runs the first matching rule in the list. Make the Contents phrase more specific, or reorder the rules.
Backup, restore and troubleshooting
The Hazel rules hold most of this setup, so keep them exported.
Backup. In Hazel, select a folder, then choose Action > Export Rules, and save into ~/Desktop/Scan Target/Rules Backup. Do this for both Raw Scans and Automate-Hazel, and again whenever you add or change a filing rule.
Restore on a new Mac.
- Install ScanSnap Home, Hazel, EagleFiler and Homebrew, then do step 2.
- Recreate the folders under ~/Desktop/Scan Target and copy over the EagleFiler library.
- In Hazel, add each folder and choose Action > Import Rules, using the backups.
- Recreate the ScanSnap profile (step 1), since ScanSnap Home profiles aren't in these backups.
- Scan a test page and follow it all the way into EagleFiler.
Troubleshooting.
- Scans sit in Raw Scans without _OCR. Likely cause: Hazel paused or OCRmyPDF failing. Fix: check Rule Status and Hazel's log, and run the OCR command by hand on the file in Terminal.
- Hazel log says tesseract or gs not found. Likely cause: Hazel's minimal PATH. Fix: add export PATH=/opt/homebrew/bin:$PATH as the first line of the OCR script.
- ocrmypdf not found. Likely cause: Homebrew moved or reinstalled. Fix: run which ocrmypdf, then fix the path in the script.
- OCR error saying the page already has text. Likely cause: ScanSnap's own OCR turned back on. Fix: uncheck Convert to Searchable PDF in the profile.
- File stays in Automate-Hazel. Likely cause: no rule's Contents phrase matched. Fix: use Preview Rule on the file, then add a rule or import it by hand as a one-off (step 4).
- Wrong date in the filed name. Likely cause: file name not in YYYY-MM-DD-HH-MM-SS form. Fix: restore [Scanned date] as the ScanSnap file name, or fix the date typed during review.
- AppleScript error about the library. Likely cause: EagleFiler slow to open, or the library moved. Fix: open EagleFiler first and check _libraryPath.
- AppleScript error about the folder. Likely cause: destination folder missing or renamed in EagleFiler. Fix: create it, or fix _folderName / _parentFolderName.
- DaveB
- Posts: 26
- Joined: Sat Apr 02, 2016 7:56 pm
11 posts
• Page 1 of 1